Microsoft Dynamics Integration
Integrate a knowledgebase with Microsoft Dynamics to send real-time, event-driven updates between the systems. This integration uses an external system adapter (ESA) to sync Agiloft and Microsoft Dynamics.
You might also want to reference an Example Microsoft Dynamics Setup as you work on configuring your own sync.
This information is provided for those who have already configured a sync with Dynamics using this configuration. For new integrations with Microsoft Dynamics, use the Integration Hub for best results.
Preparing Microsoft Dynamics for Sync
First, prepare Dynamics for the integration:
- Establish an admin account for Microsoft that you can use to log in to three Microsoft portals:
- admin.microsoft.com
- aad.portal.azure.com
- Your Dynamics portal, such as example.dynamics.com
- Log in at admin.microsoft.com and create an application in your Azure instance. Note the application ID.
- Assign at least one application user in your Dynamics instance to the application you created.
- In the Azure portal, create a Client Secret for the application. Use the application ID you noted in step 2. This generates a secret key and password pair. Be sure to use the Key value rather than the Key ID.
In the App Designer, create or identify an entity for each table you want to sync. For example, if you want to sync contracts and contract-related data, you likely need the following entities and fields in Dynamics:
- An entity for Contract Type, with these fields:
- Name
- Identifier for Agiloft Sync (text field)
- An entity for Contract, with these fields:
- Title (required)
- Description (required)
- Contract Amount
- Contract Start Date (required)
- Contract End Date (not required, to allow evergreen contracts)
- Contract Type (required, look-up field for Contract Type entity)
- Account (look-up field for Account entity)
- Identifier for Agiloft Sync (text field)
- An entity for Contract Type, with these fields:
Make sure every entity you plan to sync includes a Text field with a name similar to "Identifier for Agiloft Sync," even if the entity already exists. Make sure the field is not visible on any forms, and users can't modify it.
The Identifier fields are Text fields used later to match records with Agiloft during synchronization. You can give these fields any name, as long as it will be clear to you during setup, such as "Identifier for Agiloft Sync" or "ID for Agiloft." Configure the field so it isn't visible on any forms, and the user can't modify it. If Dynamics does not allow you to create a new field in the Notes entity, use the existing Step Id field as an alternative.
- Go back to the Azure portal, find App Registrations, and select the app.
- Select Endpoints.
- Note the URL labeled OAuth 2.0 authorization endpoint. This is the Microsoft Online authority URL.
From these steps, you should have these essential pieces before you move on to the next section:
- The base API URL of your Dynamics instance, in the form
https://<YOUR_DYNAMICS_INSTANCE>/api/data/v9.1/ - The Application ID associated with the application user in your Dynamics instance
- The secret key and password associated with the application ID, which will be used for authentication in accessing Dynamics APIs
- The Dynamics Microsoft Online authority, in the form
https://login.microsoftonline.com, such ashttps://login.microsoftonline.com/mydomain.onmicrosoft.com
Enable Sync from Microsoft Dynamics
Now, configure a web resource in Microsoft Dynamics that can push the data to Agiloft:
- In your Dynamics instance, click the gear icon in the top right corner and go to Advanced Settings.
- Go to Settings > Customizations and click Customize the system.
- On the navigation pane, click Web Resources.
- Click New.
- Name the resource StartSyncToAgiloft, and enter a display name of Start Sync To Agiloft.
- In the Content section, confirm Script (JScript) is selected and click Text Editor.
In the editor, paste the sample code below. Notice this code includes the placeholder <YOUR_URL_HERE>. This requires a URL that is accessible only after you complete the sync setup. We will revisit this code block later to replace it with the final URL.
function trimMSid(msid) { if (msid == null) return null; msid = msid.replace('{', '').replace('}', ''); return msid.toLowerCase(); } function doSync(executionContext){ var formContext = executionContext.getFormContext(); var recordid= formContext.data.entity.getId(); var tablename = formContext.data.entity.getEntityName(); var url = ' <YOUR_URL_HERE>'; if(tablename && recordid){ url = url+'&SeanceValidator.Kick.Logged.Users=false&explicittables='+tablename+'&explicitids='+trimMSid(recordid); } if (url != '') { var win = window.open(url, '_blank', 'height=150,width=300,location=0,resizable=0'); win.moveTo(500, 300); setTimeout(function() { win.close() }, 15000); } } function startSync(executionContext){ var formContext = executionContext.getFormContext(); var recordid= formContext.data.entity.getId(); if( recordid && recordid.trim().length > 0) { doSync(executionContext); } else { formContext.data.entity.addOnPostSave(doSync ); } }- Save the Web Resource and publish it in Dynamics.
Configure Dynamics to Initiate Sync
You can push updates from Dynamics automatically when records are saved, or manually, by creating a custom button that users can click to sync records. You can use one or both of these methods.
Sync Automatically
The simplest way to make sure Dynamics updates are synced to Agiloft promptly is to automatically sync when Dynamics records are saved.
- In Microsoft Dynamics, go to the App Designer and open the entity you want to sync.
- Click Edit.
- In the sidebar, click Forms.
- Locate the row where Form Type is set to Main. On that row, click the Information link.

- On the Home ribbon, click Form Properties.
- On the Events tab, click Add to add a new library.
- Enter "new_" to find the new StartSyncToAgiloft library. Select it and click Add.
- Scroll to the Event Handlers section and select OnSave in the Event field.
- Click Add in the Event Handlers section.
- In the Handler Properties window, select the StartSyncToAgiloft library in the Library field.
- In the Function field, enter startSync.
- Select the "Pass execution context as first parameter" checkbox.
- In the Form Properties window, click OK.

- In the Form Contact window, click Save in the top ribbon and then click Publish.
- Close the form to return to the entity menu with the list of forms. Click Save and Close in the top ribbon.
Sync with Custom Button
Creating a custom button involves customizing the command bar, which is documented in helpful detail by Microsoft in Customize the Command Bar. In particular, follow the steps on that page to use the app designer, create modern commands, edit the command bar, create a new command, and use JavaScript for actions.
When you reach the final steps for using JavaScript for actions:
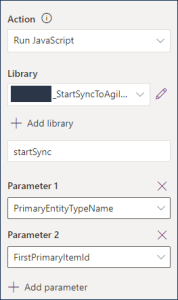
- Make sure to use the value you used in the Enable Sync from Microsoft Dynamics section of this page, with any necessary prefix. For example, if you named your JavaScript resource
StartSyncToAgiloft, the Dynamics instance would use the nameagiloft_StartSyncToAgiloft. - Then, use startSync, set the first parameter to PrimaryEntityTypeName and the second to FirstPrimaryItemId.
- Save and publish the changes.
Preparing Agiloft for Sync
As on the Dynamics side, you need to make a few adjustments to the tables and fields in Agiloft to help records sync smoothly.
For each table in Agiloft that you want to sync:
- Create a Short Text field with a display name such as "ID for Dynamics."
- Configure the field so it isn't visible in the layout, and the user can't modify it. Set the default to use the record ID, and don't allow it to update after it has been populated. Later, this field can be mapped with Dynamics to match records during synchronization.

- Finish creating the field and return to the table.
- Use Mass Edit to set the new field to $id for all existing records. This way, every record in the table has this field populated. In the Mass Edit options, do not run rules, and do not update defaults.
Configuring the Sync
With both systems prepared, you are ready to set up the sync configuration in Agiloft. Note that in some cases, integration with Microsoft Dynamics lends itself to the sync option to allow multi to multi table mappings, which is not available for two-way sync. If you need to use this option, simply create two one-way sync configurations, where one sends data from Agiloft to Dynamics and the other sends data from Dynamics to Agiloft. For example, if you want to sync a company's main location from Agiloft to the address fields in the Dynamics Account entity, you need to use one-way configurations so you can utilize the multi to multi mapping option. This is because the Company table has links to the Location table in Agiloft, but the addresses in Dynamics aren't links.
If you're syncing contract data to Dynamics, we recommend creating a separate sync configuration that syncs Contract Types data. That way you can sync the types to Dynamics before syncing the contract data that points to them.
File with Versioning Fields must be mapped to the Notes of the corresponding entity in Dynamics, rather than mapping to a file field in Dynamics. As such, only one File with Versioning field can be mapped to a single Dynamics entity.
To set up a new sync configuration:
In your Agiloft knowledgebase, go to Setup > Sync > New > External Sync.
- On the General tab:
- Set External System Type to Microsoft Dynamics 365. Leave the default Third-party ESA (HTTP) option selected.
- Select or clear the "Allow Multi to Multi Table Mappings" checkbox. This option allows you to map multiple tables to each other, but it disables the Two-way sync direction.
- If desired, select another sync configuration from the Post Sync Config drop-down to automatically start another sync when this one is completed. If you set up Dynamics with two one-way syncs, this is a convenient way to immediately begin the second sync when the first one is finished. However, this requires setting up the second sync first, so that it appears in the drop-down, or returning to set this later.
Set up Directions, Related tables, and Conflicts. Pay special attention to how you configure Conflicts if you are setting up two one-way sync configurations. This setting determines which system is treated as the source of truth during the sync, and which system's content may be overwritten.
If desired, set up personal synchronization options or API calls.
Click Next.
- On the ESA Settings tab, enter the information you acquired during Dynamics preparation:
- The base API URL of your Dynamics instance, in the form
https://<YOUR_DYNAMICS_INSTANCE>/api/data/v9.1/ - The Application ID associated with the application user in your Dynamics instance
- The secret key and password associated with the application ID, which will be used for authentication in accessing Dynamics APIs
The Dynamics Microsoft Online authority, in the form
https://login.microsoftonline.com/<YOUR_DOMAIN>, such ashttps://login.microsoftonline.com/mydomain.onmicrosoft.comInitially, the cached metadata section is empty. This is available after you finish setting up the configuration, if you return to make edits.
- The base API URL of your Dynamics instance, in the form
- On the Mapping tab, map the fields in the
Agiloft KB with the external Dynamics system. Make sure you also map the ID fields you created for this purpose, and select the Identifying checkbox. Do not sync the system-generated ID field, which is usually named TableName(Primary/Id Field) in the list. For syncing attachments, see Sync Files. To map a field:
Locate the Agiloft table in the list and then select the corresponding Dynamics entity from the drop-down menu.
Click Map. The Field Mapping wizard opens. On the Field Mapping tab:
In the Record Modification Timestamp Field, select a field that provides the timestamp in each system to indicate the latest version of the record. If you set the table to Synchronize in the System Update Type in the next step, the timestamp field is compared between systems to determine which record's values are synced to the other system.
- For System Update Type, choose the sync direction for the table. You can choose a different sync direction for individual tables than you chose for the overall sync on the General tab, but you can't contradict the General tab setting. For example, if you chose to Update Agiloft Only on the General tab, you can't choose the Export option here to send data to Salesforce. This setting also determines whether real-time automation is possible between systems; to use real-time automation, you must set this to Synchronize. Export and Import work only for scheduled automation.
- Synchronize: Updates records in both systems based on the timestamp field.
- Export: Updates records in Dynamics to match field values in Agiloft.
- Import: Updates records in Agiloft to match field values in Dynamics.
- In Allowed Operations, choose which sync operations are allowed during the sync.
- Determine how the record ID is generated during the sync. This can be done by Dynamics or Agiloft. If you generate record IDs with Agiloft, you must also specify a prefix and a table column to store the generated IDs.
- If desired, select any actions you want to run after a successful sync.
- Choose whether to include records in related tables. Selecting this option can impact performance.
For each Dynamics field you want to sync, select the corresponding Agiloft field from the drop-down. Then, choose whether the field value is updated in Agiloft, Dynamics, or both systems. Update options are disabled if the sync direction does not permit them. For fields with multiple choice values, complete the dialog box that opens to map individual choice fields.
Use this tab to map links to single fields, but not complete linked sets. Linked sets should instead be mapped in step 5 below, on the Relation Mapping tab.- Use the Identifying column to select fields to identify matching records between the systems. If you want to match records only when all the Identifying fields match, select the "Use strict match for identification" option. Otherwise, the system first attempts to identify matches by all fields, and if no match is found, it then narrows down the Identifying fields one at a time until a match is found.
- Click Next.
- On the Filters tab, if you need to prevent records created or updated in one system from being synced to the other, create a saved search to filter the desired records.
- Click Finish. The Field Mapping wizard closes.
- Repeat the previous steps for each table and set of fields you want to sync, and click Next when complete.
On the Relation Mapping tab, you need to explicitly match any linked field relationships across mapped tables that you did not select on the Mapping tab. In general, it's best to use the Mapping tab for links to single fields, or linked sets where only one of the fields in the set will be synced. For linked sets, use Relation Mapping to connect the complete set with the appropriate Lookup field in Dynamics.
Set any linked field relations between mapped tables.
- Choose whether the field values are updated in Agiloft, Salesforce, or both systems.
- Click Next.
On the Running tab, choose whether synchronization is initiated manually, via actions and rules, or via Dynamics. For more discussion of these options, see Configure Dynamics to Initiate Sync.
To run a sync manually, go to a table's action bar and select Actions > Sync > Run [Configuration Name].
- On the Export tab, customize any export settings related to the sync configuration. This allows you to transfer your sync configuration to another KB, if desired.
Click Finish.
Making Final Adjustments
After you set up the sync configuration, there are a few minor but important adjustments that still need to be made in each system.
Agiloft Final Adjustments
On the Agiloft side, you need to determine if and how to automate the sync. In most cases, rules are used to automate syncing whenever a record is created, updated, or deleted. You might append a Dynamics sync action to an existing rule, or create a new rule that runs whenever a record in the table is touched. This action typically checks the ID for Dynamics field, populates it if needed, and then runs a sync action tied to the Dynamics sync configuration. The sync action should be configured to sync a single record only. It is usually best to set this rule not to trigger any other rules, and not to update default values.

Next, use Agiloft to generate the hotlink URL you need to finalize some code in Microsoft Dynamics.
- Create a URL for your KB and sync configuration, substituting SYNC_USER, SYNC_PW, KB_NAME, and SYNC_ID with values for your privileged sync user and password, KB name, and the ID of the Dynamics to
Agiloft sync configuration you created.
https://example.agiloft.com/gui2/login.jsp?keyID=0&user=SYNC_USER&password=SYNC_PW&kb=KB_NAME&action=sync&externalSystemID=SYNC_ID - Go to Setup > Access and click Automatic Login Hotlinks.
- In the Encrypt Hotlink field, paste the URL you created in step 1.
- Set an expiration timeline for the hotlink. Keep in mind that when this hotlink expires, you will need to repeat these steps and replace the URL in Microsoft Dynamics, so this should usually be set to a number of months or years.
- Click Encrypt.
- Copy and paste the encrypted URL to a word processor like Notepad.
Dynamics Final Adjustments
With the encrypted hotlink ready to go, you can finally update the placeholder in the StartSyncToAgiloft web resource you created at the beginning.
- In your Dynamics instance, click the gear icon in the top right corner and go to Advanced Settings.
- Go to Settings > Customizations and click Customize the system.
- On the navigation pane, click Web Resources.
- Edit the resource StartSyncToAgiloft.
- In the Content section, click Text Editor.
In the editor, locate the placeholder <YOUR_URL_HERE>. Replace this text, including the <> symbols, with the encrypted hotlink you generated in Agiloft.
- Save and Publish the resource.
Sync Files
File with Versioning Fields must be mapped to the Notes of the corresponding entity in Dynamics, rather than mapping to a file field in Dynamics. As such, only one File with Versioning field can be mapped to a single Dynamics entity.
For many Dynamics integrations, the best way to seamlessly integrate the Attachments table in Agiloft with Dynamics is to map that table to the Notes, or Annotation, entity. With this configuration, an Attachments field is created in the Dynamics entity for the purposes of sync. This Attachments field is mapped to the Attached File field in Agiloft, and marked to update in the external system only. The Step ID is mapped to the ID for Dynamics field created in Agiloft, and marked to update in the external system only and to be treated as identifying. The Title field in Dynamics is mapped to the Title field in Agiloft.

On the Relation Mapping tab, map the Note / Attachment to the Attachment > Contract relationship.
This configuration supports creating and updating files in both Agiloft and Dynamics. Deletion is supported only in Agiloft, as Dynamics cannot pass the ID of a deleted record through to Agiloft; this means files deleted in Dynamics will persist in Agiloft. Unlinking an attachment from a contract is partially supported, in that it updates the record in Dynamics to remove the connection, but does not delete or otherwise remove the file.
Other Resources
These additional resources might be helpful while setting up, testing, and using your Dynamics integration.
Limitations
Integrations between systems often have some limitations based on system differences. The integration with Microsoft Dynamics has a few notable limitations:
- The first sync might take a long time if "Search for related records" is selected for the table mappings, since the system tries to find any related records and create them.
- Mapping Dynamics lookup fields or Agiloft linked fields on the Mapping tab can cause the sync to fail if there are no matching linked records and "Allow entries not in source table" is not selected. To prevent this, map these fields on the Relation Mapping tab instead.
- The integration cannot report if a sync initiated on the Dynamics side has succeeded or failed.
- If a user deletes something in Dynamics, like a record or entity, that deletion can't be synced back to
Agiloft. If possible, the simplest solution is to do all deletions in
Agiloft instead. If deleting things in Dynamics is a necessary workflow, the best workaround is to:
- Enable auditing in Dynamics at the instance level (Settings > Advanced Settings > Auditing > Global Audit Settings > select Start Auditing).
- Enable auditing in Dynamics at the organization, entity, and field level, as needed. For more information, see Microsoft's documentation.
- Create a separate sync configuration in Agiloft whose only function is to delete records in Agiloft. Run this sync on a scheduled frequency with a time-based rule on all tables mapped in the main sync configuration.