MSSQL and MySQL Database Integration
You can integrate your knowledgebase with MSSQL and MySQL databases to keep your records synchronized. This integration uses an external system adapter (ESA) to sync Agiloft with the database. This article uses two example tables to illustrate the configuration, but you can sync more or fewer tables as needed.
The integration setup is almost identical for MSSQL and MySQL, but the examples differ slightly.
Prerequisites
First, make sure that you have all the necessary credentials to access the database:
- Username
- Password
- Database name
- Server address and port
Preparing Database Tables
First, evaluate the content in your KB and your database and identify what entities you need to sync, and the nature of that synchronization. In this example, consider a database with two tables, ext_parent_table and ext_child_table, that must be kept in sync with two corresponding tables in Agiloft. Every time a change is made in either system, it must be reflected in the other.
For the database tables, consider this example code for both MSSQL and MySQL:
In both cases, ext_child_table is related to ext_parent_table using the ext_parent_id field.
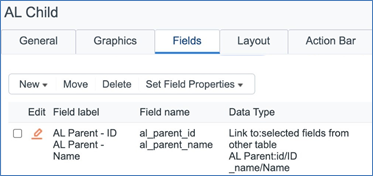
In Agiloft, you must identify a corresponding table to sync with the database table. To follow the example above, consider matching tables in Agiloft, AL Parent and AL Child. In the AL Parent table, there is a custom Text field called Name; in the AL Child table, there is another Text field called Name, and a linked set pointing to the AL Parent table's ID and Name fields.
Before these tables can be synced, every table must have its own primary key field, which is not null and increments automatically, and a DATETIME field, which represents the date and time of the last change to the record. In Agiloft, the ID and Last Modified Date fields serve these purposes. To add a last modification timestamp, a mechanism must be created in the MSSQL or MySQL database to populate that timestamp every time a record is created or updated. Consider these example triggers, one for MSSQL and one for MySQL:
For every additional field you want to sync between Agiloft and the database, make sure it has a counterpart in the other system. These are mapped later in the process.
Creating a Sync Configuration
With the tables in both systems ready to go, you can create a sync configuration in Agiloft.
- In Agiloft, go to Setup > Sync > External Sync and click New.
- Give the configuration a clear name.
- In External System Type, select Database.
- Select or clear the Allow Multi to Multi Table Mappings checkbox. If you don't need to map multiple tables, clear the checkbox to enable two-way sync.
- Select the Direction for the sync. Two-way sync is good for keeping both systems up to date, but it only works for one table in each system. If you want to sync more than one table, you can use one-way sync. One-way sync is helpful if one system is only being used to look at information, not change it. You can also use two one-way sync configurations if you need to send information back and forth between the two systems.
- Configure the remaining settings, particularly the Conflicts section, and then click Next.
- Set the Database type to MSSQL or MySQL, to match your database.
- Complete the rest of the fields with the database credentials.
- Click Next. If the credentials were entered correctly, the test connection is successful and the Mappings tab opens.
Mapping Tables
Make sure you completed the steps in Preparing Database Tables so that every table in the database has a primary key field and a DATETIME column that stores the time stamp of the record's most recent modification. These two fields are required for sync because they are used to match records across systems and to identify which record is the more recent version.
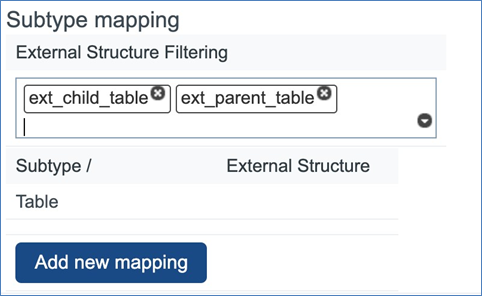
- On the Mapping tab, search the database table name in the External Structure Filtering field and select it.

- Continue to search and select each database table you want to sync until they are all selected.
- For each pair of tables you want to sync:
- Click "Add new mapping" to add a new drop-down pair to the list.
- Use the drop-downs to select the Agiloft table and the MSSQL or MySQL table that should be mapped.
- Click Map to open the Field Mapping tab.
- Click "Add new mapping" to add a new drop-down pair to the list.
Mapping Fields
On the Field Mappings tab, you can configure settings for the specific tables being mapped, and set which fields in the tables are synced.
In the Record Modification Timestamp Field, select the field that stores the date and time of the last update to the record. This field is compared between systems to determine which record's values are synced to the other system.
- For System Update Type, choose the sync direction for the table. You can choose a different sync direction for individual tables than you chose for the overall sync on the General tab, but you can't contradict the General tab setting. For example, if you chose to Update Agiloft Only on the General tab, you can't choose the Export option here to send data to the database.
- Synchronize: Updates records in both systems based on the timestamp field.
- Export: Updates records in the MSSQL or MySQL database to match field values in Agiloft.
- Import: Updates records in Agiloft to match field values in the MSSQL or MySQL database.
- In Allowed Operations, choose which sync operations are allowed during the sync.
- Determine how the record ID is generated during the sync. If you generate record IDs with Agiloft, you must also specify a prefix and a table column to store the generated IDs.
- If desired, select any actions you want to run after a successful sync.
- Choose whether to include records in related tables. Selecting this option can impact performance.
- Map the primary key, or ID, from the database to the ID of the Agiloft table and select Identifying. Clear the Update in Agiloft and Update in External checkboxes, to prevent this field from being overwritten.
- Map the last modification date from the database to the Date Created field of the Agiloft table and select Last Modified. Clear the Update in Agiloft and Update in External checkboxes, to prevent this field from being overwritten.
For each additional database field you want to sync, select the corresponding Agiloft field from the drop-down. Then, choose whether the field value is updated in Agiloft, the database, or both. Update options are disabled if the sync direction does not permit them. For fields with multiple choice values, complete the dialog box that opens to map individual choice fields.
Use this tab to map links to single fields, but not complete linked sets. Linked sets should instead be mapped below, on the Relation Mapping tab.- Use the Identifying column to select fields to identify matching records between the systems. If you want to match records only when all the Identifying fields match, select the "Use strict match for identification" option. Otherwise, the system first attempts to identify matches by all fields, and if no match is found, it then narrows down the Identifying fields one at a time until a match is found.
- Click Next.
- On the Filters tab, if you need to prevent records created or updated in one system from being synced to the other, create a saved search to filter the desired records.
- Click Finish. The Field Mapping wizard closes and returns you to the Mapping tab.
- Click Next to proceed to the Relation Mapping tab.
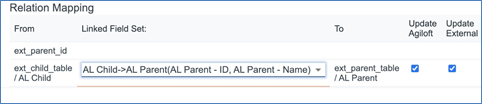
- On this tab, use the drop-down to map linked relationships, and then use the checkboxes to control where this information is updated. In the given example, here, you would map the linked relationship between AL Child and AL Parent.
- On the Running tab, choose whether synchronization is initiated manually or by actions and rules.
- On the Export tab, customize any export settings related to the sync configuration. This allows you to transfer your sync configuration to another KB, if desired.
Click Finish.
Testing the Integration
Test the integration by creating records in one system, running the sync, and then checking the other system to see if those records were duplicated as expected. Then, for two-way sync, test in reverse, creating records in the other system and syncing them back to the first.