Workflows
A workflow is a function that determines the stages that a record passes through in its life cycle, and it also governs which paths are allowed between stages. The various stages that the record can be in, such as Opened, In Testing, or Closed, are referred to as "states." A workflow can include actions that run when one state changes to another state, called a "state transition." State transitions may also trigger rules that run further actions. Workflows can also use conditions and guards that control whether actions run or state transitions occur. For example, a guard may prevent users from changing the state from Open to In Testing unless the Cause of Bug field has a value.
The workflow feature may or may not be used in a given implementation project or on a given table. For instance, the Support Case and Service Request tables in our out-of-the-box solution use workflows, primarily for sending email notifications. However, other tables, especially background tables, may not use workflows at all. In many cases, rules accomplish the same function and are used instead.
Example
Let's look at an example workflow. When a bug report is created in a state of Open, email Engineering. Do not let the record move to In Testing unless the Cause of Bug field has been completed. If the field is empty, run a Validate action that forces the user to complete the field. When the record does move to In Testing, email QA. When the record's state changes to Closed, email the person who submitted it.
This workflow contains the following parts:
States: Open, In Testing, Closed
State Transitions: Open > In Testing, In Testing > Closed
Actions: Email Engineering when a record is created with a state of Open. Email QA when the state transitions from Open to In Testing. Email Submitter when the state transitions from In Testing to Closed.
Guard: Do not permit a state transition from Open to In Testing if the Cause of Bug field is empty.

Workflows and Subtables
Subtables inherit workflows from the parent table. Consider the following hierarchy:
People
+ Employees
+ External Users
If you create a workflow for the People table, the Employees and External Users subtables inherit the workflow from the People table.
However, workflows do not have to be the same between parent tables and subtables. For example, you can edit the workflow for the Employees table by adding additional states, state transitions, guards, or conditions. This does not alter the workflow for the People table, nor does it break the link to the workflow for the People table. If you later add additional states, state transitions, or actions to the People table, they automatically show up in the Employees subtable.
In brief, subtable workflows don't contain a copy of the parent workflow; they contain the parent workflow and any additions you make to it. If you are in a subtable and try to delete one of the state transitions or edit one of the actions that was inherited from the parent table, the system warns you that the change affects the parent workflow.
Create a Workflow
The Workflow wizard refers to the drag-and-drop interface found on the Workflow tab of any table wizard. It's primarily used to define the allowed state values for records in the table, such as Open, In Progress, or Completed, as well as the available state transitions from one state to another. When you're using the wizard, make sure to save the workflow when you've finished making changes. Even if the interface appears complete, your changes not saved unless you click Save.
Once you have created and saved a table's workflow,
Agiloft automatically creates a wfstate Choice field labeled "Status," containing all the workflow states you defined. This workflow state field appears on the Fields tab of the Table wizard, just like other types of fields, and it behaves like a regular Choice field on the record layout. The field's purpose is to transition a record from one state to the next. When a record is being edited, not all of the state values appear in the field. That’s because the available choices depend on which transitions are allowed in the workflow editor. If the system didn't relabel the field to "Status" automatically, you might want to do it manually.
Older versions of Agiloft rely on a Java applet to open the Workflow editor. If you don't have Java, you are prompted to install it. We recommend upgrading to the latest version of Agiloft to take advantage of the improved DHTML editor.
Add States
To begin creating a workflow, use the Workflow wizard to add different states to your workflow.
- Navigate to Setup [Table Name] and click the Workflow tab.
- Type the state names in the text entry box, each separated by a comma.
- Click Add States. The wizard adds the states to the interface and automatically inserts state transitions between each state, which are represented by arrows.
Example
Imagine you want to create a workflow with the following states: Order Received, Sent to Partner, Updated by Partner, Fulfilled, and Canceled. After you enter the state names and click Add States, the states appear on the interface.

Modify States and State Transitions
Once you've added workflow states, you can use the interactive interface to modify the states and state transitions.
Add State Transitions
To add a state transition, select a state's corner when it's highlighted yellow and drag it to another state. When you drag the transition to another state, your cursor must either be inside the other state or touching the state's corner so that it's also highlighted yellow. Otherwise, the transition is not added.
Delete States and State Transitions
To delete a state or state transition, select a state or the arrow between two states and click Delete or press the Delete key on your keyboard. Deleting a state transition prevents the record from moving from one state to another. You can also click Delete Empty Transitions to delete all state transitions that don't contain an action or guard.
Edit States and State Transitions
To edit the properties of a workflow state or state transition, double-click it or select it and click Edit. When editing a workflow state, you can change its name, provide a description, and choose whether it's creatable and deleteable. When editing a state transition, you can select which actions run during the transition and specify the conditions, if any, that must be met before an action runs. Use the Guards tab to add guards to the transition.
Change the Field and Search Order of Workflow States
To determine how workflow states appear in the workflow state field and how they're returned by a search, click Reorder and use the arrows to move states. Workflow states above other states in the list take precedence in a search.
Example
Let's look at these example workflow states:
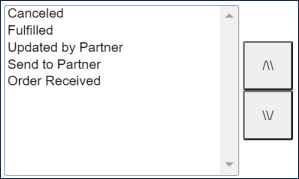
If you search "Workflow State > Updated by Partner," the search only returns records that have a state of Fulfilled or Canceled. Similarly, if you search "Workflow State < Order Received," the search returns no records because no states are "less than" Order Received. Keep this ordering in mind if you create actions or rules that use searches involving the workflow state field.
If you view the workflow state field on the record layout, the workflow states are in the same order as they appear in the Workflow wizard. However, depending on the state transitions that are allowed to occur, some states may not appear when the record is in a given state.
Arrange Workflow States and State Transitions
To arrange workflow states and state transitions, drag and drop them anywhere on the interface. Moving states and state transitions on the interface does not break any relationships between them.
Configure Creatable, Deletable, and Default States
To configure a workflow state's properties or set the default state, click on a state and select the appropriate checkboxes:
- Creatable: Allows you to select this state when you create new records. A creatable state has a caret above the state.
- Deletable: Allows you to delete records that have the selected state. A deletable state has a caret below the state. By default, all states are designated as deletable.
- Default: Selects this state by default for newly created records. If a state is the default state, it must also be creatable. Only one state can be the default state.
Print Workflows
To print a workflow, click Print and choose the device to which you want to print. You can create a PDF or print to a physical printer.
Add Actions
Actions can run when a record is created or deleted in a specific workflow state, or during a state transition.
- Choose whether the action runs during a state transition or when a record is created or deleted:
- To add an action to a state transition, double-click the arrow between the states to open the action dialog.
- To add an action when records are created or deleted, double-click the caret above or below the state to open the action dialog. If no creatable or deletable caret is available, you must first make the state creatable or deletable.
- Select an existing action or use the Create New Action drop-down to create a new action. For more information on creating actions, see Actions. You can also choose to add conditions and guards at this time. For more information, see Add Conditions and Guards.

- Use the arrows to move the action to the Selected area.
- Use Move Up and Move Down to specify the order in which actions execute.
- Click Finish. An "A" in a circle appears on the interface where the action is added. If you add conditions or guards, they also appear on the interface at the appropriate location in the workflow.

Add Conditions and Guards
Conditions and guards are similar, but they have important differences. Conditions prevent an action from occurring if its criteria are not met, whereas guards prevent a state transition from occurring if its criteria are met. In other words, a condition acts as a decision gate that prevents or allows an action, and the action only runs if all the condition's criteria are true. A guard acts as a decision gate that prevents or allows a state transition, and the state transition only occurs if the guard's criteria are false.
Conditions and guards are both created with the same Guard/Condition wizard, and they can also use the same logic. This means you can use conditions as guards and vice versa. However, a single action can only contain one condition, but a single state transition can contain multiple guards. If you have multiple guards for a state transition, the transition is only prevented if the conditions of all guards are met.
In most implementations, Validate actions offer more flexibility than guards and achieve the same result. For this reason, Validate and If-Then-Else actions in rules are used more often than workflow guards because rules offer more filtering options to handle more complex conditions. For instance, an error presented to users is more customizable in a Validate action than a workflow guard.
However, if you have a very simple workflow, it might make more sense to use a guard than to create an entirely separate rule.
Simple and Script Conditions and Guards
There are two types of conditions and guards: Simple and Script. A Simple condition or guard allows you to define a filter based on values in a record, whereas a Script condition or guard allows you to create more complex filters that span several records or tables. Script conditions and guards use Java, so if you aren't familiar with it, it's best to only use Simple conditions and guards.
The Condition/Guard wizard is slightly different for each type of condition or guard. Simple conditions and guards have a Condition tab, and Script conditions and guards instead have a Script tab. The Script tab simply contains a text box for entering a script, whereas the Condition tab contains drop-down menus for creating your condition or guard logic.
To add a Simple or Script condition or guard:
- Choose whether you're adding a condition or guard:
- To add a condition, double-click the state transition or the caret on the workflow state that contains the action.
- To add a guard, double-click the desired state transition.
- Create the condition or guard:
For conditions, select the action on the right pane, and use the Set Condition drop-down to choose the type of condition to create. The Guard/Condition wizard opens.

- For guards, click the Guards tab, and use the Create New Guard drop-down to choose the type of condition to create. The Guard/Condition wizard opens.

- Enter a name and description for the condition or guard.
- Click the Condition or Script tab, depending on the type you're creating.
- Create the logic of the condition or guard. You can use the existing values in the record, called pre-values, and the values that the record would have if the state transition was to occur, called post-values.
- For Script types, enter the script in the Script Code field.
For Simple types, create the logic using the drop-down fields. You can select which field to use, whether the filter finds pre- or post-values, which operator to use, and whether the operator acts on a value of the selected field or the value of a different field. To add additional criteria within the condition or guard, click Simple.
- Click Finish to save the condition or guard.
- Select the condition or guard:
- For conditions, select the action in the right pane, and then select the condition from the Set Condition drop-down.
- For guards, select the guard from the Available pane, and then use the arrow button to move it to the Selected Guards pane.
- Click Finish to complete the guard or condition setup. A "G" inside a circle appears on the interface where the guard is added. The name of the condition appears on the interface by hovering over the containing action, or by selecting the "Show Guards" checkbox.

Allow Groups to Cancel Actions and Override Guards
The Override Settings tab in the Workflow wizard defines which groups have the option to cancel workflow actions or override guards. It also defines which groups can view the active actions, conditions, and guards.
The tab contains two columns, each corresponding to a workflow permission setting. Checking the Visible column allows users in the selected group to see on screen the names of the actions, conditions, and guards that are triggered when the record is saved in a new state. If the Optional column is checked, users can deselect the actions and guards before saving the record.
Save Workflows
When you've finished configuring your workflow, click Finish to save and apply the changes. No matter how complete the diagram looks, it is not saved until you click Finish. When you navigate back to the Fields tab of the Table wizard, notice the field called Workflow State or wfstate. The choices in the field map to the workflow states you created. In most cases, you should rename this field and add it to the record layout to use the table's workflow.