What's New
Agiloft provides quarterly releases with new functionality, plus monthly maintenance releases consisting of corrections only. This page highlights some of the most important and exciting recent enhancements to the software, but for the full list of changes for each version, make sure to review the full list of Release Notes.
This page covers updates for Release 25.2.
You can find the latest Agiloft downloadable installer at https://www.agiloft.com/ewdownload/, or contact Support to request an upgrade if your knowledgebase is hosted in the cloud. The most recent release notes can be found here: Release Notes.
| Previous Release | Current Release |
|---|---|
| Release 25.1 | Release 25.2 |
Use generative AI to streamline contract negotiation, review, and redlining
When you review a contract, you often find a few clauses you'd like to modify. With Agiloft's new generative AI capabilities, you can easily align contract clauses with your standard Clause Library equivalent, or leverage AI to directly revise the clause based on your instructions.
- Align Clauses: Improve third-party clauses in your contract draft by using Align Clauses to bring them in line with approved, vetted clauses from your Clause Library. For example, this can take a non-standard Force Majeure clause and adjust it to match the Force Majeure clause in your Clause Library.

- Revise with AI: You can give AI direct suggestions about how to revise a clause through text prompts. This is especially useful if you don't have a Clause Library, or if your library doesn't have a comparable clause. For example, you could prompt the system to change your Limited Liability clause to a Mutual Limited Liability clause.

In both cases, Agiloft uses AI to generate a suggested new draft for the clause, which you can then tweak as needed and insert into the contract. You can run these workflows in the Agiloft Contract Assistant for Word once you have created a contract and stored it in Agiloft.
For more information, visit Generative AI.
Make contract relationships obvious at a glance with tree view
Make your contract relationships easy to see with the new tree view option. This collects child records underneath each parent, and makes it easy to expand or collapse different branches of your record's family tree. This is especially useful if you already use a diagram field to see this information, since the tree view helps to make that relational data visible directly in the table grid.
We recommend using this option when showing related records inside a record form, provided you have already established hierarchical relationships between your records. For example, you might update your Contracts table so that the Related Contracts section shows the relationships between the records. When shown in an embedded table, tree view also shows a breadcrumb trail to aid in navigation, especially for records that have many relations.
In addition, tree view includes a numeral next to each parent record that shows the number of direct descendants, and when you search or filter on a table that is using tree view, the parents of a search result are included in lighter opacity. That way, you can see which record matched your search without losing the contextual information you get from the family tree.

To configure your own Contract table this way:
- Go to Setup Contracts and open the Layout tab. In the layout, select the tab that contains information about related contracts. In the example above, the tab is named Renewal / Related Contracts. Note the name of the field that shows the related contract records.
- Next to the Layout tab, open the Fields tab and edit the field you noted in step 1. In newer KBs, this is an Embedded Search Result field named All Related Contracts.
- On the Permissions tab, find the Additional Filters section and edit the current saved search.
- If it includes a condition that ID does not equal $contract.id, click the trash can icon to delete it. This condition hides the current record from the table, and when using the tree view option, it is more intuitive to include the current record. In the example above, this step is the reason that Raynor-Collins Amendment 1 to Statement of Work 1 is included in the tree.
- Go to the Options tab for the saved search and under "When the search is run," select "Change the view" and choose an appropriate view from the drop-down. Note the name of the view you selected. If you don't have a view configured for viewing related contract records, you can create one in the next step instead, and then return to these steps to select it.
- Click Finish to save the search and then click Finish again to save your changes to the field.
- Go to the Contracts table, go to Views > Manage, and edit the view you selected in step 5. If you need to create a view, select Views > New and create one for this purpose.
- Select the Show Tree View checkbox.
- Select the field that stores the ID of the record's parent and establishes the parent-child relationship. For example, Parent Contract ID.
- Select the field that should show the plus and minus icons, and nest to indicate hierarchical relationships. In the example above, this is configured as Contract Title, so the title is where the icons appear and where the text is indented.
- Choose how many records you want to show at a single level. If there are more records at a single level than the number you choose here, the list includes a Load More button at the end of the list. This setting can impact performance if your hierarchies include many records on each level.
- Make any other updates to the view as needed and then click Finish.
- Open a contract that has linked family members and test the changes you made, so you can make any necessary adjustments.
Browse attachments, approvals, and more directly in table view
Browse attached files, approvals, and more directly from the table view, without needing to open the contract at all. With the new insight popover, you can configure related tables, some linked fields, and embedded search results to allow users to quickly browse the field's entire contents directly in the table view. For example, see all of a contract's attachments without opening the contract at all.
The insight popover is also a powerful tool when used inside another related table, such as giving the user easy access to a contract's attachments inside the Related Contracts section.

To take advantage of this feature, simply edit the field you want to use, configure the insight popover display, and add that field to a view. For details, see the Insight Popover section of Configuring Views.
Introducing the Agiloft Google Docs App
Agiloft is excited to offer a new Google-based contract assistant for Google Docs, which introduces workflows in Google Docs similar to the Agiloft Contract Assistant for Microsoft Word.
With the Agiloft Google Docs App, you can easily perform the following tasks, directly in Google Docs:
- Tag clauses in a contract, and send them to your KB as records
- Tag key terms in a contract, and send them to your KB as field values for Contract records
- Edit existing tags, and instantly sync those changes to your KB
The Agiloft Google Docs app is available on the Google Store. To take advantage of the Google Docs app, you also need to set up the new Google Drive Integration.
For more information about using, installing, and configuring the app, visit Agiloft Google Docs App.
Automatically highlight required clauses missing from a contract
Improve your contract review workflows by configuring the Word app to highlight clause types that appear to be missing from a contract. With this feature, whenever a contract is opened in the Word app, the system checks the contract for clauses required by the Contract Type, and flags any absent Clause Types in the Missing Clause Types field. You can select a missing clause in the field to easily add it to your contract.
To set up this feature:
- Navigate to Setup > Integrations and click Configure under Agiloft Contract Concept Mapping.
- Scroll to the bottom of the General tab and edit a table.
- Under Missing Clause Types, select the field where the system will store any clause types that are flagged as potentially missing. In the default template, this is the Missing Clause Types field. If you don't have this field, you can create it by creating a linked field to the Clause Type field of the Clause Types table.
- Click Save twice.
In order for Missing Clause Types to populate in the field, you need to establish which Clause Types are required by each Contract Type. You can assign required Clause Types to a Contract Type by editing a Contract Type record and adding Clause Types to the Required Clause Type field, which is usually located on the General tab.
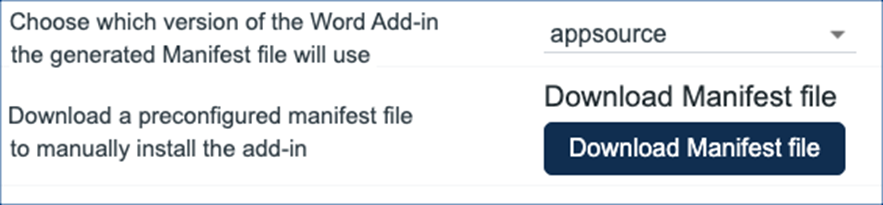
Word app manifest file improvements
Manage your organization's Word app installation with a new and improved manifest file source that:
- Makes it easier to add or remove users from the O365 group, which helps with accessibility changes.
- Eliminates the need for users to manually enter a URL and KB name.
- Automatically keeps the Word app up to date.
To enjoy these benefits, download a new copy of your manifest file and select the appsource option on the Download Manifest tab of the Agiloft Contract Concept Mapping wizard. Then, follow the rest of these steps to publish the file to the O365 access group.
AI labels now automatically kept up to date
Keep your system up-to-date with the latest improvements and additions to your AI labels library. Now, your system automatically updates the AI label library on a nightly schedule, and any time you navigate to Setup > Integration and click Configure under AI. For a list of available labels, visit AI Platform Labels.
Evaluate model performance directly in the document viewer
If you have AI enabled, you can evaluate the performance of the models you are working on in an AI Label Training project by uploading a sample contract and clicking Generate AI Suggestions. This button appears in the top right corner of the document viewer in the AI Suggestions tab, but only appears in documents that are linked to an AI Label Training project, and only when the AI Suggestions tab is empty.

For more information, see AI Trainer.
Annotate contracts directly in the document viewer with AI
Easily access the Analyze Contract button directly in the document viewer, so you can quickly run an AI model and complete the annotation workflow for an AI Project, with fewer steps and screens.
In order for the Analyze Contract button to appear in the document viewer:
- Your KB must have AI enabled in Setup > Integrations > Agiloft Contract Concept Mapping, and the "Action Button field to use when requesting clause extraction" field must point to an action button that runs the Data Analysis action used for extraction. In the default template, this is Analyze Contract.
- The action must be configured to have a Processing Type value of Single Document.
- The action button must be configured to not run in background mode.
- The Attachment record that you open in the document viewer must be linked to a Contract record.
If all the above criteria are met, the Analyze Contract button appears on the top right corner of the document viewer. When you click this button, the AI model annotates your document and shows all the tagged labels in the right pane.
Open .docx files for editing directly from doc viewer
Jump directly from the doc viewer in Agiloft into Microsoft Word with the new Edit in Word button. This method is faster and more intuitive than downloading a copy of the file, editing it locally, and re-uploading it to the record.
The button appears only when the file field is configured to allow direct file editing. To turn on direct editing for a file field, edit the field and go to the Options tab, then set Enable Versioning? to Yes and Direct File Editing to "Allow direct editing of MS Office document and directly save back to the file field."
As part of this change, some other controls on the toolbar have been rearranged.
New API support for the Integration Hub
Expand your integrations with new API support for Integration Hub, which opens the door for even more flexible interconnectivity between Agiloft and the other systems you use. This offers several advantages:
- Secure Traffic Forwarding: Create secure pathways, known as API proxies, for data to move from one place to another. This feature is not available on the base platform.
- Data Sharing: Utilize API recipes, which expose certain functionalities as API endpoints so you can share data with partners or use it in other recipes. Without the API Platform, this process is more manual.
- Access Control: Control who has access to your data endpoints on a more granular level than you can with the base platform.
- Lifecycle Management: The API Platform supports the smooth transition of APIs from development to testing to production. Managing the lifecycle of APIs without the API Platform would require additional tools or manual processes.
The Integration Hub now also includes the API Platform tab, where a dashboard makes it easy to monitor your APIs and track their usage and performance.
For more information, visit Workato's documentation on the API Platform.
New Table field in Integration Hub to improve load times
When you edit a recipe in Integration Hub, the system automatically retrieves a comprehensive list of table metadata. For a larger KB, this process can be rather slow and may lead to errors. Now, you can enter a single table name, so that the Hub only retrieves the metadata for the specified table. This cuts down on load time as well as potential errors.
Use Quick Search to find multiple values
When you search on a field in the Quick Search pane, use the new "is contained in" and "is not contained in" operators to apply more sophisticated filtering to your searches. For example, you might use "is contained in" to find all contracts whose status is any of the selected options, instead of having to search for only one status at a time.

To select more than one value in a drop-down list, hold the Shift key as you click. For other field types, you can enter multiple search terms separated by a comma.
Improved DocuSign event tracking and separate Certificates of Completion
This release includes two improvements to your DocuSign integration:
- The new Latest Event field tracks a more granular list of events, so you can see what last occurred with an envelope and its recipients and get additional context beyond the existing status fields. This field is available in both the DocuSign Envelopes and DocuSign Recipients tables. Simply add the field to your record layout or view to take advantage of this new feature.
- Completed DocuSign envelopes can now include both a Certificate of Completion for the envelope and a separate final, signed copy of all the documents in one unified file. If you have configured your envelopes to save a combined file with both the signed documents and the Certificate of Completion in one, you will continue to receive combined files unless you change your settings. To review your settings, follow the steps in the Certificate of Completion section of DocuSign Account Settings.
To take advantage of these improvements, go to Setup > System > Manage Global Variables and locate the DocuSign API Version variable. Edit the variable, set it to "v2.1", and save it. Then, go to Setup > Integration > Configure DocuSign Extension, edit your DocuSign integration, and Disable and then Enable DocuSign Connect.
In addition to these changes, the configuration settings for DocuSign Users now offer only the JWT authentication method, now that the alternate authentication methods are no longer supported by DocuSign. For more information about setting up DocuSign authentication, see DocuSign Setup.
Machine to Machine (M2M) authentication for REST API
The Agiloft REST API now supports client credentials flow, which enables machine-to-machine (M2M) authentication. M2M is beneficial because it enhances security, centralizes API management, standardizes configurations, and eliminates the need for human intervention in the authentication process.
To create the Client Credentials API application:
- Go to Setup > Integration > OAuth2 Client Setup.
- Click New.
- Under Authorization Grant Type, select Client Credentials.
- Add a Name and a Display Name.
- Select a user under Associate this Application with the Contract ID field. This specific user's permission settings are used by the server when handling API calls. In most cases, it is useful to use a dedicated account for this purpose.
- Add the Redirect URI.
- Click Save or Apply Changes.
For more information about M2M use cases, visit the Microsoft documentation on client credentials flow.
CONTENTS
- Use generative AI to streamline contract negotiation, review, and redlining
- Make contract relationships obvious at a glance with tree view
- Browse attachments, approvals, and more directly in table view
- Introducing the Agiloft Google Docs App
- Automatically highlight required clauses missing from a contract
- Word app manifest file improvements
- AI labels now automatically kept up to date
- Annotate contracts directly in the document viewer with AI
- Open .docx files for editing directly from doc viewer
- New API support for the Integration Hub
- New Table field in Integration Hub to improve load times
- Use Quick Search to find multiple values
- Improved DocuSign event tracking and separate Certificates of Completion
- Machine to Machine (M2M) authentication for REST API