...
- Go to https://developers.docusign.com/.
- Click Create Sandbox. You can create an unlimited number of test / developer accounts.
- In the DocuSign website for the account, click your icon and click Go to Admin.In the left pane, click Pclick rmission Sets.Admin at the top
- . In the sidebar, click Permission Profiles.ndthnselect t
- On your permission set, click Actions > View.
Confirm that Allow view and manage envelope rights through API and Allow send on behalf of other users through API are selected.
Tip These options are enabled by default.
- Click on the admin permission profile to open it.
- Go to o the User Permissions tabPermisstab.
- Ensure that the E"Allow send on behalf of other users through API" check box is selected. If the option is disabled, create a copy of the permission set and then select this option.soboother users throu"chckox is slctd. I th optio i disald, ceate acoy f the p et
| Anchor | ||||
|---|---|---|---|---|
|
...
- Log in to your KB as an admin user.
- Navigate to Setup > Integration > DocuSign Extension and click Configure.
- Click Change Server.
- For the initial setup and testing, select the Demo server.
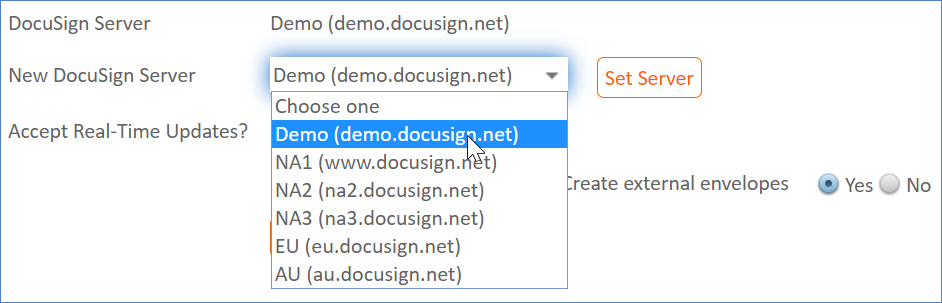
- Click Set Server.
- Optionally, set the Create external envelopes option to "Track envelopes sent outside Agiloft" to Yes or No. If you select Yes,
will create records in the DocuSign Envelopes table when envelopes are created outside theCompanyname
system. If you select No,Companyname
will only accept DocuSign data for envelopes that already have a corresponding record in the DocuSign Envelopes table.Companyname - Optionally, if you have multifactor authentication set up in your system and you don't want users to need to confirm their identity every time they use DocuSign, you can configure your integration to use DocuSign to authenticate users instead. For more information on how to complete this optional process, visit the Avoid Redundant User Authentication section.
- Click Save.
...