Boomi Integration
The Agiloft connector makes it easy to exchange data between Agiloft and applications on the Boomi platform. When you've connected the two systems, you can configure your connector to do any or all of the following:
- Pull data using Get, GetChoiceListId, Query, and Retrieve Attachment
- Add or update data using Create, Update, Delete, Attach, and Remove Attachment
If multiple users need to work with the connector on the Boomi platform, or if one user needs to connect to multiple KBs, configure a connector for each user-KB combination.
Prerequisites
To install and configure this connector, you need:
- The name, domain URL, and login credentials for the Agiloft KB
- Web services enabled in Agiloft, with the user's group listed in the "Groups allowed for REST" field in Setup > System > Manage Web Services
- Familiarity with the REST Interface documentation
Set Up the Connector
First, set up the connector in Boomi.
- Log in to the Boomi platform and open the integration Atom Sphere. If you haven't configured one yet, go to Manage > Atom Management, click New, select "In the Cloud," and create a new atom.
- Under the Component header on the Welcome tab, click Connection.
- In the Component Name field, enter a name for the connection. Usually, it is helpful to include Agiloft in the name.
- In the Folder field, select the folder where you want to place the connection.
- In the Connector field, select Agiloft.
- Click Create.
- In the Settings tab that opens, complete the fields with your REST API details (Where do you find this?):
- In the URL field, enter the URL for the
Agiloft REST API service endpoint. It should follow this syntax:
https://<SERVER>/ewws/ - In the KB Name field, enter the name of the KB you want to connect.
- In the User Login and Password fields, enter the login credentials for the user. Make sure the user's group is listed in the "Groups allowed for REST" field in Agiloft.
- In the URL field, enter the URL for the
Agiloft REST API service endpoint. It should follow this syntax:
- Click Test Connection to make sure your settings are correct, valid, and functioning.
- If the test is successful, click Save.
- If the test isn't successful, check the information you entered in step 3 and then test the connection again.
- Click Save to return to the connector setup.
Now, you are ready to configure one or more operations. You can configure operations for the connector by clicking the plus icon next to the Operation field, or you can use other options in Boomi to add operations in other contexts, such as Process Calls.
Configure Operations
The operations you set up in the connector determine what actions can be taken to retrieve, exchange, and update data.
- If you haven't already, log in to the Boomi platform and open the integration Atom Sphere.
- Under the Component header on the Welcome tab, click Connector Operation.
- In the Component Name field, enter a name for the operation. Usually, it is helpful to include the operation name and any relevant parameters, such as which table the operation is configured for. The Agiloft connection type supports these operations:
- Pull data using Get, GetChoiceListId, Query, and Retrieve Attachment
- Add or update data using Create, Update, Delete, Attach, and Remove Attachment
- In the Folder field, select the folder where you want to place the connection.
- In the Connector field, select Agiloft.
- In the Component Name field, enter a name for the operation. Usually, it is helpful to include the operation name and any relevant parameters, such as which table the operation is configured for. The Agiloft connection type supports these operations:
- Click Create.
- Configure the settings according to the operation you want to configure. For details, see the sections below for specific operators.
After you create a Connector Operation, place it in a Boomi process to put it to use. Each operation listed below includes an example process you can use as a model.
Get Operation
Follow these steps to configure a Connector Operation to use the GET operation:
- In the Connector Action field, select GET.
- On the right-hand side, click Import.
- Select your KB connection.
- If you want to import only some of the available objects, enter a keyword in the Filter field. For example, to import only Contract table objects, enter "contract" in the Filter field.
- Click Next.
- In the Response Profile field, select the GET response profile for the appropriate object.
- In the Error Behavior field, you can choose whether to return error responses when running the operation.

Example Process
In this example process, we use a Message shape to build a GET operation request to find the ID of a requested record, set as a parameter. That request is passed using the Agiloft Connector GET operation. The ID result is returned in JSON format. The Notify shape outputs the result response code and message.

For reference, the Message shape uses these parameters in this example:

GetChoiceListId Operation
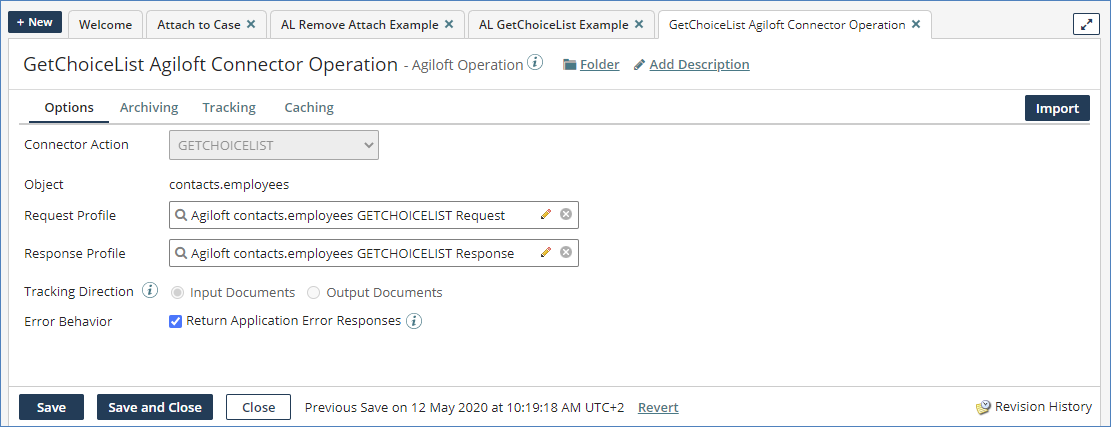
Follow these steps to configure a Connector Operation to use the GETCHOICELIST operation:
- In the Connector Action field, select GETCHOICELIST.
- On the right-hand side, click Import.
- Select your KB connection.
- If you want to import only some of the available objects, enter a keyword in the Filter field. For example, to import only Contract table objects, enter "contract" in the Filter field.
- Click Next.
- In the Request Profile field, select the GETCHOICELIST request profile for the appropriate object.
- In the Response Profile field, select the GETCHOICELIST response profile for the appropriate object.
- In the Error Behavior field, you can choose whether to return error responses when running the operation.
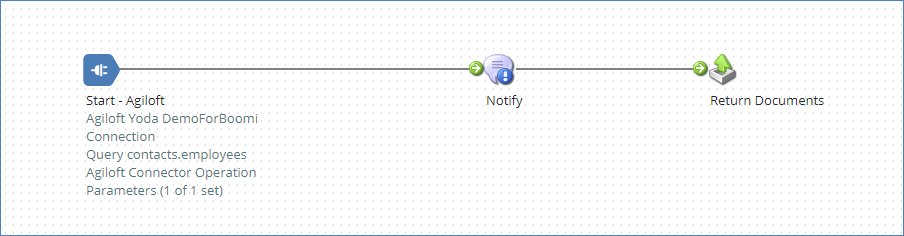
Example Process
In this example process, we use the GETCHOICELISTID operation to retrieve the ID of the Choice list item "On Vacation" used in the "Working Status" field of the Employee table. First, we use a Message shape to construct the request using the JSON GetChoiceListId Request Profile. Then, we use the Agiloft Connector operation to send the request and receive the ID in the JSON GetChoiceListId Response Profile format.

For reference, the Message shape uses these parameters in this example:

Query Operation
Follow these steps to configure a Connector Operation to use the QUERY operation:
- In the Connector Action field, select QUERY.
- On the right-hand side, click Import.
- Select your KB connection.
- If you want to import only some of the available objects, enter a keyword in the Filter field. For example, to import only Contract table objects, enter "contract" in the Filter field.
- Click Next.
- In the Response Profile field, select the QUERY response profile for the appropriate object.
- In the Error Behavior field, you can choose whether to return error responses when running the operation.
- In the Saved Search field, select the saved search used for the query.

Example Process
In this example process, we query all Employee records in the KB for records where the "email" field contains "gmail" in the value. This filter is set in the Parameters tab. The returned value is presented in JSON Query Response Profile.
For reference, the Start shape uses these parameters in this example:

Retrieve Attachment Operation
Follow these steps to configure a Connector Operation to use the ATTACH_RETRIEVE operation:
- In the Connector Action field, select ATTACH_RETRIEVE.
- On the right-hand side, click Import.
- Select your KB connection.
- If you want to import only some of the available objects, enter a keyword in the Filter field. For example, to import only Contract table objects, enter "contract" in the Filter field.
- Click Next.
- In the Request Profile field, select the ATTACH_RETRIEVE request profile for the appropriate object.
- In the Response Profile field, select the ATTACH_RETRIEVE response profile for the appropriate object.
- In the Error Behavior field, you can choose whether to return error responses when running the operation.

Example Process
In this example process, we first use a Message shape to create the input data for the ATTACH_RETRIEVE operation. Then, we use the Agiloft Connector shape to use the ATTACH_RETRIEVE operation to get the attachment in the form of a JSON Retrieve Attach Response Profile. We then use another Message shape to extract the file data. The attachment is received in Base64, so we have to decode the value. Finally, in this example, we save the file locally using a Disk Connector.

For reference, the first Message shape uses these parameters to create the operation's input data:

The second Message shape uses these parameters to extract the file data:

Create Operation
Follow these steps to configure a Connector Operation to use the CREATE operation:
- In the Connector Action field, select CREATE.
- On the right-hand side, click Import.
- Select your KB connection.
- If you want to import only some of the available objects, enter a keyword in the Filter field. For example, to import only Contract table objects, enter "contract" in the Filter field.
- Click Next.
- In the Request Profile field, select the CREATE request profile for the appropriate object.
- In the Response Profile field, select the CREATE response profile for the appropriate object.
- In the Error Behavior field, you can choose whether to return error responses when running the operation.

Example Process
In this example process, we first use a Message shape to describe the record we want to create, using the JSON Create Request Profile. This data is passed using the Agiloft Connector CREATE operation, and the operation produces a JSON Create Response Profile when the process completes.

For reference, the Message shape uses these parameters in this example:

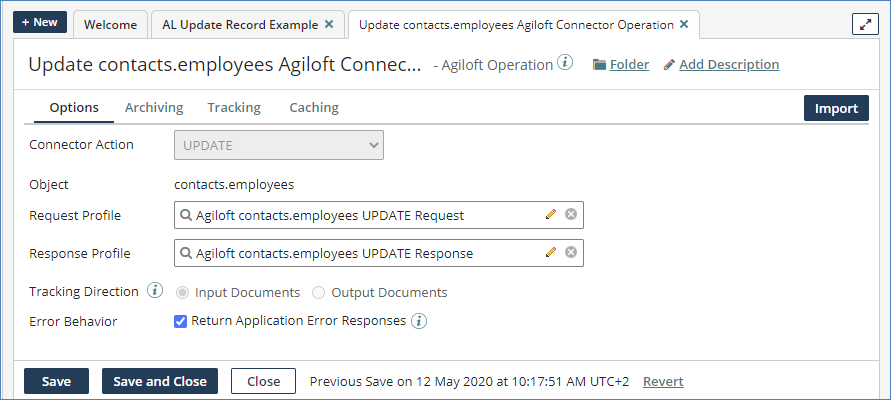
Update Operation
Follow these steps to configure a Connector Operation to use the UPDATE operation:
- In the Connector Action field, select UPDATE.
- On the right-hand side, click Import.
- Select your KB connection.
- If you want to import only some of the available objects, enter a keyword in the Filter field. For example, to import only Contract table objects, enter "contract" in the Filter field.
- Click Next.
- In the Request Profile field, select the UPDATE request profile for the appropriate object.
- In the Response Profile field, select the UPDATE response profile for the appropriate object.
- In the Error Behavior field, you can choose whether to return error responses when running the operation.
Example Process
In this example process, we first use a Message shape to create a sample record and update, compatible with the JSON Update Request Profile. This is sent using the UPDATE operation to the KB, which returns a JSON Update Response Profile.

For reference, the Message shape uses these parameters in this example, with a placeholder record ID:

Delete Operation
Follow these steps to configure a Connector Operation to use the DELETE_RECORD operation:
- In the Connector Action field, select DELETE_RECORD.
- On the right-hand side, click Import.
- Select your KB connection.
- If you want to import only some of the available objects, enter a keyword in the Filter field. For example, to import only Contract table objects, enter "contract" in the Filter field.
- Click Next.
- In the Request Profile field, select the DELETE_RECORD request profile for the appropriate object.
- In the Response Profile field, select the DELETE_RECORD response profile for the appropriate object.
- In the Error Behavior field, you can choose whether to return error responses when running the operation.

Example Process
In this example process, we use a Message shape to construct the request, compatible with the JSON Delete Request Profile. We then pass the request into the DELETE operation

Attach Operation
Follow these steps to configure a Connector Operation to use the ATTACH operation:
- In the Connector Action field, select ATTACH.
- On the right-hand side, click Import.
- Select your KB connection.
- If you want to import only some of the available objects, enter a keyword in the Filter field. For example, to import only Contract table objects, enter "contract" in the Filter field.
- Click Next.
- In the Request Profile field, select the ATTACH request profile for the appropriate object.
- In the Response Profile field, select the ATTACH response profile for the appropriate object.
- In the Error Behavior field, you can choose whether to return error responses when running the operation.

Example Process
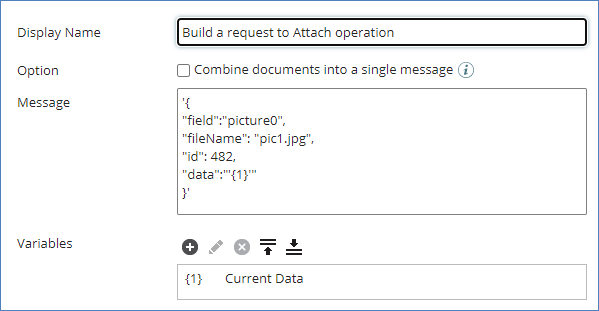
In this example process, we first retrieve a sample logo.png image from a Google website and then encode it in Base64 format as a string. In the Message shape, we build a JSON Attach Request to send to the KB. The Agiloft Connector shape uses the ATTACH operation to attach the encoded file to the specified record in the Employee table. Afterward, it returns the JSON Attach Response Profile.

For reference, the Message shape uses these parameters in this example:
Remove Attachment Operation
Follow these steps to configure a Connector Operation to use the ATTACH_REMOVE operation:
- In the Connector Action field, select ATTACH_REMOVE.
- On the right-hand side, click Import.
- Select your KB connection.
- If you want to import only some of the available objects, enter a keyword in the Filter field. For example, to import only Contract table objects, enter "contract" in the Filter field.
- Click Next.
- In the Request Profile field, select the ATTACH_REMOVE request profile for the appropriate object.
- In the Response Profile field, select the ATTACH_REMOVE response profile for the appropriate object.
- In the Error Behavior field, you can choose whether to return error responses when running the operation.

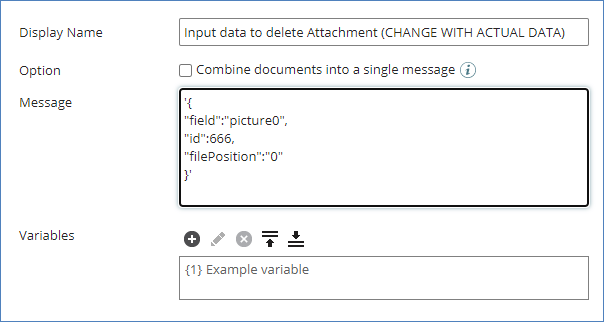
Example Process
In this example process, we create the JSON Remove Attach Request Profile in a Message shape and send it using the ATTACH_REMOVE operation. Afterward, it returns the JSON Remove Attach Response Profile.

For reference, the Message shape uses these parameters in this example, leaving placeholders for the values: