This topic explains how to establish the connection to the SOAP interface via the WSDL, and test several of the available requests. Ideally these tests should be performed on a 'clean' knowledgebase, prior to setting up complicating factors such as WS-Security. The instructions in this topic use SOAPUI as a reference point, but you can use another tool and adapt the instructions if you prefer.
- Using SOAP requires the Advanced or Premium edition of
 . . - You must have the admin login details for your knowledgebase.
- Download and install SoapUI from here: https://www.soapui.org/downloads/soapui.html. The Open Source edition works for the testing described here.
|
Enable Web Services in the KB
- In the knowledgebase, click the Setup gear in the top-right corner and go to System > Manage Web Services.
- Select version 2 of SOAP and click Enable WS. Wait for web services to be enabled, and the wizard to refresh.

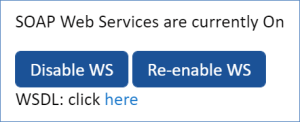
- The Enable WS button is replaced by two new buttons, and the message now says SOAP Web Services are on.

- Make sure that only the admin group has access to the SOAP and REST services.
- Click the link to the WSDL, which opens a new tab in the URL format: https://<SERVER>/ewws/<KBNAME>/EWServiceAPIv2?wsdl
Add the WSDL to SOAPUI
- In SOAPUI, click the SOAP icon to create a new SOAP project.
- Enter a name for the project, and in the Initial WSDL field paste the URL to the
 WSDL.
WSDL. - Ensure that Create sample requests for all operations? is selected, and click OK. This creates the project, with all of the available SOAP calls listed.
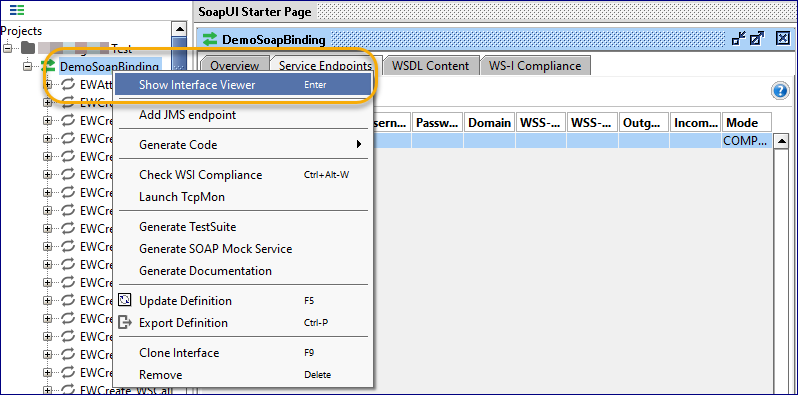
- Expand the first level to see the full project menu, right click
DemoSoapBinding, and select Show Interface Viewer.

- Open the Service Endpoints tab of the interface viewer, and check the details of the WSDL URL. It should be formed as above. Select the endpoint and click Assign.
- In the Assign Endpoints dialog, select All Requests from the drop-down list, and click OK.
- Exit the interface viewer.
Test the SOAP Calls
At this point, you can test the calls from SOAP to the knowledgebase. To test a call from the list:
- Expand it to see the request, then double click the request.
- Replace the existing parameters - which are written in the format
<ParameterName>?</ParameterName> - with the relevant values from the knowledgebase - Click the green arrow to run the request.

Follow the example test cases below to test some of the available requests. Many of the examples below use the Support Cases table (WSCase) to test the requests.
 EWLogin
Add the following values to the EWLogin request:
<dem:EWLogin>
              <String_1>KBNAME</String_1>
              <String_2>admin</String_2>
              <String_3>admin_password</String_3>
              <String_4>en</String_4>
</dem:EWLogin> |
Click Run. This returns something similar to the following response, which includes a session string between the <result> tags:
<env:Envelope xmlns:env="https://schemas.xmlsoap.org/soap/envelope/">
   <env:Header/>
   <env:Body>
      <demo:EWLoginResponse xmlns:demo="https://Demo.api.ws.enterprisewizard.com">
         <result>78658161687694</result>
      </demo:EWLoginResponse>
   </env:Body>
</env:Envelope> |
- Change the password in string_3 to an incorrect value and click Run.
- An error message similar to the following appears:
<message>[http-0.0.0.0-80-1][1618616486d] login/password combination admin/****** for knowledgebase KB1</message>
- Set the username and password to an existing, non-admin user and click Run.
An error message similar to the following appears:
<ns1:EWPermissionException xmlns:ns1="https://api.ws.enterprisewizard.com" xmlns:xsi="https://www.w3.org/2001/XMLSchema-instance">
<message>not allowed, please check logs</message>
</ns1:EWPermissionException> |
- Enter the correct admin username and password again and click Run.
- Write down the session string, which will be used in later tests.
EWRead
Add the following values to the EWRead_WSCase request and click Run:
<dem:EWRead_WSCase>
                   <sessionId>SESSIONID_FROM_LOGIN_RESPONSE</sessionId>
                   <recordID>0</recordID>
</dem:EWRead_WSCase> |
- An error message similar to the following appears:
<message>[http-0.0.0.0-80-6][1503916816216] no data found for 0</message>
- Replace the recordID with an existing Support Case record in the KB.
- The response is an XML string with the details of the Support Case record.
EWSelectFromTable
In the Support Cases table, create a new record and assign it to the system user 'Ralph Knowles'; or if the user does not exist, assign them to another user and replace String_3 below with their name.
Add the following values to the EWSelectFromTable request and click Run:
<dem:EWSelectFromTable>
                   <String_1>SESSIONID_FROM_LOGIN_RESPONSE</String_1>
                   <String_2>case</String_2>
                   <String_3>assigned_person='Ralph Knowles'</String_3>
</dem:EWSelectFromTable> |
- The response returns the ID of the Support Case, as well as any other Support Case records assigned to that user.
- Modify the string_3 parameter with a SQL query, which returns the record with the highest ID from the table. Note that the
[DB_TABLE_NAME] can be found in the Table Name field of the General tab of the Table wizard. Click Run.- The response returns the ID of the highest record number for the Support Case table.
EWSelectAndRead
Add the following values to the EWSelectAndRead_WSCase request and click Run:
 <dem:EWSelectAndRead_WSCase>
              <sessionId>SESSIONID_FROM_LOGIN_RESPONSE</sessionId>
              <where>assigned_person='Ralph Knowles'</where>
</dem:EWSelectAndRead_WSCase> |
- The response returns the details of any records assigned to user Ralph Knowles.
- Modify the <where> condition so that it finds only one record; for example:
<where>assigned_person='Ralph Knowles' and wfstate=1</where>, and click Run.- The response contains the full data of that record.
EWCreate
Open the EWCreate_WScase request.
Remove all of the field tags apart from problem_Description and summary, and add the parameter values in this way, then click Run:
 <dem:EWCreate_WSCase>
              <sessionId>SESSIONID_FROM_LOGIN_RESPONSE</sessionId>
              <WSCase>
                             <problem_Description>Test ticket for SOAP</problem_Description>
                             <summary>SOAP test create</summary>
              </WSCase>
</dem:EWCreate_WSCase> |
- This request creates a very basic new record in the Support Cases table. The response gives the record ID in this way:
<result>361</result>. - In the KB, locate the new record to verify that it was created successfully.
EWCreateAndRead
- Open the
EWCreateAndRead_WSCase request. Remove all of the field tags inside <WSCase> apart from problem_Description and summary, and add the parameter values in this way, then click Run:
 <dem:EWCreateAndRead_WSCase>
<sessionId>SESSIONID_FROM_LOGIN_RESPONSE</sessionId>
              <WSCase>
                             <problem_Description>Test ticket 2 for SOAP</problem_Description>
                             <summary>SOAP test create and read</summary>
              </WSCase>
</dem:EWCreateAndRead_WSCase> |
- This request creates a basic new record in the Support Cases table. The response gives the full data for the new record.
- In the KB, locate the new record to verify that it was created successfully.
EWUpdate
- Open the
EWUpdate_WSCase request. Remove all of the field tags apart from ID and Priority and add the parameter values in this way, then click Run:
<dem:EWUpdate_WSCase>
                   <sessionId>SESSIONID_FROM_LOGIN_RESPONSE</sessionId>
                   <WSCase>
                                  <id>RECORD_ID_FOR_UPDATE</id>
                                  <priority>OPTION_CRITICAL</priority>
                   </WSCase>
</dem:EWUpdate_WSCase> |
- This request changes the priority of the Support Case record to Critical. The response gives the full data for the updated record.
- In the KB, locate the record and check that its priority was changed.
EWDelete
Add the following values to the EWDelete request and click Run:
 <dem:EWDelete>
              <String_1>SESSIONID_FROM_LOGIN_RESPONSE</String_1>
              <String_2>case</String_2>
              <arrayOflong_3>
                             <value>RECORD_ID_FOR_DELETE</value>
              </arrayOflong_3>
              <DeleteRule_4>APPLY_DELETE_WHERE_POSSIBLE</DeleteRule_4>
              <arrayOflong_5>
              </arrayOflong_5>
</dem:EWDelete> |
- This request deletes the record number in the KB. The response shows no record data.
- In the KB, search for the record and confirm that it was deleted.
- Execute the same request with the identical settings and check that the response is similar to the following:
<message>[http-0.0.0.0-80-5][1504006477104] Operation cannot be done. Not all records can be removed.</message>
EWGetChoiceLineID
Add the following values to the EWGetChoiceLineID request and click Run:
 <dem:EWGetChoiceLineId>
              <String_1>SESSIONID_FROM_LOGIN_RESPONSE</String_1>
              <String_2>case</String_2>
              <String_3>priority</String_3>
              <String_4>Critical</String_4>
</dem:EWGetChoiceLineId> |
- This request returns the line number in the
Priority choice list for the value Critical. The response is a value like <result>6</result>. - Change the
<String_4> value to a non-existent priority and click Run.- The response is similar to the following message:
<message>[http-0.0.0.0-80-4][1504007797277] No choice line found for value Defcon 6</message>
- Change the
<String_3> value to some non-choice field like 'summary' and click Run.- The response is similar to the following:
<message>[http-0.0.0.0-80-4][1504007877613] unexpected exception: null</message>.
EWAttachFromSOAPAttachment
Create a txt file with the file name testfile, and save it to a location on your system.
Add the following values to the EWAttachFromSOAPAttachment request, replacing the <key> value with an existing Support Case record number:
<dem:EWAttachFromSOAPAttachment>
              <sessionId>SESSIONID_FROM_LOGIN_RESPONSE</sessionId>
              <tableName>case</tableName>
              <key>419</key>
              <fieldName>downloadable_files</fieldName>
              <fileName>testfile.txt</fileName>
</dem:EWAttachFromSOAPAttachment> |
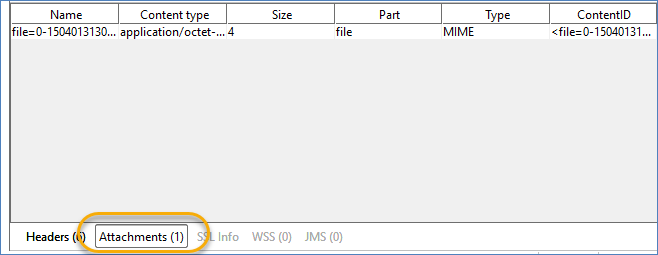
- Click Attachments below the request window, then click + and select the
filename.txt file from your system.

- Click Run. The request attaches the file to the record in the Support Case table. The response is similar to
<result>1</result>. - In the KB, open the record and check that the file has been attached to the Downloadable Files field.

- Create a new file and execute the same request again with it. Check that the result has been incremented to
<result>2</result>.- In the KB, open the record and check that the new file was added to the Downloadable Files field.
EWRetrieveAttachedAsSOAPAttachment
Add the following values to the EWRetrieveAttachedAsSOAPAttachment request, replacing the <key> value with the Support Case record number from the example above, then click Run:
 <dem:EWRetrieveAttachedAsSOAPAttachment>
              <sessionId>SESSIONID_FROM_LOGIN_RESPONSE</sessionId>
              <tableName>case</tableName>
              <key>419</key>
              <fieldName>downloadable_files</fieldName>
              <filePosition>1</filePosition>
</dem:EWRetrieveAttachedAsSOAPAttachment> |
- The request retrieves the attached file from the Downloadable Files field with a file position of 1. The response doesn't show any data, but below the response window the Attachments button indicates that there is 1 attachment.

- In the request, change the
<filePosition> vaue to an incorrect attachment number like 80, then click Run.- The response is similar to the following:
<message>[http-0.0.0.0-80-7][1504013330298] Blob field id in table case does not contain 81 files, but less (2) for key 419</message>
EWRemoveAttached
Add the following values to the EWRemoveAttached request, replacing the <long> value with the Support Case record number from the example above, then click Run:
<dem:EWRemoveAttached>
                   <String_1>SESSIONID_FROM_LOGIN_RESPONSE</String_1>
                   <String_2>case</String_2>
                   <long_3>419</long_3>
                   <String_4>downloadable_files</String_4>
                   <int_5>1</int_5>
</dem:EWRemoveAttached> |
- The request removes the first attached file from the Downloadable Files field. The response is similar to
<result>1</result>, with the number in the <result> tag being the number of remaining attached files. - In the KB, open the record and check that the first file was removed from the Downloadable Files field.
 EWSearchTable
Add the following values to the EWSearchTable request, then click Run:
 <dem:EWSearchTable>
              <String_1>SESSIONID_FROM_LOGIN_RESPONSE</String_1>
              <String_2>case</String_2>
              <arrayOfString_3>
                             <value>id</value>
                             <value>summary</value>
              </arrayOfString_3>
              <String_4>Open Cases</String_4>
</dem:EWSearchTable> |
- The request searches the Support Cases table for all records with a status of Open. The response shows the field values for each of the open cases.
- Change the search name in String_4 to a non-existent search and click Run. The response is similar to
<message>No search=Open Cas for table=WSCase</message>.
EWSearchTablePaginated
Add the following values to the EWSearchTablePaginated request, then click Run:
 <dem:EWSearchTablePaginated>
              <String_1>SESSIONID_FROM_LOGIN_RESPONSE</String_1>
              <String_2>case</String_2>
              <arrayOfString_3>
                             <value>id</value>
                             <value>summary</value>
              </arrayOfString_3>
              <String_4>Open Cases</String_4>
              <int_5>0</int_5>
              <int_6>1</int_6>
</dem:EWSearchTablePaginated> |
- The request searches the Support Cases table for the first page number (int_6) of the first record (int_5). The response shows the fields on page 0 of the first record in the table.
- Modify the
<int_6> value to 2 (record count), then click Run.- The response shows the fields from the first two records.
- Modify the
<int_5> value to 1 (page number), then click Run.- The response shows the first two records on page 1 of the table.
- Modify the
<int_value> to 777, then click Run.- The response shows no records.
- Modify
<int_5> to 0, and <int_6> to 1000, then click Run.- The response shows all records in the table.
EWSearchTableWithQuery
Add the following values to the EWSearchTableWithQuery request, then click Run:
<dem:EWSearchTableWithQuery>
                   <String_1>SESSIONID_FROM_LOGIN_RESPONSE</String_1>
                   <String_2>case</String_2>
                   <arrayOfString_3>
                                  <value>id</value>
                                  <value>summary</value>
                                  <value>priority</value>
                   </arrayOfString_3>
                   <String_4>Open Cases</String_4>
                   <String_5>priority='Low'</String_5>
</dem:EWSearchTableWithQuery>
|
- The request searches the Support Cases table for all open cases with a priority of Low. The response shows the fields for all records in Open status with a Priority of Low, including the ID Summary and Priority fields.
- Change the condition for
<String_5> to something like <String_5>priority='Low'&& summary~='How'</String_5>, then click Run.- The response should return no errors and there should be a record data where the Summary field contains the word 'How'.
- Change the search in
<String_4> to a non-existent value, then click Run.- The response is something like
<message>No search=Cases for table=WSCase</message>
EWSearchTableWithQueryPaginated
Add the following values to the EWSearchTableWIthQueryPaginated request, then click Run:
 <dem:EWSearchTableWithQueryPaginated>
              <String_1>SESSIONID_FROM_LOGIN_RESPONSE</String_1>
              <String_2>case</String_2>
              <arrayOfString_3>
                             <value>id</value>
                             <value>summary</value>
              </arrayOfString_3>
              <String_4>Open Cases</String_4>
              <String_5>priority='Low'</String_5>
              <int_6>0</int_6>
              <int_7>1</int_7>
</dem:EWSearchTableWithQueryPaginated> |
- The request searches the Support Cases for open cases with a priority of Low, in the first record (int_7) on the first page (int_6) in the table. The response shows all fields from that record.
- Modify the
<int_7> value to 2, to find the first two records, then click Run.- The response shows all the fields in the first two records on the first page of the table that match the search query.
- Modify the
<int_6> value to 777 to find the first two records on the 777'th page of the table, then click Run.- The response shows no records.
- Set the
<int_6> value to 0, and <int_7> to 1000, then click Run.- The response shows the fields for all records in the table.
EWLogout
Add the following values to the EWLogout request, then click Run:
 <dem:EWLogout>
              <String_1>SESSIONID_FROM_LOGIN_RESPONSE</String_1>
</dem:EWLogout> |
- The request logs out the session. The response doesn't have any errors.
- Execute any of the previous requests with the same values. The response is similar to
<message>[http-0.0.0.0-80-7][1504083695004] not logged in or this session has timed out</message>
Deactivate Web Services
- As the admin user, log into the testing knowledgebase, then go to Setup > System > Manage Web Services.
- Click Disable WS.
- The message changes to "SOAP Web Services are currently Off".
- Try to perform the test case for EWLogin.
- The response is similar to
HTTP Status 404 - /ewws/Demo/EWServiceAPIv2.
Testing SOAP Security
The following examples enables you to test the security of your SOAP application. Leave your instance of SOAPUI configured as above.
Add WS-Security to Web Services
- In the KB, go to Setup > System > Manage Web Services. Check that the wording states "SOAP Web Services are currently Off".
- Check that 'version 2', and the WS-Security enabled checkbox, are both selected.
- Write down the current TTL value - 10 by default.
- Click Enable WS.
- Select the 'admin' group for SOAP groups, even if it already shows the group as being selected.
- Click Finish, then reopen the Web Services screen.
- Check the wording states "SOAP Web Services are currently On".
Login Without Security
- In SOAPUI, try to perform the test case forEWLogin.
- The response says something like
<faultstring>This service requires <wsse:Security>, which is missing.</faultstring>.
Configure SOAPUI for WS_Security
- In SOAPUI, double click the project root to open the settings wizard.
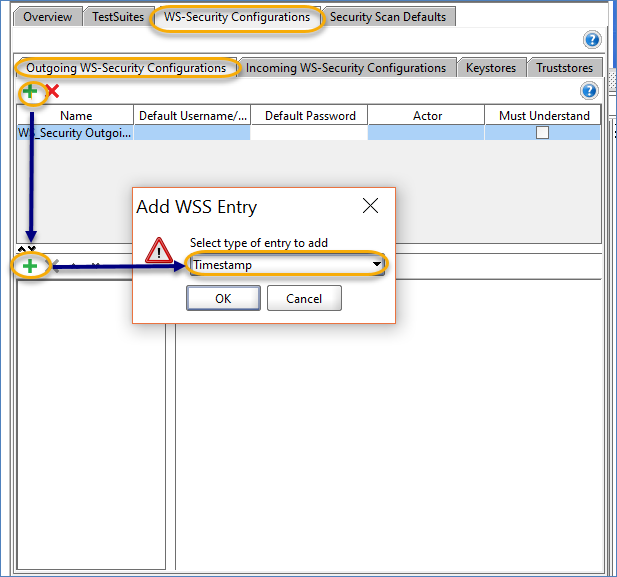
- Open the WS_Security Configurations tab to the Outgoing WS-Security Configurations tab.
- Click + then add a name in the dialog, and save it.
- In the bottom pane, click + then in the ADD WS Entry dialog, select Timestamp. Click OK.

- Click OK.
- In the Time To Live field that appears, enter the TTL value in the
 Web Services wizard.
 - Exit from the settings wizard.
Login with Security
- In SOAPUI, select the EWLogin request, right click in the window and select Outgoing WSS > Apply <WS Config Name>.

- Click Run.
The response returns new timestamp data similar to the following:
 <wsse:Security ...>
              <wsu:Timestamp wsu:Id="timestamp">
              <wsu:Created>2016-10-12T13:54:35.482Z</wsu:Created>
              <wsu:Expires>2016-10-12T13:54:45.482Z</wsu:Expires>
</wsu:Timestamp>
</wsse:Security> |
EWSearchTable with Security
- Reopen the EWSearchTable request and add the Session ID from the previous example, then click Run.
- The response is similar to
<faultstring>This service requires <wsse:Security>, which is missing.</faultstring>. - Right click in the window and select Outgoing WSS > Apply <WS Config Name>, then click Run.
- The response returns the record data, with an additional <wsse:Security> section with timestamps.
Related articles
|
.


