Table Wizard
The Table wizard is used to act on whole tables, including creating and editing them, and even hiding or deactivating them. You can create any number of new tables. When editing a table, you can customize it in a variety of ways, such as its permissions, fields, actions, rules, and more.
To edit a single table, simply expand it in the navigation menu and click Setup [Table]. To act on the entire table by hiding or deleting it, or to create a new table or edit multiple tables, click the Setup gear in the top-right corner and click Tables to see the full table tree.

From Setup > Tables, you can Hide or Unhide a table from all users, Deactivate existing tables to completely disable them in the system, and Print Fields for all Tables to quickly create an Excel reference sheet of all fields in all tables.
Creating New Tables
To create a new table or subtable:
- Go to Setup > Tables.
- In the table tree, select:
- Table Tree to create a new table
- An existing table to create a new subtable
- Click New. The table wizard opens.
- Before fully configuring the table, it's wise to set only the necessary options and then create the table, to make sure the system creates the table successfully. Begin on the General tab.
- On the General tab, enter a Table Label, which automatically populates the plural label and table name.
- On the Graphics tab, choose an icon for the table. You can also set different icons to use when the table is deselected or when this table is the last one the user opened.
- Go to the Navigation Menu tab.
- Select the "Add this table to the following navigation menus" checkbox and choose the appropriate menus. This makes the new table appear in the navigation menu for easy access and further configuration.
- Click Finish to create the table.
- Click Setup [Table] in the navigation menu and configure the rest of the settings.
Best Practice Tips
When creating a new table, save the table before adding too many new fields. This can prevent problems when the system generates the table.
Editing Default Table Settings
To edit the default table settings for new tables:
- Go to Setup > Tables.
- In the table tree, select Table Tree.
- Click Edit. The Table wizard opens.
Make any desired adjustments to the default table settings. These changes aren't applied to existing tables, with the exception of adding new default fields. Only new tables inherit the other settings chosen here.
If you add new default fields, they are added to all existing tables. This process can take a long time in a live system, and the process also locks all the tables, preventing users from working with records. If you need to add new default fields, it's usually best to do it outside of working hours.
Editing Existing Tables
To edit a table or subtable:
- If the table is included in the navigation menu, expand it and click Setup [Table].
- If the table isn't in the navigation menu:
- Go to Setup > Tables and select the table in the tree.
- Click Edit. The Table wizard opens.
Deleting Existing Tables
It's almost always best to deactivate a table rather than delete it. Deleting a table also dismantles its linked fields, actions, and rules, which might be connected to other tables behind the scenes. If you deactivate a table, it is disabled from use and hidden from users, without deleting those elements that other tables might be using.
Deactivating a table also deactivates and hides all of its subtables. You can't deactivate a subtable directly; if you need to remove a subtable, but keep the parent table, select the subtable and click Hide.
To deactivate a table:
- Go to Setup > Tables and select the table in the tree.
- Click Deactivate. This both deactivates the table and hides it from users. You do not need to also click Hide.
Using the Table Wizard
Use the following tabs on the Table Wizard when you create or edit a table or subtable.
General
The General tab allows you to configure several settings:
- Set the table's label and plural label
- Choose a table name
- Choose whether the table is deletable or not
- Apply a saved search automatically when the table is opened from the left pane
- Hide the table label from certain groups
Graphics
The Graphics tab is where you can select the icon used to represent the table and set certain icon properties, such as how the icon displays in the left pane. This tab also shows icons currently used in other tables, provides a selection of icons, and offers a way to upload additional custom icons.
It usually looks best to choose the Default Unselected Icon for the "Icon When Table is Unselected" and "Last Opened Icon" options.
Fields
The Fields tab provides a full list of all fields in the table, regardless of whether they appear on the record form. Fields are listed alphabetically by label and may be deleted from this screen. You can also launch the Field wizard from this screen to edit existing fields or create new fields. The Data Type column identifies fields by type, such as linked field, related table, or other data type. You can see a full list of available data types by hovering over New.
You can select multiple fields and click Set Field Properties to configure field visibility, edit dependence, and more. To view information about fields in the table, such as admin notes, date updated, history entries, and other attributes, select the desired field(s) and click Print Field Documentation.
When you create a new field, it won't appear on any forms until you add the field to the layout and grant permission for groups to view it.
Layout
The Layout tab controls how record forms appear for power and end users. Each available field is listed on the left sidebar, which you can search to find specific field names. Drag and drop the fields into place on the layout. The top toolbar offers Undo, Redo, options to add or remove rows and columns, controls for section headings and tabs, and more. Fields that aren't dragged onto the layout are not shown to users.
For more information, see Layouts.
Action Bar
The Action Bar tab allows you to view existing action bars for the table. You can click New to launch a wizard and create a new action bar, or you can click one of the Edit icons to configure an existing action bar. You can also copy or delete actions bars from this screen. Action bars, which allow you to perform a variety of actions, can be used in the current table and when records from the current table appear in other tables. They appear above the table view and above tables embedded within records.
![]()
For more information, see Action Bars.
Navigation Menu
The Navigation Menu tab lets table admins force an update to a navigation menu configuration, based on the default navigation menu for the team.
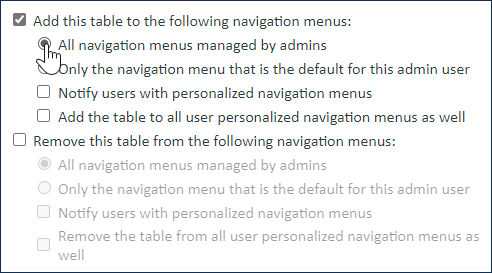
For example, if the default navigation menu for Sheila's team includes the Incidents menu, but Sheila used her personal preferences to remove the Incidents table from her navigation menu, the table admin can use this tab to add the Incidents table back to Sheila's navigation menu. To do so, the admin selects the "Add the table to all user personalized navigation menus as well" checkbox shown above.
If the table admin adds the Approvals table, which isn't included in the default navigation menu for Sheila's team, nothing changes in Sheila's navigation menu. Likewise, if a table admin adds a table that is included on the default navigation menu, and Sheila hasn't removed it, nothing changes for her and she doesn't receive a notification.
Actions
The Actions tab allows you to create, edit, and delete all table actions. You can delete actions directly from this tab, or you can click one of the "Create..." action type buttons to launch a wizard to create a new action. You can also select an existing action and click Edit to launch a wizard to configure the action. This tab functions identically to the action wizards in rules or actions buttons.
For more information, see Actions.
Rules
The Rules tab allows you to create, edit, and delete all table rules. This tab functions identically to the rules wizard accessed elsewhere. For more information, see Rules.
Workflow
The Workflow tab allows you to create or edit the table workflow. For more information, see Workflows.
Permissions
Record Ownership is defined on the Permissions tab, which determines whether a user "owns" the record or not. These settings have a significant impact on record-level permissions, since view and edit permissions are separate for "my own" and "other people's" records.
This tab also contains shortcuts for basic group permission settings which are otherwise set in the Table Permissions Wizard.
Indexes
The Indexes tab allows you to create indexes that work on specific fields to improve saved or advanced ad-hoc search speed. However, the process is resource intensive and should be turned off for tables where it is unnecessary. For more information, see Indexing.
Conversion
The Conversion tab allows you to set up conversion mappings to automatically create new records in one or more other tables, mapping values from fields in the current table. The maximum number of possible conversion mappings is 99 per table.
Examples
Conversions have many uses:
- Convert leads into contacts, companies, and opportunities.
- Generate new records from a set of base records on a regular basis such as monthly to do's from a set of scheduled recurring tasks.
- Reassign records from the wrong table to the right table, such as if customers submit an issue to the wrong table.
- Collect information in one table and then populate it to several other tables automatically.
For more examples, explore some of the existing conversion mappings in the out-of-the-box setup.
For more information on conversion permissions, actions, and setup, see Data Conversion.
History
The History tab displays a list of history entries for the table, with each entry providing the user, a timestamp, and a description of the history event. The Clear History button removes all the entries on the tab.
API
The API tab allows you manage REST services and SOAP Web Services for the table. For more information, see SOAP and REST API Web Services.