Once
| Companyname |
|---|
Setup.exe file or Setup.sh file located in your | Companyname |
|---|

Status
The Status window tells you whether the
| Companyname |
|---|

Settings
The Settings window allows you to manage the amount of ram allocated for the database and application servers. In addition, you can add configuration options for the database and Jboss, and select the database connection type. To see a list of the available JBoss configuration options, click More...

Web Server
Web server settings are defined during initial installation, but can be changed later in the Web server section of the Setup menu. You may change all parameters related to external web server integration, as well as those for the built-in Apache Tomcat server. The input fields are described in more detail in the Database Server section of
| Companyname |
|---|
Service Control
The Service Control menu contains the settings for
| Companyname |
|---|
- How the system should handle stop and restarting the database or JBoss server, and which service should be affected when a start/stop/restart happens
- Memory dumps
- Broadcast messages
- Start/stop timeouts
- Duration of inactivity value for the broadcast message during the outage
- How to monitor the services
Software Update
Updating an
| Companyname |
|---|
For more information on updating to a newer version of
| Companyname |
|---|
,
upgrade to the current version of| Companyname |
|---|
see Upgrade Guide.
In general, the update process has the following stages:
- Back up everything that should be backed up. This may include KBs, software code, database files, etc., depending on what is to be updated.
- Obtain new licenses for the new release, if it is a major upgrade with a new main version number.
- Run the automated
software update to replace installed software and/or data that should be updated.Companyname - Roll back to pre-update state if something goes wrong.
There are three ways to run the update process:
Online update
The online update option is the simplest method. Run Setup and select Software Update from the main menu, then click Check for updates online. Setup will automatically check to see if a new version of
| Companyname |
|---|
Manual update
If an earlier release of
| Companyname |
|---|
| Companyname |
|---|
Command line utility ewupdate
The ewupdate command line utility performs an update with all default options if run without any arguments. Use the –help option to print a short help screen. If you wish to use the command line updater with non-default options, use the command line arguments listed below.
Command line options
These options are also available using the ewupdate utility. Default options can be changed using the command-line options listed, which correspond to the options presented in web GUI mode. For additional update options, use the –help command to print a list of commands.
Update option | Corresponding ewupdate command-line option | Description | |
|---|---|---|---|
Backup database data using OS-level backup | -k,--skiposlevel | This command only applies if the built-in MySQL server is used. Under normal circumstances a full OS-level backup is made. Use this option to skip the default OS-level backup of the MySQL directory. No database restoration will be possible if the upgrade fails. | |
Skip checkers unless any patchers were run | -p,--scup | When the application server starts it performs data checks for consistency; data checking may take a long time. Use this option to skip data checking if no data was changed on update. This may speed the application server starting. | |
Skip project backup if possible | -K,--skipprjbckp | At the very beginning of the update process all existing projects are saved to the backup directory. If this option is set then no project backup is performed, if allowed. Project backup is required in some update modes. | |
Don't delete temporary files after update | -t,--keeptemp | Upon update, temporary files are normally stored on the hard drive. These may include data backups, unpacked new
| |
Don't backup temporary files - logs etc
| -i,--backuptemp | If this option is set then no temporary files such as log files are backed up before the update. This saves used disk space and shortens elapsed time. |
Update options
Update options allow the user to set certain update process details. When performing an update in web GUI mode, you can change the default options on the update options page, shown below:

Backup
The Backup window allows you to store all
| Companyname |
|---|
| Companyname |
|---|
To create a backup...
- Click Backup in the Setup Assistant.
- Select a folder path - either the default, or a custom folder.
- Click Perform backup.
Restore
The Restore window restores all projects stored in
| Companyname |
|---|
admin.xml.ew should be present in the backup directory. If no database cleaning is performed before restoration, then to avoid overwriting the active admin console KB, admin.xml.ew should not be in the directory.Product Reset
Database resetting performs a low-level erase of the entire
| Companyname |
|---|
Snapshots
A snapshot in
| Companyname |
|---|
| Companyname |
|---|
...
| Warning | |
|---|---|
This operation cannot be undone; the current
|
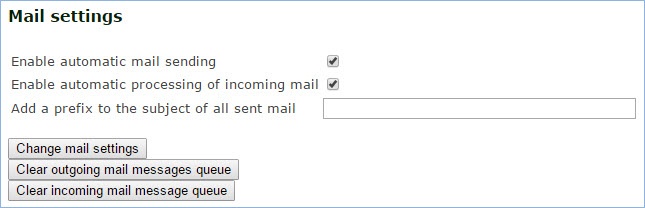
Mail Settings
The Mail settings Setup page allows the user to configure the most common mail system properties.
| Companyname |
|---|
Disabling email processes is also useful for debugging. The option 'Add a prefix to the subject of all sent mail' can be used for debugging, or to label all emails sent from the server as belonging to a test server.
To disable outgoing or incoming email message processing...
- Navigate to the Mail Settings page of the Setup utility.
- To turn off outbound email, deselect the checkbox next to 'Enable automatic mail sending.'
- To turn off inbound email processing, deselect the checkbox next to 'Enable automatic processing of incoming mail.'
When inbound or outbound mail processing is disabled, messages still waiting to be processed are stored in queues. When mail processing is re-enabled, these messages will be sent or delivered. In order to prevent this, clear the outbound or inbound mail queue before re-enabling email processing.
To clear email queues for the whole server...
- From the Mail settings page, use the following buttons:
- Clear outgoing mail messages queue – this clears any outbound emails stored in the system but not sent.
- Clear incoming mail message queue – this clear any inbound emails received but not yet processed by the system.
Uninstall
To uninstall
| Companyname |
|---|
| Companyname |
|---|
...
After confirming that you really want to uninstall the software, the uninstaller removes the current instance of
| Companyname |
|---|
| Hide If | ||||||||||||||||||||
|---|---|---|---|---|---|---|---|---|---|---|---|---|---|---|---|---|---|---|---|---|
| ||||||||||||||||||||
Related articles
|