Importing Record Data
For any number of reasons, you might need to add a lot of data to your system at once, such as transferring a full list of contacts for a new company or uploading documents for past contracts. This article details how to perform data imports in Agiloft. You can import record data into Agiloft from a variety of file types.
If you're importing data into the Contract table, refer to the Importing Contract Data section for more specific recommendations.
Importing Data
Data is imported from a text, XML, or JSON file, or an Excel spreadsheet. Before uploading the file, check the fields and data naming conventions. The labels on the import document should closely match the labels for the fields they will be mapped to. A great way to create an import template is to export a single record from the table to populate a spreadsheet with the appropriate field names. If you are using the Data Import Excel template, provided by Agiloft staff, copy and paste your data into a clean spreadsheet before beginning your import.
If you need to import to multiple tables, you can simply create separate files for each table and follow the steps below for each. Alternatively, you can put your data in one Excel spreadsheet, with one worksheet tab for each table's data. To use one file with multiple tables, click the Setup gear in the top-right corner and click Import to perform your import, instead of using the table action bar as described in steps 1-2. Then, when you reach the Options tab, map each worksheet to each table at the bottom of the tab. Map them sequentially, so tables with background records are listed first, and tables that link to those records are listed last.
Make sure to validate the data in your file before you import it. For example, use the Data > Filter tool in Excel to check choice field columns for typos. You can even use an Excel data validation tool or the Fuzzy Lookup add-on to check for other potential problems.
Uploading an import file may take several minutes, depending on the number of records and overall file size.
- Navigate to the table into which you would like to import data.
- Hover over Actions on the action bar and click Import. The Import wizard opens.

- On the Data Source tab, select the source of the data. You can upload files from the local hard drive, the server home directory, or a local Outlook file.
- On the File Name tab, browse for, select, and upload your file.

- On the Data Format tab, select the file type of the file you uploaded in step two. Your options are Tab-delimited text, Other text file, Excel spreadsheet, XML file, or JSON.
- On the Options tab, choose whether to run rules and workflow options, and whether any passwords are already encrypted.
- On the Table tab, set the available options. The options depend on the file type selected on the Data Format tab, but might include:
- Skip first row: If your import spreadsheet has headers, or if you exported a record to create your import spreadsheet, leave this set to Yes.
- Missing choice values: When the system encounters a choice value in the import file that doesn't exist yet in the choice field in Agiloft, it either ignores that value and sets the default value or it adds the value to the choice list. Adding missing values can make the import process faster, but only if you validated the data in your file ahead of time. Make sure there aren't typos or mistakes in the choice field's column before you import the file, if you plan to create missing choice values.
- On "failed to convert field" errors: When the import file includes an invalid date/time field entry, or an invalid choice value when you chose not to add missing choice values, decide whether to stop the import to show an error, ignore the error entirely, or only show a warning.
- On "import record" errors: If the system fails to import a row, decide whether to continue the import or stop and alert you.
- Date fields: Select the format used in the file for dates.
- Input of date/time fields: Decide whether to treat the date and time values as being in the KB time zone or in your current display time zone.
- On the Records tab, choose what to do with existing records:
- Append new records: Adds new records only, without affecting existing records.
- Replace matching records: If a match is found, current records are overwritten and completely replaced by the data contained in the import file.
- Skip matching records: If a match is found, the import action skips the record and ignores the data contained in the import file for that record, leaving the record unchanged.
- Update imported fields only in matching records: If a match is not found, the import ignores the data contained in the import for non-matching records and no data is copied. If a match is found, the import action updates the record with the data contained in the import file, leaving any fields not contained in the import file unchanged.
- Delete all records before importing: The system deletes all existing records prior to the import.
- If you chose an option that mentions "matching records," set the additional matching options:
- In the Match Records drop-down list, select a unique field included in the import data that the system should use to match import rows to existing records. Otherwise, the system can't match records properly, and all records might be considered matching. The ID field is commonly used to match records.
- In the "If matching record is found" section, you can choose to skip records when all the fields in the import data match the existing data in the record fields. For example, if you're using the "Update imported fields only in matching records" option, you might want to save time and avoid erroneous history entries by skipping records that don't actually need to be updated. If you don't want to skip exact matches, select the "Import record" option instead.
- If applicable, set the remaining options on the Records tab.
- On the Fields tab, define how to map the data in your import file to the system fields. If your spreadsheet closely matches the field names, or if you exported a record to create an import template, this process is easier because the system attempts to match the imported fields based on data type and field name.
- Click Test to test your import. This reveals potential errors, such as conflicting unique values, which you can resolve before you perform the actual import.
- Click Finish to complete your import. The system generates a summary of the import process and number of imported records.
Importing Attached Files
To import attached files in bulk, you need to do some additional file preparation.
Create a folder named
fileswith all the attached files. The folder must be namedfiles, with no additional characters.If your files are stored in subfolders, it's preferable to modify any duplicate names and extract them all to the same shared folder before you import them. If you must retain the subfolders, please contact your Agiloft implementation specialist for more information about your particular import use case.
- Create an Excel spreadsheet or .csv text file to serve as an index file. Use the first column for a unique field in the target table, and the second column as a list of file names. For a unique field, you might use the ID, an agreement number, or any other field that will be unique in the table as the unique identifier field.
- Populate the file with all your file names and IDs. If you must upload a files folder that includes subfolders, the file names must include the file path, such as
subfolder/file.pdf.

- When you're finished, save the file in the same directory as the
filesfolder. Select the folder and the text file. Create a .zip file containing the folder and the main file, such as
import.zip. Both the spreadsheet and the files folder should be at the root of the archive, not enclosed in any other folder.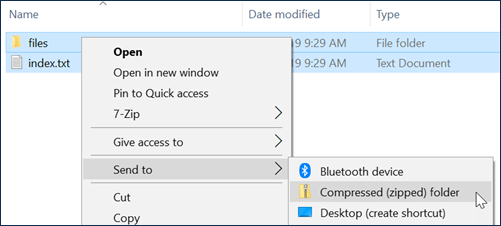
Now you can import the .zip file you created. Use the process outlined in Importing Data to import your records.
- Select your table in the left pane, hover over the Actions button on the action bar, and click Import.
- On the Data Source tab, choose Local hard drive.
- On the File Name tab, upload your .zip file.
- On the Data Format tab, choose the format of the index file you created, either Excel or Other Text file.
- On the Table tab, choose your preferred options.
On the Records tab:
If you're importing attachments for existing records, choose to Update imported fields only in matching records, and then under Match Records, select the unique field you used in the index file. If there are multiple attachments per ID or unique field, choose to use all records under the Duplicates option.
- If you're importing new attachments, select Append new records.
On the Fields tab, map the columns from your index file to the unique identifier field and the file field.
The Contracts table has a field specifically for this purpose, titled Transitional Contract Files. Any file attached to this field in a contract record is automatically placed in a related entry in the Attachments table. This allows multiple attachments to be tracked for a given contract. Be sure to choose to run rules on import when uploading contracts to this file field.
Click Finish to run the import/update. When done, check your data and validate that the attached files were added.
Importing Data into Multi-Value Enabled Fields
When importing data into multiple values enabled (MVE) fields, the values must be comma-separated. However, when attempting to import text strings into a MVE field, the text may contain a comma. For example, a company name may have commas, such as Minister of Innovation, Science and Economic Development. In these cases, you need to use another unique field for importing purposes. In most cases this would be some type of ID field. However, if an ID integer field is being used for import with an MVE field type, it must be delimited with a comma even if there is only one value.
Example
Company A has structured their Company table to have multiple Parents per Company to represent their internal divisions. To see detailed information about the parent company, they chose to have a link to selected fields with MVE. At the time of the import, each company only had one parent and therefore only one integer to import. The following values will import correctly when a comma is appended to the Parent Unique ID integer field.
ID | Company Name | Company Acronym | Company Level | Parent Unique ID |
|---|---|---|---|---|
| 4 | Audit and Evaluation Sector (AEBS) | AEBS | Sector | |
| 5 | Intellectual Property Office (IPO) | CIPO | Sector | |
| 6 | Chief Information Office (CIO) | CIO | Sector | |
| 21 | Audit and Evaluation Branch (AEB) | AEB | Branch | 4, |
| 22 | Business Services Branch (CIPO-BSB) | CIPO-BSB | Branch | 5, |
| 23 | Copyright and Industrial Designs Branch (CIPO-CID) | CIPO-CID | Branch | 5, |
| 24 | Corporate Strategies & Services (CIPO-CSS) | CIPO-CSS | Branch | 5, |
| 29 | Trademarks Opposition Board (CIPO-TMOB) | CIPO-TMOB | Branch | 5, |
| 30 | Business Services Branch (CIO-BSB) | CIO-BSB | Branch | 6, |
| 31 | CIPO Business Solutions Branch (CIO-CBSB) | CIO-CBSB | Branch | 6, |
Importing Contract Data
There are some best practices specifically for importing contract information into our out-of-the-box Contract Management system. Because data, such as company and contact names, are linked between tables, it's important to import records in the right order. The Contracts table also includes a special field for attached files that automatically creates related Attachment records when files are added to it.
If this is a preliminary import, or if you're introducing new records for any of the following tables, import data in this order: 1) Companies, 2) Locations, 3) People, and 4) Contracts.
If you are introducing no new records for tables other than the Contracts table, skip directly to importing your Contracts data in Step 4.
Follow this order of operations for imports:
- Prepare and import your company-level information.
- Prepare and import your location-level information. Include a separate column for US States and State or Province for locations outside the US. By default, US States should be listed using a two-character abbreviation.
- Navigate to the People table. Prepare and import your contact-level information.
- Be sure to import First and Last Names separately. The system joins these fields into the compound Full Name field. If your data only offers a Full Name column, use Text to Columns in Excel to split the column using a delimiter, usually the space character.
- Include the Company Name field, which links the contact to the company record you created in step 1.
- On the Table tab of the Import wizard, select the External Users subtable.
- Import your contract-level information. Be sure to include the correct Company Name, which links the contract to the company record you created in step 1.
- Prepare and import any attached files related to the imported contracts. You can use the Transitional Contract Files field in the Contracts table to automatically place each file in a related entry in the Attachments table. If you choose this option, make sure to select the option to run rules after import.