Document signing is typically integrated into a workflow between signing parties as part of the contract management process, as well as in some situations other than contract management. Using Adobe Sign with allows you to send documents to different parties to sign and then track and manage those documents from within the system. The documents to be signed are either uploaded into a field in the relevant record, directly added in the Attachments table, or generated from print templates. For more information on using print templates with Adobe Sign, see Create Document Templates with Adobe Sign Tags.
The signing process can be initiated directly from within a record, and you can select one or several documents to be sent for signing at once. The documents you can select are determined by the To Be eSigned field in the Attachment record for the document. An action button with a special Adobe Sign action in the record allows you to begin the signing process.

Adobe Sign is integrated with the Contracts table by default. If you want to integrate with other tables, you must complete a setup process. For more information on configuring Adobe Sign with your system and tables of your choice, see Adobe Sign Integration.
|
Signing order and signature flow are two approaches for determining how Adobe processes the document for signing between recipients. Signing order allows you to determine the exact order that recipients receive the document to sign. Signature flow provides a more general approach for defining the recipient order and is only used in cases where the signing order hasn't been defined. We strongly recommend that you always use signing order because it is more reliable and offers more control over the recipient order. However, in both cases, the user can confirm the recipient order by previewing the agreement before sending it.
To configure the default signing order for a document:
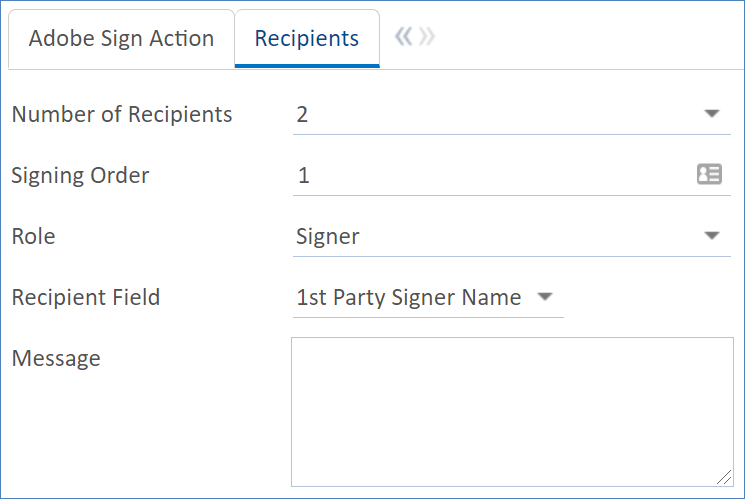
Define the total number of recipients, as well as each recipient's signing order, role, field in the record that defines the signer, and optional message. 
The maximum number of recipients is 9, and recipients can have one Adobe Sign role. Delegate roles are available for Enterprise accounts, and in order to use them, you must log in to Adobe Sign as an administrator, go to Account > Account Settings > Send Settings > Allowed Recipient Roles, and select the "Allow senders to mark some recipients as delegators" checkbox. Delegates receive the document, and can review it, but they can't interact with it otherwise; instead, they must enter the email address for the person they are delegating to, and the document is sent to that address to complete the role's responsibilities. Delegates can't enter the email address for someone who is already a party to the current agreement.
You can also set a recipient's signing order if you add a recipient when you create an agreement. For more information on creating agreements, see Create Adobe Sign Agreements. |
Click Save.
We strongly recommend that you always use signing order because it is more reliable and offers more control over the recipient order. However, if you need to use Signature Flow, use the steps below to configure the default signature flow for a document.
You can also set the signature flow when you create an agreement. For more information on creating agreements, see Create Adobe Sign Agreements.

Parallel: Sends the document for signing simultaneously to both the sender and recipients.
Documents used with Adobe Sign are sent using agreements. An agreement acts as a container that holds the document, recipient information, signing order, and other processing details. You can create new agreements in the Adobe Sign Agreements table or, more typically, in another table where Adobe Sign has been integrated. For instance, the Contracts table in the out-of-the-box knowledgebase has a Signature tab with a Create Adobe Sign Agreement action button.
In older KBs, you might see "envelope" used in place of "agreement." The functionality is the same. |
To create an Adobe Sign agreement from a table with Adobe Sign integration:
If you didn't define the documents and recipients in step 1, add them using the fields in the agreement.
Attach the documents in the order you want to present them to the recipients.
Recipients do not have to be added as an Adobe Sign user before they can sign agreements. In the Recipient record, enter their position in the signing order, full name, email address, and role. You can also use the Authentication Method field to use a single sign-on method, a password, or have no form of authentication, if you don't want to automatically authenticate users from within the document.
The first recipient specified in the signing order or signature flow receives a notification by email that contains the document to be signed.

Adobe Sign automatically adds signature blocks to the document so that the recipient can insert their signature. Recipients do not need to have an Adobe Sign account to use their email address to sign the document. For more information, see Sign a Document with Adobe Sign on the Adobe website.
Recipients and senders are notified by email during the signing process. Recipients receive a second notification after they sign a document. The sender receives a notification when a document is sent for signing, when a recipient signs a document, and when all recipients have signed a document.
To track the progress of a document and manage the audit trail, open the record in the Adobe Sign Agreements table and click the History tab. The statuses of the agreement workflow are updated automatically by Adobe and maintained in the Adobe Sign Statuses table. For more information, see Adobe Sign Tables Overview.
Related articles |