View Wizard
Views determine the way records are displayed within a table, such as the fields that are displayed, row ordering and colors, layout, and the number of records per page. Views allow individuals and teams to have their own settings for the same table.
Creating and Editing Views
To create or edit a view:
- From a table's action bar, hover over the Views drop-down menu.
- Choose whether you want to create a new view or configure existing views:
- Select New to create a new view.
- Select Edit to edit the current view.
- Select Manage to display all the existing views you can edit for the table.
Fields Tab
Use the the Fields tab to configure field and record display options.
- Select whether the selection checkboxes and different icons are displayed.
- Select the maximum lines to display per record and per linked field.
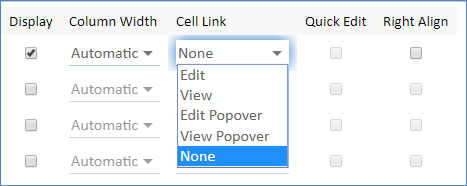
- For each field, set its display options:
- Whether it's displayed at all
- Column width
- Cell link, or behavior when clicked
- Quick edit
- Right alignment
If you cannot select the Quick Edit column for a particular field, check the field's settings to ensure that it is enabled for quick edit. You may also need to check that your group permissions allow you to create Quick Edit views
Best Practices
- To save space, show the Edit icon but not the View icon, and then make the ID field a view hyperlink to give users a way to view the record.

- Display each record in one row to create the best-looking layout.
- For column width, typically select Automatic to create the best view. However, use value of 14 for Date/Time fields, which tends to improve the display by forcing the date to wrap onto two lines.
- Only display relevant fields. Displaying a very large number of fields can result in slower screen refreshes. Displaying too few fields can slow employee productivity.
Order/Colors Tab
Use the Order/Colors tab to select the order in which fields are displayed, as well as the row coloring and notification icons.
- Drag and drop fields into the left-right order you want. If you are editing an existing view, newly added fields appear to the far right.
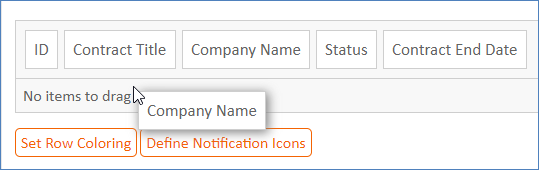
- Click Set Row Coloring and Define Notification Icons to define row coloring, fonts, text highlighting, and icons. See Row Coloring and Notification Icons for more information.
Best Practices
- Position more relevant fields to the left of less relevant fields.
- Always place the ID field in the leftmost position.
- If you have a lengthy text field that you want to display across the full width of the screen, drag the field name down to the No items to drag area. The content of a field in this area displays without a field label.
General Tab
Use the General tab to configure settings for the view.
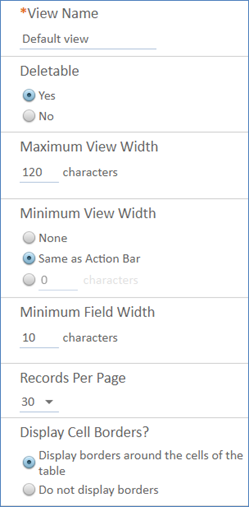
- Provide a name for the view.
- Determine whether the view is deletable.
- Define a maximum and minimum view width, as well as a minimum field width.
- Choose how many records to display per page.
- Select whether cell borders are displayed.
Best Practices
- Set a Maximum View Width of at least 100 to 120. The best choice depends on the fields in your view and the number of characters in those fields.
- Set the Minimum View Width to Same as Action Bar. When this is set to None, the view is only as wide as the data being displayed, which can sometimes look too narrow.
There is a trade-off when choosing the number of Records Per Page. Too many records and fields can mean slower screen refreshes, whereas too few records and fields may affect productivity. A reasonable number is 30 records per page.
Apply Tab
Use the Apply tab to choose to which teams the view applies. This tab is only visible if you have permission to publish views to other users.
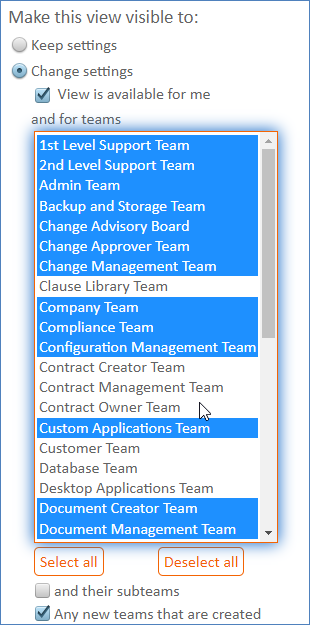
- Select whether to keep or change the current visibility settings for the view.
- If changing the visibility settings, choose which teams can see the view, as well as whether subteams and new teams can see the view.
- Select whether to keep or change the settings for which teams have the view as a default.
- If changing the default view settings, choose which teams have the view as a default, as well as whether subteams and new teams have the view as a default.
Team membership affects default and available views:
- A user on multiple teams can see all views that are available to any of their teams.
- A user’s default view is the default assigned to their primary team. A team has only one default view.
- A primary team's default view is a user’s personal view until the user logs in and customizes their personal view.
Troubleshooting
Known Issue: Disappearing or reappearing table borders
Showing borders around rows and cells in a view is one of the settings in the View wizard. However, a setting in the Look and Feel wizard can override the settings in a view. If you see borders but the view doesn't have borders applied, or if you don't see borders but the view does have borders applied, check the following setting:
- Go to Setup > Look and Feel.
- Click Power User Interface or End User Schemes to resolve the issue in the corresponding interface.
- Edit the look and feel scheme that is applied to the users experiencing the issue.
- On the Tables tab, check the settings under Table Border and Cells. The Table View Borders Visibility setting can override settings for all views.