Twitter Integration
Once integrated, a new Twitter feed can be sent from within an Agiloft knowledgebase in real time, enabling you to send and receive tweets directly from within your records. To set up Twitter integration:
Test Test Test
Test Test Test
Obtain Twitter Account Details
Follow these steps to configure your Twitter account to connect to Agiloft:
- In your browser, go to http://apps.twitter.com, and sign in to your Twitter account or create one if you do not already have one.
- Click Create New App.
- Fill out the required fields and click Create your Twitter application.
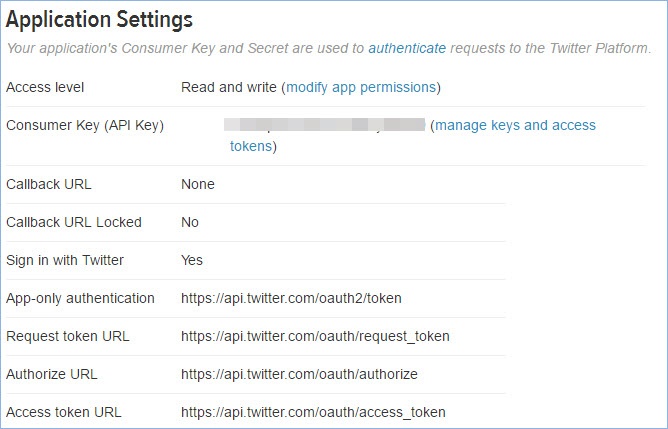
- Click the Permissions tab and ensure that the Read and Write option is selected.
- Select the Keys and Access Tokens tab and click Create my access token.

- Save/write down the Consumer key, Consumer secret, Access Token, and Access token secret.

- Once Twitter has been configured, login to your knowledgebase to continue setup of Twitter integration.
Configure the Knowledgebase
Tweets and their responses will be stored in their own fields - generally a text field - which will be mapped in the Twitter Integration wizard. In addition, you must designate a Yes/No choice field to determine whether the conversation should continue to be published in the record. This is the most basic level of integration which is required for Twitter to work.
To review the Twitter records in the All Communications table, you should also set up the permissions and All Communications table view to make it possible to view the Tweets which are stored in the table.
Follow these steps to configure Twitter integration with the knowledgebase:
- Log into your knowledgebase and navigate to Setup > Integration > Twitter > Configure.
- Select New.
- Enter a description, then fill in the Consumer key, Consumer secret, Access Token, and Access token secret from the Twitter configuration. Do not worry about the Screen Name field.
- Click the button Test login and fetch screen name. If everything has been entered correctly, the Screen Name will automatically be filled in for you.

- Click Next.
- Select the table you wish to integrate with Twitter and click Next.
- Select a field to publish messages from the Store tweet in list.
- Select a field to receive responses from the Store Tweet text in list.
- Select whether the responses should prepend, append, or to overwrite the text in the response field. See the images below to see the difference in how replies appear if a text field is chosen or an append-only text field is chosen:
- Regular text field response appearance:

- Append-only text field response appearance:

- Regular text field response appearance:
- The list of Yes/No choice fields allows you to select a field to determine whether to tweet a particular new record on a case by case basis. The tweet will only be sent if it has a Yes or blank value.
- The Polling Frequency option allows you to set how often you wish the Twitter account to be polled for responses to your tweets.
Once the table has been set up with the fields to send and receive tweets, and to choose whether to continue publishing tweets in the conversation, any tweets sent from a record in the table will be sent from the Twitter account, and responses will appear in the record as long as the choice to continue the conversation is set to Yes. It is important to note that if a record is edited and the text in the designated field changes, the tweet, as posted on Twitter, will be unchanged, and no new tweets will be added to the Twitter feed. In other words, any edits made to the source field after the creation of the record will not be reflected on Twitter in any way.
Notes
- If the choice field option is turned on in the wizard, it is recommended that you set a default value for the field or make it required, because if the field has not been set by the user at record creation to either Yes or No, the knowledgebase will interpret the value to be Yes and tweet the text in the source field.
- If a new tweet is created outside of the knowledgebase, for example from within a Twitter client, the knowledgebase will not create a new record for the tweet, nor will it store it in any existing records.