Work with Setup
To finish configuring and installing the software, or to access advanced server settings at any time after installation, run the Agiloft configuration utility Setup. To run Setup, open the file located in your Agiloft installation directory.
For initial installations on Windows, you will be prompted to run Setup once the initial installation steps are complete. For Linux installations, you may run Setup in console mode by accepting all defaults or in web mode by selecting Customized setup.
If you run the installer in GUI mode, or if you selected the custom setup option when running the installer in console mode, the embedded web server starts. You will be asked how to connect to it and in the case of local installation a web browser opens.
Agiloft Setup Assistant
After initial installation is complete, the Setup utility will guide you through a series of configuration steps.
Language selection
Setup currently supports English, Russian and Chinese. The language selection page is displayed each time Setup is run. Select your language and click Continue.

Antivirus warning
You will be prompted with recommendations for configuring any antivirus software running on your system. When you are finished, click Continue.

Installation method selection
Select Fully automatic setup to accept all defaults, and continue with the installation, summary or select Customized setup to control all configuration parameters. If you select Abort installer, you can run Setup and resume configuration later. The automatic setup does not allow you to define elements such as a custom SQL server

Sample KB configuration
The installer offers two knowledgebase configurations:
- CRM/Helpdesk/BPM - this offers a standard set of tables and features for most business purposes, that can be selected as required. For more information, see Standard System.
- ITIL/ITSM/BPM - this template is optimized for ITIL-compliant business environments.

Licenses
If you are using the Agiloft Free Edition, fill out the form with your information and Agiloft will send you an email with licensing information. Both Free Edition and regular customer licenses must be installed after installation is complete. For more information, see Licensing.
Database Server
The server page allows you to define the server options, including the SQL database, and the Python, Perl and Nmap distributive locations.
SQL Installation
Agiloft can work with several database server types:
- An embedded MySQL server - this is the default, and included with Agiloft installations
- An external MySQL server
- An external Microsoft SQL server
- An external Oracle SQL server
Note that the last three are only available in the Customized Setup. Select which one to use on this page. For more information, see Installation with Custom Databases.
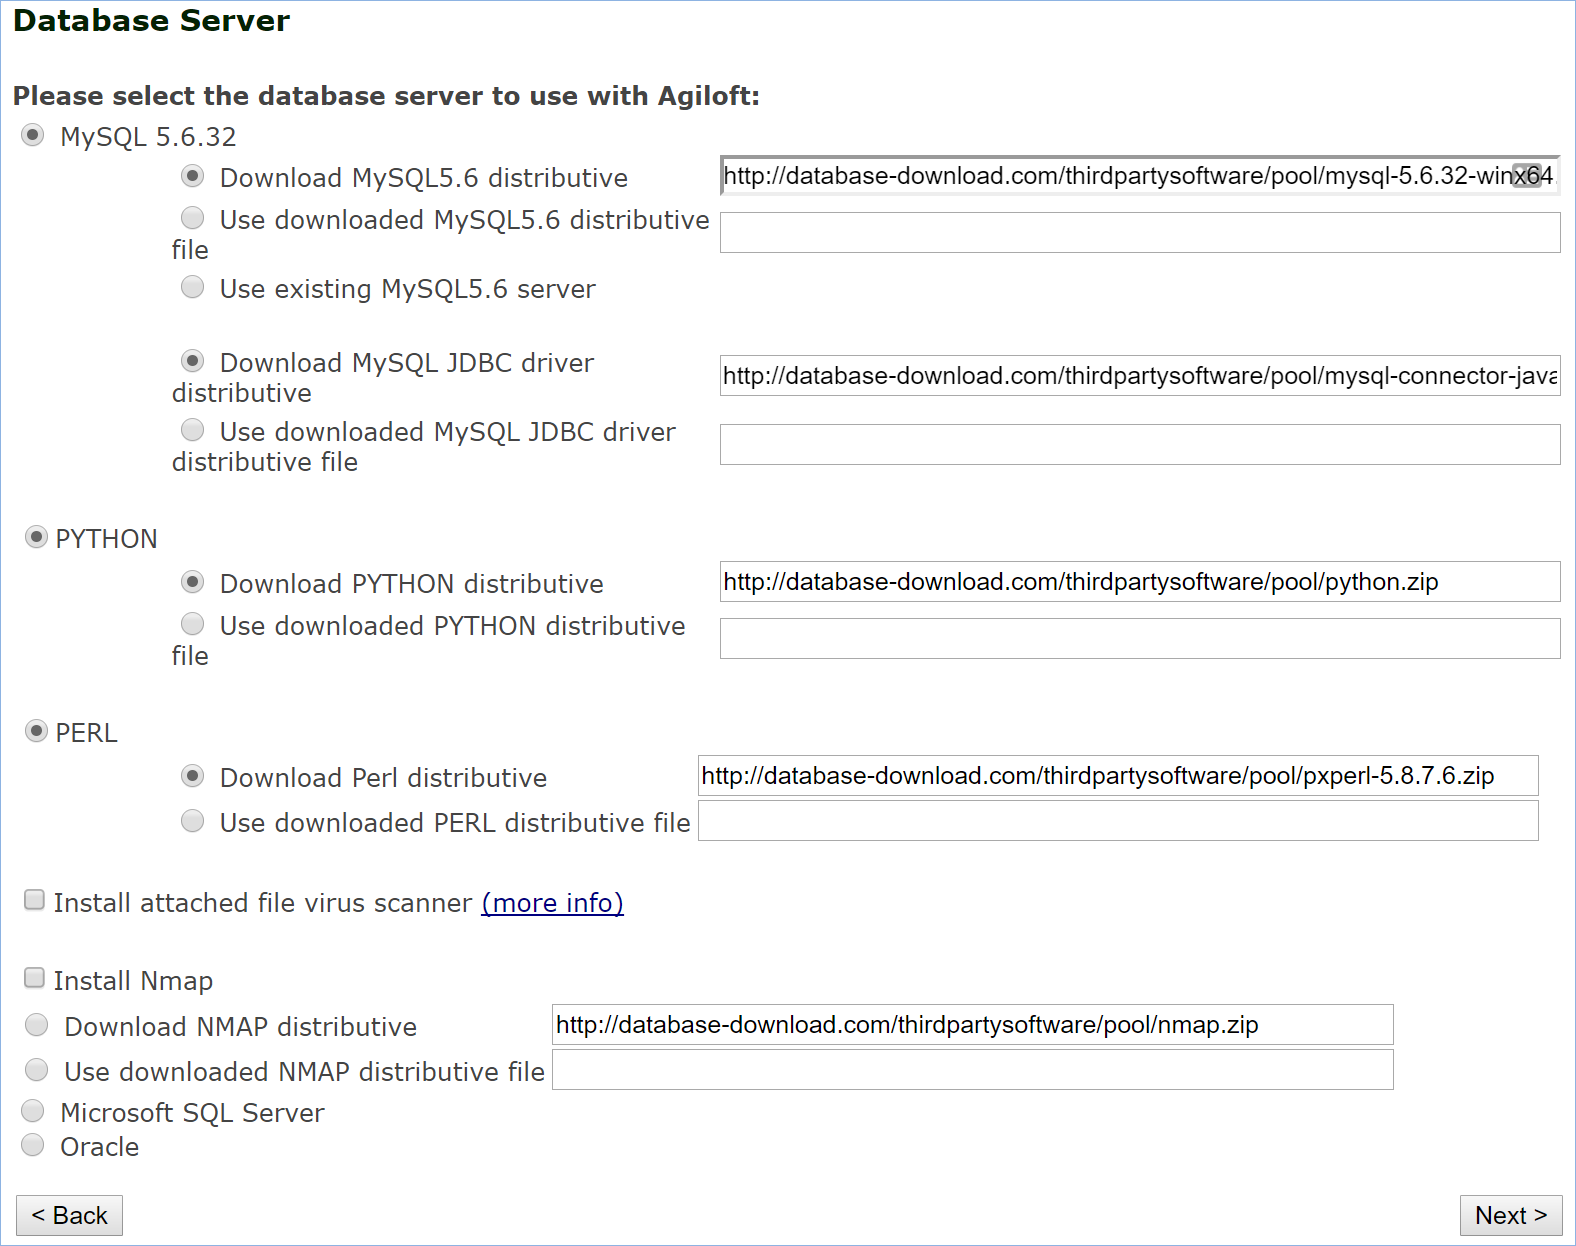
- Embedded MySQL server: To use the embedded MySQL server, select MySQL and Download MySQL distributive; or select Use downloaded MySQLx.x distributive file and enter the file path. The default MySQL server requires almost no configuration. All you need to do is set a password for a database user with read-only access to
Agiloft data, which Setup will create automatically. Click Next to view the auto-generated password. You will need to write it down.

External MySQL server: To use an external MySQL server, select MySQL and Use existing MySQLx.x server. Click Next to enter the database server settings on the following page. Enter valid values for all fields. The MySQL user needs administrator access rights in the database.

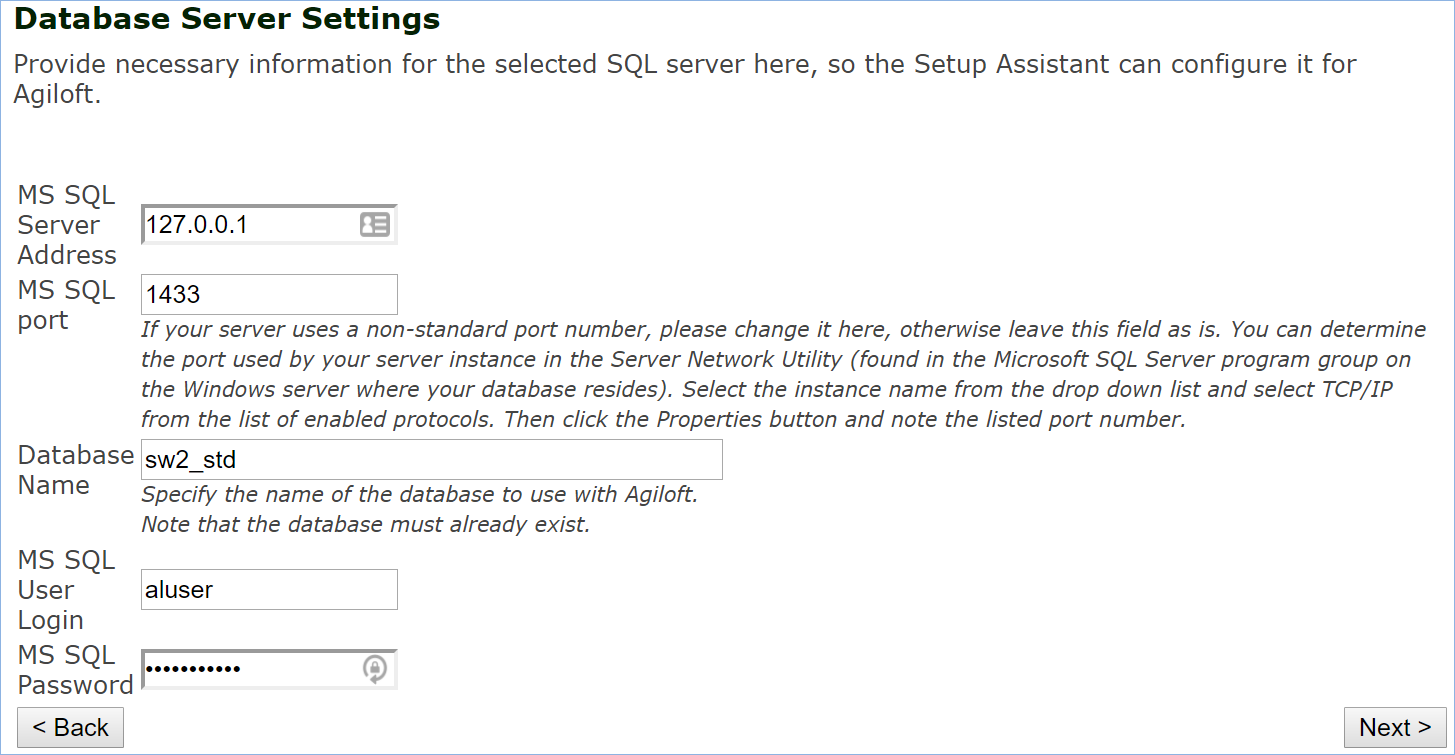
- External MS SQL server: To use an external MS SQL server, select Microsoft SQL server. Enter the connection settings on the following page.
- External Oracle server: To use an external Oracle SQL server, select Oracle. Enter the connection settings on the following page.

Python, Perl, Nmap and Virus Scanner
To select the Python, Perl and Nmap files, either use the default supplied distributives, or enter the location of a downloaded file in .zip format.
If you select Install attached file virus scanner, the installer will include ClamAV toolkit, which will scan any attached files for viruses. ClamAV can also use either the default supplied file, or a downloaded local file location. When implemented, the antivirus protection only scans attached files and has no effect on the rest of the operating system. For more information, see www.clamav.net.
Web Server Settings and Integration
Agiloft uses a built-in web server, Apache Tomcat, which can work with an external web server installed on the same machine. This means that requests to the web server will be redirected to
Agiloft. You may set various configuration options for Apache Tomcat.
Agiloft supports integration with Apache 2* for all platforms and Information Information Services (IIS) for Windows.
Enable https for NTINX HTTP server: NGINX is installed by default on Linux, but not in Windows. If you are supplying server certificates, then HTTPS should be enabled; otherwise, only the HTTP port is needed. For more information, see: NGINX Setup.
Open HTTP port for outside access, Main HTTP port: Apache Tomcat always listens on the port. On this page you may change the number of this port and open or close access from outside the local machine where
Agiloft is installed.
Enable HTTPS port, Keystore File, Keystore Password: You may open Apache Tomcat’s HTTPS port for listening. This allows you to have a trusted and secure connection with
Agiloft. The standard HTTPS port is 443, but Apache Tomcat uses port 8443 for HTTPS connections by default.
Note: To enable HTTPS you will need a keystore file to keep track of your secure certificate(s). You may use your own keystore or have a dummy keystore certificate auto-generated on installation. To use your own keystore, enter the file name and passwords in the Keystore File and Keystore Password fields. To automatically generate a dummy keystore, leave the fields unchanged.
Integration with Other Servers
Here you decide whether or not to integrate
Agiloft with an external web server, and if so, what type of server.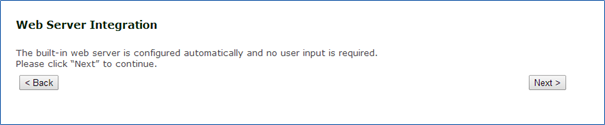
- No integration: If you choose not to integrate with an external web server, Apache Tomcat will be configured automatically. Click Next to continue.
- Integration with IIS: If you select integration with IIS, then no further configuration is needed. Click Next to continue.

Integration with Apache: If you select integration with Apache, Setup will automatically look for the Apache main configuration file. If no file is found, you can enter the full file path.

Note: Based on your earlier selections, you will have either HTTP or HTTPS redirection, but not both. If you use HTTPS redirection, for example, all HTTP requests will be redirected to HTTPS also.
Apache HTTPS (SSL) must be properly configured before you select this option.
Apache Tomcat’s HTTPS port should be opened for listening.
Hotlink root server: You should change the default “localhost” server name used in hotlinks and emails automatically generated by
Agiloft to the hostname that is accessible to users through a standard URL, e.g. https://support.agiloft.com. This setting can also be changed later from the admin console once installation is complete.
Installation summary
Setup is now ready to complete the installation and configuration. Click Next when you are ready to continue. Installation can take 10-30 minutes depending on the computer. When Setup is finished, you will be redirected to the Setup main menu.
You can now access and begin using your system.
If Something Goes Wrong
If an error occurs during installation an error message is displayed in the progress page. There are two options after an error: you can either leave all installed files ‘as is’ while you determine the cause of the error, or you can completely uninstall Agiloft from the computer and save the installation logs for later debugging.
Ignoring Import Errors
In some cases imported data when installing or importing may be corrupted and cannot be properly imported. You may wish to set a special import mode when SQL import errors produce warnings that are not fatal errors. We recommend that you do not use this option unless instructed to do so by a support or implementation specialist. Ignoring errors may result in a corrupted database.
Setting ignore SQL errors mode in Unix
Set the environment variable ew.import.ignore.sql.errors to the value true, then restart the application server. You must be logged in as the Unix root user to do this.
# ew.import.ignore.sql.errors=true
# export ew.import.ignore.sql.errors
# /etc/init.d/ew-server restart
This example is given for bash shell. If you use a different shell, consult its documentation on how to set and export environment variables. If you want to make this mode permanent, edit the /etc/profile Linux/Unix file, and add the following lines:
ew.import.ignore.sql.errors=true
export ew.import.ignore.sql.errors
Re-enter the Unix console session. To check if the environment variable is set correctly, execute the following command:
# export | grep ew.import.ignore.sql.errors
Setting ignore SQL errors mode in Windows
Set the environment variable ew.import.ignore.sql.errors to true, and then restart the application server.
- Click Start > (My) Computer > [Right-click] > Properties > Advanced > Environment Variables > System Variables > New.
- Enter the variable name
ew.import.ignore.sql.errorsand set the variable value to true. Press OK. - Run command line window by clicking Start > Run… Then type cmd in the Open field and press OK. Restart the application server:
C:\> net stop ewserver
C:\> net start ewserver
Download Errors
If a download of external software fails in the installer, the error message will provide detailed information for troubleshooting. Depending on the context of the reason for the download failure, the error dialog will either report this message:
The installer could not download the file from the external source, possibly due to inadequate permissions. Please download the software manually and add it via the Use Downloaded Distribute File option when reinstalling.
Or something similar to this message:
Installation of database server failed due to a problem downloading http://database-download.com/thirdpartysoftware/pool/mysql-connector-java-5.1.26.tar.gz88. We tried four times for 160 seconds in total. The error message is: Can't get http://database-download.com/thirdpartysoftware/pool/mysql-connector-java-5.1.26.tar.gz88 to /usr/local/Agiloft/software/archives/mysql-connector-java-5.1.26.tar.gz. You can manually download the file from ftp://www.agiloft.com/thirdpartysoftware/pool, save it on your computer, and use the "File Already Downloaded" option.
Optimizing Tables
In the bin directory there is a script named optimize_tables.
This script performs the mass execution of an optimize table SQL statement against a set of SQL tables. Running the script can often increase performance if tables have become unoptimized.