Pushing Changes to Production
Entity Set Sync allows you to transfer a structural portion of your system from one knowledgebase to another. It differs from External System Synchronization, which is used to keep Agiloft and external systems up-to-date with the same records and data, such as integration with Salesforce, Google, or other third-party systems. Entity Set Sync is used to transfer the structure of a KB, such as tables, fields, rules, and actions. A common use of Entity Set Sync is to transfer changes from a development or testing KB to your production system.
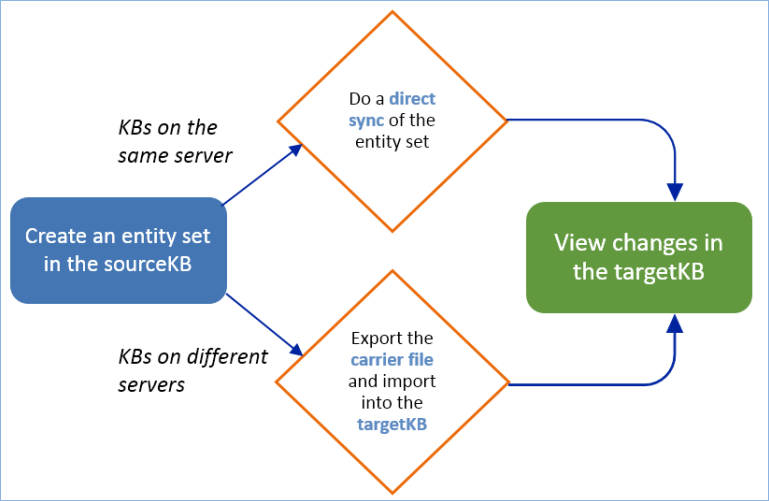
Using a separate development or testing KB from your production system allows for complex or experimental builds without affecting day-to-day use of the system, or unintentionally changing connected but unrelated system behavior. Working with multiple environments might look like this:

Terminology
| Term | Definition |
|---|---|
| Entity Set | A set of objects, such as tables, rules, color schemes, fields and teams, that is packaged together into a file for transfer to another KB. |
| Source KB | Sync donor knowledgebase; it contains the entity set including tables, field or other structure which you wish to transfer. |
| Target KB | Sync recipient knowledgebase; it contains the entity set after the sync is completed. |
| Direct Sync | Syncing between KBs on the same server. |
| Indirect Sync | Syncing between KBs using an exported carrier file. This can be done between KBs on the same server or on different servers, but is primarily used when KBs are on different servers. |
| Lightweight entity set | An entity set that only includes one level of implicitly added entities. |
| Carrier KB file | The knowledgebase carrier file created from the Source KB for import into the Target KB during an indirect sync. Carrier KB files are in XML format, with a file extension of .xml.ew. |
When transferring changes from a development to a production environment, the Source KB is the development KB, and the Target KB is the production KB.
Types of Sync
Sync is either direct or indirect. Direct sync is preferred, but to use it, the source KB and target KB must be on the same server. If the KBs are on different servers, they can still sync, but only through the indirect sync method that uses an intermediary carrier file to transfer the entity set. In indirect sync, the carrier file is exported from the source KB and then imported to the target KB.
Carrier KBs are occasionally used to enable special features. If you have a carrier KB file to set up a special feature, skip to the Sync the Entity Set section to import it.
Direct Sync
If the source KB and target KB for the entity set transfer reside on the same server, you can perform a direct sync. You can export an entity set directly from one KB to another by providing login credentials for the target KB in the Sync wizard. This is the simplest way to perform sync and only requires admin level login credentials for both KBs.
See Direct Sync for detailed instructions.
Indirect Sync
If the source KB and target KB are on different servers, you must perform an indirect sync, also known as "sync via carrier file." Note that Carrier KB files can only be imported into other knowledgebases running the same release version or higher. A carrier KB created on a higher release will not import successfully into an older KB.
In an indirect sync, the entity set is created in the source KB and exported to an XML file, known as the carrier KB file . Download the file and transfer it to the target server. Then, the carrier file is imported into the target KB on the other server.
See Indirect Sync for detailed instructions.
Create an Entity Set
Direct and indirect sync both require an entity set. Start by creating an entity set that contains everything you need to sync.
- Click the Setup gear in the top-right corner, go to Sync, click Configure under Entity Set.
- Click New and then click Entity Set or Lightweight Entity Set. Lightweight entity sets are used for sending simple build without including a lot of implicit dependencies, because lightweight sets send only a single level of implicit entities and curtail any beyond that. A standard entity set will populate all implicit dependencies, which makes the sync more complex, but also makes sure pieces of the build aren't missed. If you create a standard entity set, you can always choose to send only explicit entities later.
- In the wizard, enter a Name for the entity set.
- Select which entities are included in the set. Available entities include: tables, choice lists, color schemes, pictures/images, groups, teams, attached files, and global variables.
- Customize the entity set as needed by marking entities as Explicit or Implicit, or by adding or removing fields, rules, etc. See Customize the Entity Set.
If applicable, select the Transfer Only Explicit Entities checkbox. See Explicit and Implicit Entities.
If this option is selected, leave the Update Implicit Linked Fields option selected to prevent broken relationships after sync. This option is used only for advanced troubleshooting.- Click Finish to save the entity set.
Explicit and Implicit Entities
When you add an entity to the set, it is added explicitly. Explicit entities are always sent to the target KB. If an explicit entity doesn't exist in the target KB, sync creates it; if an explicit entity does exist in the target KB, sync updates it to match the entity in the source KB. Selecting an entity explicitly tells the system to make sure the target KB has an entity configured the same way.
However, many entities have relationships to other entities in the system, and they do not work as expected without those other entities. For example, a rule that runs three actions is not very useful in a system that doesn't have those three actions. For this reason, when an entity is added explicitly, the system identifies other entities that are necessary for the table to work as expected, and adds these other entities to the set as implicit entities. Implicit entities added or updated in the target KB unless you choose the option to prevent updating implicit entities that already exist.
| Entity Not Found in Target KB | Entity Found in Target KB | |
|---|---|---|
| Explicit Selection | Entity is created in target KB | Entity is updated in target KB |
| Implicit Selection | Entity is created in target KB | No change in target KB |
You can choose to send only the explicit entities in your set. This is useful to minimize the size and duration of the sync, but for large changes, it can be difficult to make sure all the necessary entities are sent. If you do choose to send only explicit entities, carefully review any implicit entities that were added to the set and evaluate whether they need to be made explicit and sent as well.
You can also choose a middle ground using a lightweight entity set. These send a single level of implicit dependencies, but no additional levels beyond that. This make sure the bare essentials are included, but might miss some pieces when used to send complex build.
Customize the Entity Set
Sync takes longer when the set includes more entities, but you might encounter more sync difficulties when essential entities are not included. When you prepare an entity set, you must carefully consider what you need to send and what you can exclude.
Add Tables to the Entity Set
There are three options for adding tables to an entity set:
- Add empty tables.
- Add tables and all fields.
- Add tables and all entities. This option adds all child entities of the table, including fields, saved searches, rules, email templates, inbound email accounts, and other settings.
Add Other Entities to a Set
- Locate the type of entity to be added, such as choice lists, groups, teams, images, etc. When sending groups, add the group explicitly if the intention is to sync the group's permissions. For more information, see the Group Permissions section.
- Click Add Entities to expand the list of available items.
- Select the entities you want, then click Add Entities or Make Explicit to finish adding them to the set. The screen refreshes and additional entities may be added implicitly.

- Change the status of previously added entities by clicking Make Explicit or Make Implicit.
Remove Entities
When an entity is added to the set, the system automatically adds implicit entities that are necessary to reproduce the table structure and functionality. You can review and, if necessary, override these implicit entities by clicking Remove next to an item, or Customize next to a table to add or remove fields, searches, the table layout, and so on.
Be cautious when removing items that were added by the system. It is usually best to keep all items which are automatically added to an entity set. Removing these items may cause an incorrect sync transfer. The system warns the user of any dependencies broken by removing an item. For example:

You can use this warning or the Entity Set Dependency Report to investigate why the unwanted item was originally added, and then potentially remove the causal relationship. To successfully remove an entity from the set and prevent the system from adding it back, you must identify how your selected set relies on the unwanted entity and make changes to resolve that relationship. For example, you might need to remove an action you don't want to send from a rule you do want to send, to prevent the system from sending both.
If you do remove an implicit entity added by the system, but you do not remove the relationship that caused it to be added, it might be added back automatically when you save the set. See Automatic Refresh of Entity Set Dependencies.
Automatic Refresh of Entity Set Dependencies
Entity sets are automatically updated by the system in certain situations. These might override changes that were made when customizing an entity set. For example, an entity could be removed then automatically added back later to make sure the table is functional after a sync.
Dependent items are automatically added to an entity set.
Example
If a linked field is added to an entity set, the system transfers the associated saved search and action, which are part of the linked field settings.
If an empty table is added to an entity set, the system may add additional tables. Even without custom fields, some tables have a relationship to other tables such as Email, Email Marketing, Team, and People, which the system identifies and adds to the set.
Changes to items included in an entity set are refreshed the next time an entity set is opened for edit.
Example
An entity set includes a linked field based on a saved search. The saved search is later modified or replaced. When the entity set is reopened, the new or modified saved search is included in the set.
This feature is designed to make working with sync easy: just add the key components needed, and the system identifies and includes related and dependent entities.
Entity Set Dependency Report
This feature is used to examine why additional entities have been added automatically or implicitly to an entity set. Once you understand which relationship is causing the system to add the entities, you can determine whether to keep the entity or change or remove the relationship.
To run a dependency report:
- Go to Setup > Sync.
- Select the entity set and click Report entity set dependencies.
Reports are divided into five tabs:
- Subtypes, or tables
- Columns, or fields
- Teams
- Groups
- Records
The report shows the logical chain between items added to the entity set by users and those that the system adds implicitly due to dependencies. For example:

Sync Preparation
Sync is a complicated process that can produce unexpected conflicts and challenges. It is critical to a successful sync to prepare both the target and source KBs for the process, and to do as much as you can to anticipate issues that may come up. This section details all the steps you should take to prepare for sync.
Verify KB Health and Integrity
Use Verify KB to check the overall integrity of both the target KB and the source KB before performing sync. The system reviews linked field schema, actions, tables, and teams, and generates an on-screen report of any issues.
- Go to Setup > Sync > Verify KB.
- Allow some time for the report to run.
- When the report is finished, review it and resolve any issues.
- Repeat these steps until the KB is verified to have no issues.
From the admin console, you can also perform Linked Field and Schema Repair, which identifies inconsistencies and broken linked fields that may lead to a sync failure. Hosted customers may contact Agiloft Support to perform LF and Schema repair.
- In the admin console, go to Setup > Repair.
- Select a KB for repair.
- Click LF and Schema Repair.
Make sure to perform these steps for both the target KB and the source KB.
Disable Linked Field Auto-propagation During Sync
Sync has a higher risk of failure with large KBs and entity sets where tables in the target KB contain a lot of records and massive propagation on linked field columns. In this situation, it can be useful to disable linked field auto-propagation during the sync. This can save time and prevent sync failures. If you do disable this feature, make sure to run linked field repairs after sync.
To do this, open the Using the Setup Assistant and navigate to the Application Server section. Enter the following text into the options field:
-Dew.sync.populateAddedColumns.disabled=true
After adding the property, click Apply changes, and after restarting, Agiloft sync does not automatically propagate linked fields.
Note that this property will survive server upgrades. If you wish to disable the property after sync, just add the following property into the same options field:
-Dew.sync.populateAddedColumns.disabled=false
Test Sync on a Copy KB
The best way to see what to expect from a sync is to create a copy of the target KB and sync to the copy. This offers you a complete picture of what to expect.
Create a copy of the target KB. Note that if the target KB is on a different server, it can be useful to perform these steps twice: once with a copy KB on the same server as the source KB, and once with a copy KB on the same server as the target KB. The more thorough your tests can be, the more likely you are to efficiently resolve any issues in the final sync.
Perform all preparation steps in this section on the copy KB if possible.- Test the sync operation using the steps in the sections below. Syncing to a copy KB helps to discover inconsistencies between KBs that must be fixed before syncing to a production KB. The KB might contain obsolete actions that should be deleted, such as unused conversion actions with no conversion selected, or broken actions resulting from the removal of a team, group, or saved search. It's important to clean up these objects before performing sync.
- Check for problems and unique attributes. Run the test sync and carefully read error messages to resolve any issues. For example, if the Company Name field is designated ‘unique’ in the source KB but not the copy, sync will fail if it finds duplicate entries in records in the copy KB.
- Resolve issues and take notes as you go. In the copy KB, investigate and resolve the conflicts, taking careful, detailed notes of each step you take. These notes are the plan for the final sync, and they are critical to making sure everything will work as expected. For more information about conflicts between entities, see UUID Recognition and Sync Conflicts.
- Repeat these steps to test your plan in a new copy of the target KB. After sync, follow the plan exactly, and then review and test the result to make sure the KB works as expected and data appears appropriately. If anything is found in the KB that does not meet expectations, investigate, plan, and test a solution. Add that solution to the plan for the final sync.
Many test syncs may be needed before everything is ready for the final sync. Thorough preparation is essential to making sure the target KB is in good condition after the final sync.
Schedule the Final Sync
Treat a sync, especially a large sync, like a server upgrade. Secure a generous time window outside business hours, so you have time to complete the sync, resolve conflicts, and run basic checks. Make sure to back up the target KB shortly before the final sync.
If possible, it is helpful to:
- Stop background services and emails from the KB, which can cause sync failure
- Log users out to prevent anyone from modifying a record being synced
- Disable linked field propagation for sync with very large KBs
- Perform the sync with a user account that won't be needed for anything else during the scheduled window
- Perform the sync on a computer with consistent network connectivity
Sync the Entity Set
Once the entity set has been created, all relevant entities have been added, and all necessary preparations have been made, begin the direct or indirect sync.
Direct Sync
Direct sync is used between KBs on the same server. To perform direct sync, either export from the source KB or import from the target KB.
You do not need to complete both sets of steps below. There is no functional difference between the two. You can perform direct sync from either KB. Choose one set of steps to follow.
To run a direct sync from the source KB:
- Log into the source KB as an admin.
- Go to Setup > Sync.
- Select the entity set.
- Click Export to open the Sync Export wizard.
- On the Source tab, select Transfer to existing KB.
- The drop-down list shows all knowledgebases on the same server. Select the name of the target KB.
- Enter admin-level login credentials for the selected target KB.
Click Export Now to begin exporting changes. It may take several minutes to transfer changes depending on the size and number of entities in the set. You may not log out of the KB while sync is working.
- Log into the target KB as an admin.
- Go to Setup > Sync > Import to open the Sync Import wizard.
- On the Source tab, select Transfer from existing KB.
The drop-down list shows all knowledgebases on the same server. Select the name of the source KB containing the entity set. It may take some time to load the drop-down list.
If the Security: Show KB Names variable is set to No, this list is hidden and the KB name needs to be added manually.- Enter an admin-level login credentials for the selected source KB.
- Click Next.
- On the Entity Set tab, select the entity set from the drop-down provided.
Click Import to begin the sync process. It may take several minutes to transfer changes depending on the size and number of entities in the set.
Indirect Sync
Indirect sync is used between KBs on different servers. Given a choice, direct sync is preferred. Indirect sync is more complex because it involves creating, transferring, and importing a separate carrier KB file.
Create and Export a Carrier KB File (Indirect Sync)
If the source KB and target KB are on different servers, a carrier KB file is used to transfer the entity set. Follow these instructions to create a carrier KB file using the sync export wizard.
- Log in to the source KB as an admin.
- Go to Setup > Sync.
- Select the relevant entity set, then click Export to open the Sync Export wizard.
- In the wizard, select Create export file.
- Click Export Now.
- Leave the progress window open; it may take a few minutes to create the file. Once completed, a confirmation message with an option to download the export file and to view a transfer report appears.

- Save the file locally and note its location.
Import from a Carrier KB File (Indirect Sync)
You need the carrier KB file available on your machine in order to complete an indirect sync.
- Log in to the target KB as an admin.
- Go to Setup > Sync > Import to open the carrier KB file.
- On the Source tab, click Browse.
- Find and select the carrier KB file and click Upload.
- Click Next.
- On the Entity Set tab, select the entity set from the drop-down.
- Click Import to finish. A progress message is displayed while the entities are transferred. It may take a few minutes to transfer changes depending on the size and number of entities in the set.
Example
For example, the following file contains the entities for the 2017 default Look and Feel: 2017_default_look_and_feel_for_power_and_end_user.xml.ew
After the file has been imported, Setup > Look and Feel > Manage Power Schemes shows an L&F named "2017 Calibri Default" and Setup > Look and Feel > Manage End User Schemes shows an L&F named "2017 Calibri Default EUI."
Monitor Sync Progress
Check the status of the sync process from the Sync Status page. Go to Setup > Sync and click Sync Status to see all active sync processes. When a process is complete, it disappears from the list.
After Sync
If this is a test or final sync, use the plan to resolve any issues or conflicts from the sync. When all issues have been resolved, check the affected tables and workflows to make sure they work as expected. If any of the suggested precautions were taken before the final sync, reverse them when it is complete:
- Resume background services and emails from the KB
- Make sure users are allowed to log in
- Enable linked field propagation if needed
Once sync is complete, all users in the Admin Team will receive an email with the results of the entity set. The email subject is: Sync result for KB <KB LABEL>. The email body is similar to the following message, including a detailed report of all the structures transferred in the sync:
Status > COMPLETE
Result message Transfer completed successfully. Click here to see a detailed transfer report.
Click here to close this window.
TYPE | NAME | OPERATION | RESULT |
Picture | /gif/customicons/master_light_orange_red_28_169.png | UPDATE | COMPLETE |
Picture | /gif/customicons/lp_arrow_right_u.png | UPDATE | COMPLETE |
Picture | /gif/maximize.png | UPDATE | COMPLETE |
Picture | /gif/bell.gif | UPDATE | COMPLETE |
Picture | /gif/famfam/cancel.png | UPDATE | COMPLETE |
Picture | /gif/customicons/master_light_orange_red_16_137.png | UPDATE | COMPLETE |
Picture | /gif/customicons/master_light_orange_red_28_86.png | UPDATE | COMPLETE |
In case of sync failure, see Troubleshooting with Error Logs.
Compare KBs
The Compare feature generates a report of differences between two selected KBs based on a selected entity set. Compare is only available for two KBs hosted on the same server. The Compare feature is available from both the power user interface and the admin console.
Users typically compare KBs in the following cases:
- Transferring changes from a development to a production environment. Use Compare in this case to discover any changes in the KB, what these changes are, and whether sync is necessary. For more information about environment management, see Managing Multiple Environments.
- Checking the results of a just-performed sync. After a full development-to-production sync, use Compare to check that the comparison report is empty and verify that all items were transferred correctly.
- Comparing two completely different KBs to reveal how many differences they have. For example, you can see how far two systems are from each other, and get a sense of how much cleanup would be needed to perform a successful sync operation between them.
Comparing whole KBs from the admin console
- Log in to the Admin Console and go to Setup > Debugging > Compare KBs.
- Select the source and target KBs you want to compare.
- The system will generate a report in .xls format listing the differences and sorting by item type.
Comparing partial KBs (entity sets) from the admin interface
- Log in to the Power User Interface as an admin user.
- Go to Setup > Sync, select an entity set, and click Compare.
- You will be prompted to select a second KB for comparison.
- Here you can compare only the items of interest in the entity set.
- You can download or open the system-generated report in .xls format.
Repair Linked Fields
If you disabled linked field auto-propagation before performing sync, use the LF Propagation Check utility to repair any linked field issues caused by the sync.
- Log in to the Admin Console and go to Setup > Repair.
- Select a KB.
- Click LF Propagation Check.
- In the report, review the flagged fields in each table. You can click the red hyperlink to see a list of the affected records.
- Repair individual linked fields with Repair LF, or use Repair All LFs to repair all the linked fields in a given table. Using a repair option generates a report with details on what was changed.
If you disabled linked field auto-propagation, you might also need to enable it before the next sync. For details, see here.
Entity Sync Limitations
The following sections describe the known limitations of sync.
Deletion
In general, sync does not support deleting objects in a target KB.
Example
An object is included in an entity set and synced to a target KB. The item is later deleted in the source KB and entity set. When you run sync again, the object will not be deleted in the target KB. Instead, its status will be marked 'Free' in the transfer report. Thus, 'Free' items are objects not found in the source KB due to deletion.
Group Permissions
Transfer of groups and permissions during sync is minimized to save time and resources during sync. Group permissions are transferred only if one of these are true:
- The groups are included explicitly in the entity set
- The target KB contains the same groups as the source KB
Even when group permissions are transferred, only a direct sync of explicitly listed groups syncs all the permissions in the group. Indirect sync only transfers permissions for entities that are included in the entity set. For example, let's say group A in the source KB has access to tables B, C, and D, and group A is added explicitly to your entity set. Table B is also added explicitly, and table C is added implicitly, but table D is not included at all. If a direct sync is performed with this entity set, group A is synced to the target KB with access to tables B, C, and D, even though table D is not included in the set. However, an indirect sync is performed with this entity set, group A is synced to the target KB with access to tables B and C, but the permission to access table D is not synced. This applies to permissions at all levels.
Groups can automatically be added to an entity set depending on the table and field dependencies. If the number of user groups is large, we recommend performing an entity set sync with all components (tables, fields, related items) except groups. Permissions can be transferred afterwards in a separate direct sync action.
If an entity set contains some (or all) groups selected for sync, all permissions for previously synchronized tables are correctly transferred for each group.
Indirect sync can update permissions only for the entities included in the set, even if all groups are selected for sync. In contrast, if you use direct sync to update all groups, the sync updates permissions for all entities, even if they aren't included in the set.
Layout Transfer
Sync does not support renaming layout tabs because layout tabs have no universally unique identifiers (UUIDs). If a tab is renamed in the source KB and then synced, the corresponding table in the target KB has two tabs: an empty tab with the previous name, and a tab with the new name holding the corresponding fields.
Record Transfer
Entity set sync does not support record transfer, except in special cases:
- Question records used in surveys
- Records which are used as default values for linked fields or inbound email settings
To sync records between KBs, use a scheduled Import/Export action.
Conflicts and Troubleshooting
Use these sections to understand how sync resolves conflicts, and how to troubleshoot sync using the error log.
UUID Recognition and Sync Conflicts
UUIDs are used to identify groups, teams, saved searches and other items within Agiloft. During sync, the UUID helps identify and match objects in the source and target KBs.
If the system is unable to identify a match based on UUID, the object's name is used to resolve a conflict. This typically occurs because the KBs are very different, or came from different sources.
Example
This examples shows a simple case of UUID conflict involving a saved search. Imagine two knowledgebases named "Alpha" and "Beta".
In Alpha, there is a saved search called "Restrict Test" with a filter defined as follows:
Field A = value 1
In Beta, there is a manually created saved search with the same name using a different filter:
Field B ! = $formula1
Although these searches have the same name, they have different UUIDs and are different searches. How does sync behave in this case?
When a user syncs the "Restrict Test" saved search from Alpha to Beta, the system compares UUIDs and determines that they are not a pair. In Beta - the target KB - the saved search is renamed "Restrict Test (1)" and the "Restrict Test" saved search from Alpha is transferred as "Restrict Test".
Any settings in the target KB which previously used "Restrict Test' are correctly updated to use the "Restrict Test (1)" filter. In other words, the changed label is propagated throughout the system, and both saved searches are available in the target KB.
Field conflicts are resolved in a similar manner. If a source and a target KB have two fields with the same name but of different data types, the field in the target KB is renamed with a numeric suffix; for example the field my_address is renamed to my_address0. The source KB field is transferred with its original name. Dependencies are transferred correctly: all rules, searches, fields and so on which referenced or depended on the renamed target KB's field correctly refer to the renamed field, in this case my_address0.
Conflicts based on mismatched field types can be detected using the Compare feature. They are reported as follows:
Conflict because field with Logical Field Name my_address has type "Text" in Alpha and type "URL" in Beta.
Troubleshooting with Error Logs
Most errors can be prevented by following all the recommended Sync Preparation steps.
If the Entity Set Sync fails, it presents an error message showing the sync stage (import, export, creating entity set, and so on) where the error occurred. If it stopped due to a particular entity, the error provides the entity name, the object type, and the operation name.
Error importing: (WIN-T67T10LP8GM_1536340605178) com.supportwizard.utils.ejb.SWEJBException: Unexpected Error; nested exception is: java.lang.AssertionError

The entity on which the error occurred:
Object type: Subtype
Name: company
Operation: CREATE
However, the error messages might be inadequate to troubleshoot the real cause of the error. This could be because:
- The message does not have enough information. For example, if another non-sync issue leads to unexpected behavior it is not reported in the message. The message is often not informative enough to provide a deep analysis of a sync failure.
- Another sync issue that occurred earlier in the process may be the root cause of its failure down the line. The sync engine attempts to continue the process if it believes it can finish correctly and provide a detailed sync result report, but sometimes this can lead to delayed errors that stop the sync process.
In these cases, the administrator should investigate the server logs for a better idea of the cause of failure.
The sync process is split into smaller components - Agiloft Sync Updaters - each of which updates a particular object; for example tables and fields, saved searches, and so on. The update might be prevented by an unsatisfied dependency, in which case the updater updates what it can, and returns the corresponding status - "In Progress", or "Stalled" if nothing could be updated.
If there are updates by other updaters, the updater is invoked again because other updaters might have created or updated the necessary dependencies. The process is repeated until either:
- Everything is done
- All updaters are stalled - a transfer failure, or
- There is a critical error that stops the sync process.
Sync Logs
The entity set sync logs, primarily sync.log, is found at <Installation_directory>/wildfly/standalone/log/sync.log.
In some cases sync issues can be found by other
Agiloft activities, so it could be helpful to use the server.log files at <Installation_directory>/wildfly/standalone/log/server.log.
Sync is sensitive to concurrent database level operations. Please avoid running a KB import/export/deletion or concurrent syncs on the same server while attempting to import an entity set.
To search through the log history, use the date/timestamped files (sync.log.YYYY-MM-DD, server.log.YYYY-MM-DD).
These Unix log commands can also be useful for troubleshooting:
-
grep -e "text_to_search" sync.log*- returns all sync.log.* files that contain the text_to_search. -
vi sync.log- opens the sync.log file for viewing. -
tail -nXX sync.log- displays the last XX lines of the file.
Locate the Error
Find the log entry with the error message shown in the sync result message - by text searches or timestamp - and check the log entries just above that message. There is often helpful information here, including:
- The full stack trace of an exception.
Information relating to what the sync was trying to do at the moment of failure:
DEBUG  [ard.modularity.UpdatePlan] Performing iteration 0, plan size is 19
2017-07-29 16:48:12,699 INFO   [.modularity.ExportProcess] Running <span class="SIBoldMark">Rules updater</span> (step 6 out of 19)
2017-07-29 16:48:12,702 DEBUG  [ers.EntityPairUpdaterBase] Analyzing EntityPairUpdaterBase::com.supportwizard.modularity.updaters.RulesUpdater for source Demo(2) and target Carrier KB(3)
If this information is still not enough, try to review the logs further.
- If the log entries do not have any specific information on what caused the issue, check the server.log entries at the same time for any other critical errors not related directly to the sync process.
If the server log entries have information about an entity, check the sync log entries for occurrences of errors by the UUID or name of the entity. It is possible that some other error occurred earlier which is the real cause of the issue. For more information, see UUID Recognition and Sync Conflicts.
Server logs contain entries with different levels of priority (debug, info, warn, or errors). In most cases, you should look at the log entries with WARN/ERROR priority levels.
If you need further technical assistance, contact the Agiloft support team by submitting a ticket with the attached sync.log and server.log files: Get Support.