Incidents
Incidents are used to report service problems and outages. They represent interruptions to customer service. The objective is to return to the normal service as quickly as possible with minimal business impact. An example of an incident for an end user might be: "I cannot access my email."
What is the distinction between Service Request and Incident? Incidents are interruptions or degradations of an existing service that need to be rectified. They are problems that need to be solved, rather than a request for new service or a change to a functioning service, such as a new employee setup or new software application request. Incidents and service requests are held in separate tables.
Incidents may result from underlying problems caused by misconfiguration or hardware failures, and an underlying problem may result in several end users submitting Incidents. When this is the case, the underlying problem may be reported and managed in a separate Problem record.
When an incident is caused by an underlying problem, the technician working on the incident can link the incident to an existing problem record or create a new problem record. They may also click the Save and Create Change Request button to create a change request, if they wish. The Change Request keeps track of incidents that are linked to it.
Problems may require significant changes in order to be permanently resolved. In this case, the technician working on the problem will link it to a new or existing change request. While a problem may stay open until the change is implemented, often a workaround is found to resolve the interruption in service for the customer.
The system is set up to make it easy to generate and relate Incidents, Problems, and Change Requests, and to quickly and automatically propagate workarounds from problems into all related incidents.
Creating Incidents
Incidents may be created by internal customers through the web portal in the same manner as for service requests, via email, or by a technician taking a telephone call from a customer. When incidents are created through the user emailing a specific address, the subject line of the message becomes the Summary of the incident, the message body becomes the Description, and the Source field is set to Email.
Incidents may also be created by network monitoring systems configured to send problem reports to the system through one of the standard APIs. If you are using Agiloft's Event Management module, you can specify which event types should result in an incident, and which kinds of event resolutions should close the incident. See more details in the Event Management section. A field in the incident form specifies the reporting source (email, web, phone, event monitoring system, etc.).
A technician may convert a service request to a new incident via an action button in the SR form if a customer submitted a service request when he should really have submitted an incident. incidents can also be created from a change request, when they result from a change that has been implemented.
End User Record Submission
When a customer submits an incident, the contact fields automatically populate based on the details in his/her User record. In the default setup, an Incident cannot be submitted on behalf of a user who has no user record in the system. This may easily be changed by modifying the linked fields from the User table to enable "non-source" values to be used.
If the user clicked the Create Request button from the view of services in the service catalog, the system will also populate the Business Service and the Service Problem Type automatically. If the user created the incident by clicking on a Create an Incident link, then the user will need to select the Business Service and the Service Problem Type from the drop-down fields.
The user then describes his/her problem in more detail via the Summary and Description fields.
There are two fields to describe the priority of the incident: Impact and Urgency. Impact specifies how widespread the Incident is: A user whose desktop computer is malfunctioning would choose 'Affects Single User', whereas a critical server failure might be classified as 'Affects Company'. Urgency is a subjective measure of the criticality and time sensitivity of the incident, and ranges from Low to Critical. Both Impact and Urgency are used to automatically determine the official Priority of the incident, a field which is only editable by IT staff.
After providing the summary, description, impact, and urgency, the user clicks Finish and receives an automatic email notification when the system creates the record.
Technician Record Submission
A technician creating an incident sees additional information relating to the status of the incident, including assignee and status fields. Unlike end-users, technical staff can see an additional section on the details tab for Configuration Item Information that shows fields relating to a specific configuration item. By default, incidents are created with the Relevant CI Identified? field set to No, but if a staff person determines the CI that is the root cause of the incident, he or she may set this field to Yes and select a configuration item via a linked field set.
Incidents are automatically assigned based on the selections made in the Service Problem Type (the service record) about which team should take priority - the CI team, if there is one, the service responsible team, or the default 1st Level Support Team. Technicians can also set the assigned team and assigned person manually via drop-down lists.
If the Relevant CI has been identified, and if the service has been defined to give the CI team priority, when the incident is saved, a rule will assign the team responsible for the CI selected to the incident. A technician may change the Assigned Team field later, as the rule will only set the Assigned Team at the time the incident is first created.
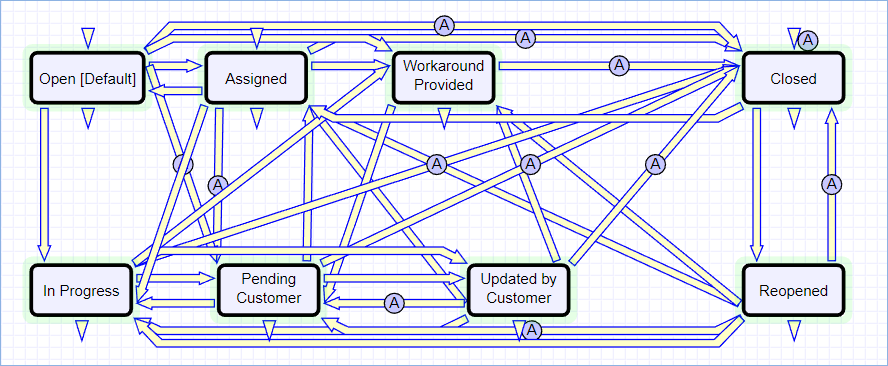
New incidents are created in a status of Open by default. During creation, a technician may change the status to Assigned (if he wishes to indicate it has already been assigned to an individual) or Closed (if he was able to resolve the issue over the phone and wants to capture the request for reporting purposes).
Automatic Emails Sent upon Submission
If a technician creates a record in a status of Closed an email is sent to the customer telling him/her how to reopen the incident. This email is sent by a workflow action and is displayed as a checkbox that can be turned off by technician users. This option is set in the workflow options.
If the status is not Closed when saved, a rule will send the customer an acknowledgement email and will also send an email to either the Assigned Person, if there is one, or to the Assigned Team if not.
Incident Form Layout
This section contains an overview of the information stored in an incident record.
Common Area
In the common area, an incident Summary must be entered to briefly describe the issue. An Assigned Team and Assigned Person can be selected, and anyone who wants to be CC'd on all notifications can be added to the Internal CCs field. If an Assigned Team is chosen but an Assigned Person is not, all team members will receive a notification. If an Assigned Person is chosen, the email will be sent only to that individual.
Details Tab
The Details tab contains most of the basic information for an Incident including the submitter, service and service problem, priority, description, files, and related CIs.
Submitter Information
The submitter fields, Submitter Name, Preferred Notification Method, Phone, Department, and Service Level in the Submitter Information section default to the person who creates the incident, but this can be changed by clicking the lookup icon.
Incident Information
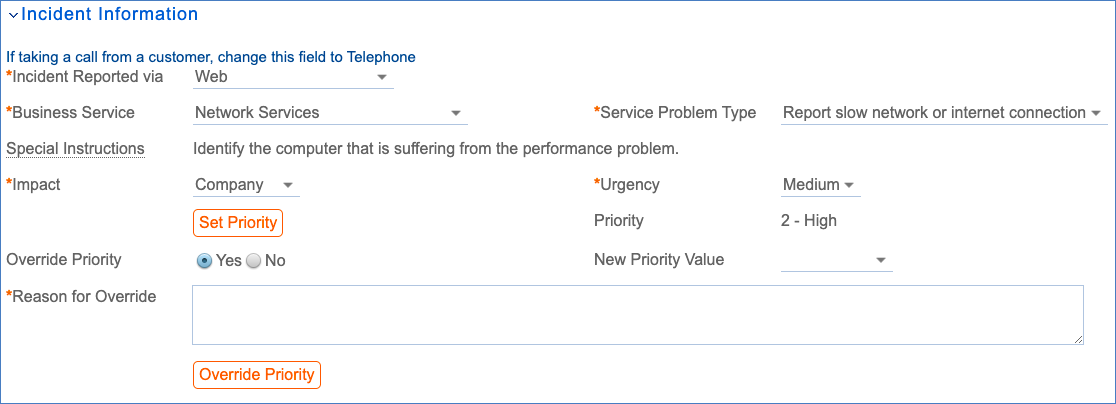
The Incident Information section contains an overview of the incident itself. Incident Reported via can be used to indicate how the incident was submitted, with options of Web, Telephone, E-mail, Voicemail, and Event Monitoring System. Next, a Business Service must be selected. Depending on the Business Service chosen, certain Service Problem Types are available to categorize the incident further. Impact indicates the scope of the incident's effect, and Urgency can be used to convey how important it is to resolve the issue. Impact and Urgency have options that are available based on the Priority Group for the Service Problem Type selected. Once Impact and Urgency values are selected, the Set Priority button can be clicked to view the priority that will be automatically assigned when the record is saved. If this automatically-generated Priority needs to be manually overwritten, Override Priority can be set to Yes, a new Priority can be selected, and a Reason for Override must be entered before clicking the Override Priority button.
The Description field allows for a more detailed explanation of the incident.
CI Information
If there is a configuration item involved with the incident, it can be selected by setting Relevant CI Identified? to Yes. This will make CI fields visible, and a lookup icon can be clicked in order to search for and select the configuration item.
Work Status Tab
The Work Status tab contains information about the SLA, progress notes, resolution information, and fields to allow creation of a knowledge article.
The SLA Title, SLA Support Hours, SLA Target Response Time, and SLA Target Resolution Time are set automatically by a rule, based on the SLA Group of the user who submitted the incident, whether a selected CI has its own SLA, and any SLAs specific to the incident problem type. The SLA targets are set based on the SLA and the priority of this incident. Note that if you have turned off the SLA function, the SLA fields will not be displayed.
Additional Information is an append-only field showing a timestamp and author for each note added. It is used to communicate with the customer, and customers and staff members may view and update it. The Staff Only Notes field also shows the timestamp and author, but is only visible to members of the base servicedesk group and other technical groups, along with admins.
If the particular problem type has any knowledge articles associated with it, they will be shown below the Staff Only Notes. This allows you to create articles providing troubleshooting steps or staff instructions for each problem type and to display these scripts within the incident. You can alternatively put such details into the Special Instructions field for the particular problem type and display it in the form.
Tasks/Cost/Time Tab
Any tasks generated for the incident are shown on this tab, as well as service costs, if any, and the amount of time spent on the associated tasks. More on task generation can be found in the Tasks section below.
Closing Tab
The Resolution and Closure Category fields are populated when closing an incident, along with Reason for SLA Breach, if the target was not met. Publication fields appear when an incident is Closed, and can be used to mark this incident as a Standard Solution and to create a knowledge article based on it.
Related Records Tab
The Related Records tab can be used to show records that are related to the incident. More on linking incidents to problems, service requests, and change requests can be found in the Processing Incidents section below.
Stats / History Tab
This tab shows event dates including Date Created, Date Updated, and Date Closed. Below, in the History Events section, each row represents a record edit made by a person or rule and shows the user or rule that made the edit, the date and time of the edit, the fields that were changed, the previous value of the fields, and the updated values. Edit a history record to see the details.
The SLA Response Met and SLA Resolution Met fields are updated automatically when the response time or resolution time passes.
Processing Incidents
This section describes how to process incidents.
Requesting Information from the Submitter
If a technician needs more information from the customer in order to work on an Incident, they can add a note to the Additional Information field and set the status to Pending Customer. A workflow action will automatically send an email to the submitter requesting further information. The email includes the content of the Additional Information field, an append-only field used to communicate with the submitter. The email includes a link for the customer to open the Incident directly.
Reassigning Incidents
If the technician needs to reassign the Incident to a different team or person, they can simply change the Assigned Team and/or Assigned Person field and the system will email the new assignee notifying them of the reassignment.
The Staff Only Notes field is an append-only field that holds technician working notes that are not visible to the customer.
SLAs
An SLA is assigned to each new incident automatically. If the incident has a related CI, and the CI has an SLA, that SLA is used. If not, an SLA is chosen that meets the following criteria:
- The SLA is available for the service in the incident.
- The SLA is available for the SLA Customer Group to which the Submitter of the SLA belongs or the SLA Type is Corporate.
- The SLA is either Active or In Review.
- If the previous criteria are met for more than one SLA, the SLAs are sorted by SLA Type, and the first one is chosen. SLA Types are sorted in the following order: Configuration Item, Service-specific, Customer Group, and Corporate.
Once an SLA is set for the new incident, an SLA Target is set automatically. The SLA Target defines the Response Time, the Resolution Time Warning, and the Resolution Time in minutes. These times are used in the incident to set the SLA Response Due Date, SLA Warning Date, and SLA Due Date. Once these dates are defined, rules running every 10 minutes in the incident check whether the dates have arrived. Note that these rules are disabled in the out-of-the-box system and should be enabled when you are ready to start using the system.
The SLA response measures how long it takes a technician to change the Status of the incident. A rule captures any change to status and tracks whether the response was met at that time. If the SLA Response Met is still empty when the SLA Response Due Date arrives, the system compares the Actual Response Time to the SLA Target Response Time. If the Actual Response Time is less than the SLA Target Response Time, the system marks that the SLA Response time was met by setting SLA Response Met to Yes. If the Actual Response Time is greater than the SLA Target Response Time, or if the Actual Response Time is empty, meaning that the Status of the incident was never changed, SLA Response Met is set to No. If the SLA Response Time was not met, an email is sent to the Assigned Person, Assigned Team, and the Assigned Team Leader and a browser pop-up also alerts the Assigned Person and Assigned Team to the breach.
The SLA resolution target is met if the incident is marked as Closed before the SLA Due Date. If the incident has not been closed before the SLA Warning Date, an email is sent to the Assigned Person, the Assigned Team, and the Service Escalation Team to warn them of the upcoming SLA deadline. Once the SLA Due Date arrives, the field SLA Resolution Met indicates whether the incident was closed in time. If the incident is Closed before the SLA Due Date, the SLA Resolution Met field is immediately set to Yes. If on the SLA Due Date the incident is not yet Closed, the SLA Resolution Met field is set to No. In addition, if the SLA is breached and there is a Service Escalation Team, the Assigned Team for the incident is set to the Service Escalation Team and the new Assigned Team and Assigned Team Leader, in addition to the Assigned Person, receive an email alerting them of the breach. If there is no Service Escalation Team defined, an email is sent to the current Assigned Team, Assigned Person, and the Assigned Team Leader.
Tasks
Depending on the service, an incident may have predefined tasks. Within a service, there are three Task Generation Method options:
- User Selected Tasks: Individual task templates are defined in the service without a sequence defined, and one or more of them can be selected and generated within an incident for that service.
- Predefined Task Workflow: A series of tasks are defined in the service as the default task workflow, generally with a sequence defined. In an incident for that service, the entire task workflow is generated.
- User Generated Ad hoc Tasks: Within an incident, tasks can be manually created that are not based on a template.
For instance, an incident with the Business Service of 'Facilities Maintenance and Security' and Service Problem Type of 'Lost Keycard' automatically shows three checkboxes representing tasks that can be selected and generated for an incident.
To use one or more of these tasks for this incident, follow the steps below.
- Select the task(s) checkbox and click Generate Tasks. The tasks will be generated and shown in the Tasks related table.
- By default, these user-selected tasks are not sequenced and can be completed in any order. It is usually better to create a task workflow if you want a sequential process. However, you can also take the unordered tasks and modify them to identify prerequisites. To indicate that the task has prerequisites, edit it and navigate to the Related Tasks tab.
- Set 'Enable Prerequisite Tasks' to Yes to show the fields used to create task prerequisites.
- Next, select the task that should precede this one from the Add Task to Prerequisites drop-down and then click Add to Prerequisites. If there will be more than one task in the sequence number before this task, you can use the Trigger Condition field to specify whether this task should be launched when all of the tasks for the previous sequence number are complete or if any one of them is complete.
- The prerequisite task will then be shown in the Prerequisite Tasks table and the Number of Prerequisite Tasks will be incremented.
- Save the task. Once saved, the task's Sequence number will be automatically updated to reflect its new position in the task workflow.
- The task chosen as a prerequisite will also be updated to show the tasks that are dependent on it.
- Set 'Enable Prerequisite Tasks' to Yes to show the fields used to create task prerequisites.
Additional tasks can be modified in the same way. Once the task sequences are set up and any other modifications that might be needed are complete (for example, the default Assigned Team or Person could also be changed), the tasks can be launched by clicking Launch Tasks. This will update any tasks that do not have prerequisites defined to a status of Assigned and trigger an email to the Assigned Person, or, if there is no individual assigned, the entire Assigned Team. In addition, the Status of the incident will automatically be set to In Progress.
If the tasks have a sequence defined by setting prerequisite tasks, tasks of a certain sequence number will only be launched once the previous tasks are complete. In our example task workflow, the two tasks with a Sequence of 2 are marked as Assigned once the first task is Completed.
Closing Incidents
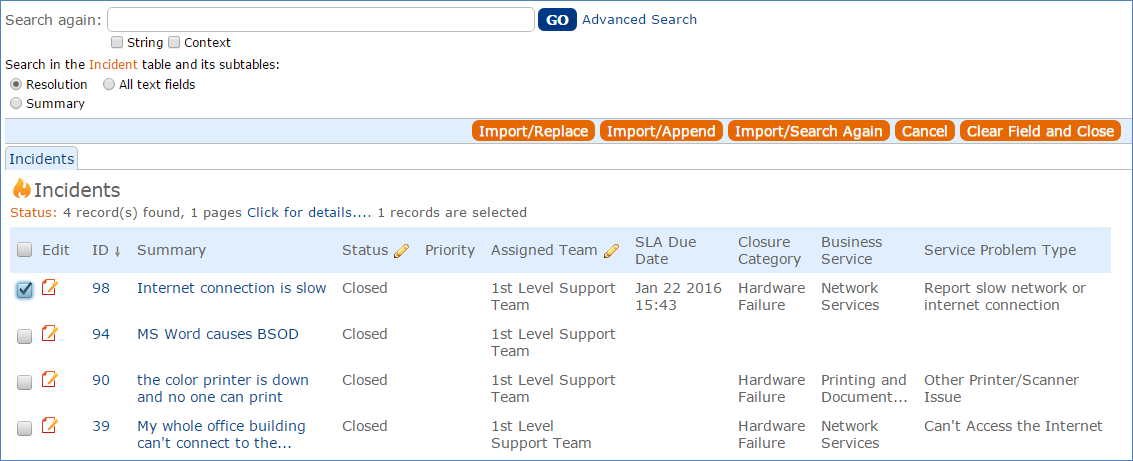
When the technician completes work on the Incident, they set the Status field to Closed and put the solution notes into the Resolution field. If a similar incident has been resolved and marked as a standard solution, a technician can click on the lookup icon next to the Resolution field. Clicking this icon opens a new window showing all previously resolved incidents marked as standard solutions.
The technician can use the search bar at the top of the window to look for incidents most relevant to the one that is currently being closed. If an incident with a similar resolution is found, use the Import/Replace button to select it. This will copy the previous incident's resolution into the current incident, where it can be modified as needed.
Closing an incident triggers a workflow email to the customer that includes the content of the resolution field and tells the customer that the request has been completed. A closure category should also be added at this time. When an incident is marked as Closed, publication fields appear.
If the incident's resolution might apply to future incidents, set Standard Solution to Yes. Once standard solution is Yes, the resolution in this incident can be used in the Resolution field for future incidents.
Setting Review for Knowlegebase to Yes indicates that a knowledge article should be considered for this incident. Once Review for Knowledgebase is Yes, the Knowledge Document Status and Create Knowledge Article fields are visible.The default value of Knowledge Document Status is Pending Review, and once Create Knowledge Article is clicked, the Knowledge Document Status automatically updates to Created. If it turns out the knowledge article is not necessary, Knowledge Document Status can be changed to Not Needed manually. Clicking Create Knowledge Article opens a new knowledge article record with some information mapped from the incident, such as the Title, Purpose, and Description. Additional required fields must be populated before saving the record. Once the new knowledge article is saved, it is automatically linked within the originating incident.
In addition, the knowledge article will automatically include information about the source incident.
When an incident is closed, an email such as the following is sent to the Submitter:
Dear Customer,
We believe we have resolved your Incident. The resolution is:
The keycard was not in the lost and found, so we decommissioned the old card and generated a new card. You can pick it up any time.
Further information about your Incident is included below. If you would like to reopen your request, click here and add your comments in the additional information field.
We appreciate hearing your feedback so that we may improve our service. Click here to submit a survey.
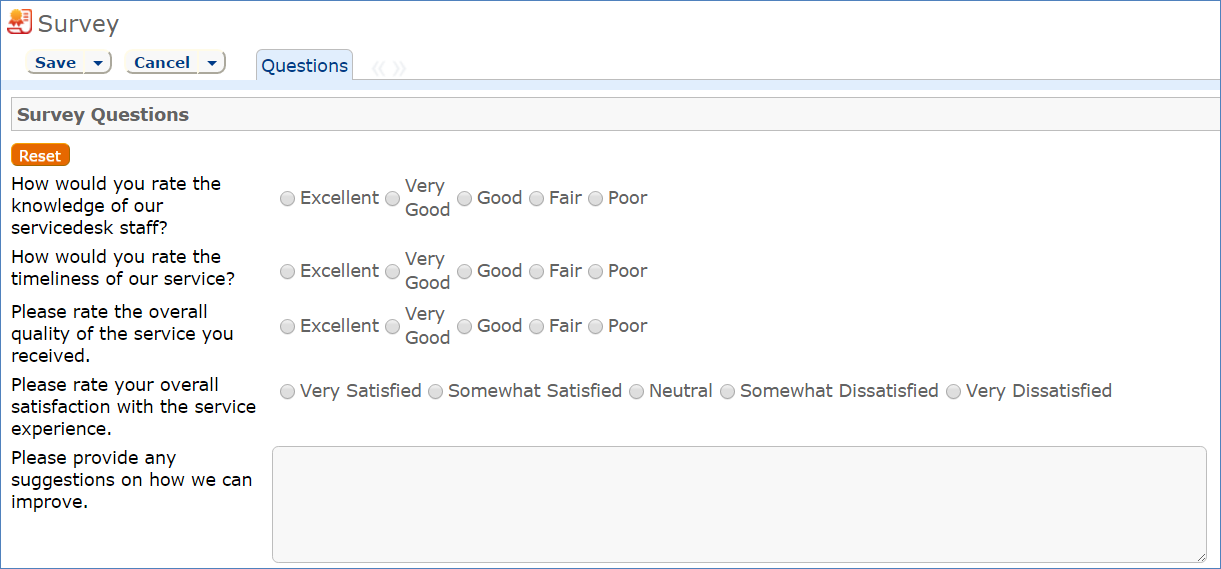
If the submitter chooses to submit a survey, a new Survey window opens.
Once the survey is saved, it is added to the Surveys table, where it can be included in reports and used to inform service improvement plans. Note that the link in the closing email that brings up the survey will first need to be modified to use your system hostname, KB name, and other parameters.
Creating or Linking to Related Records
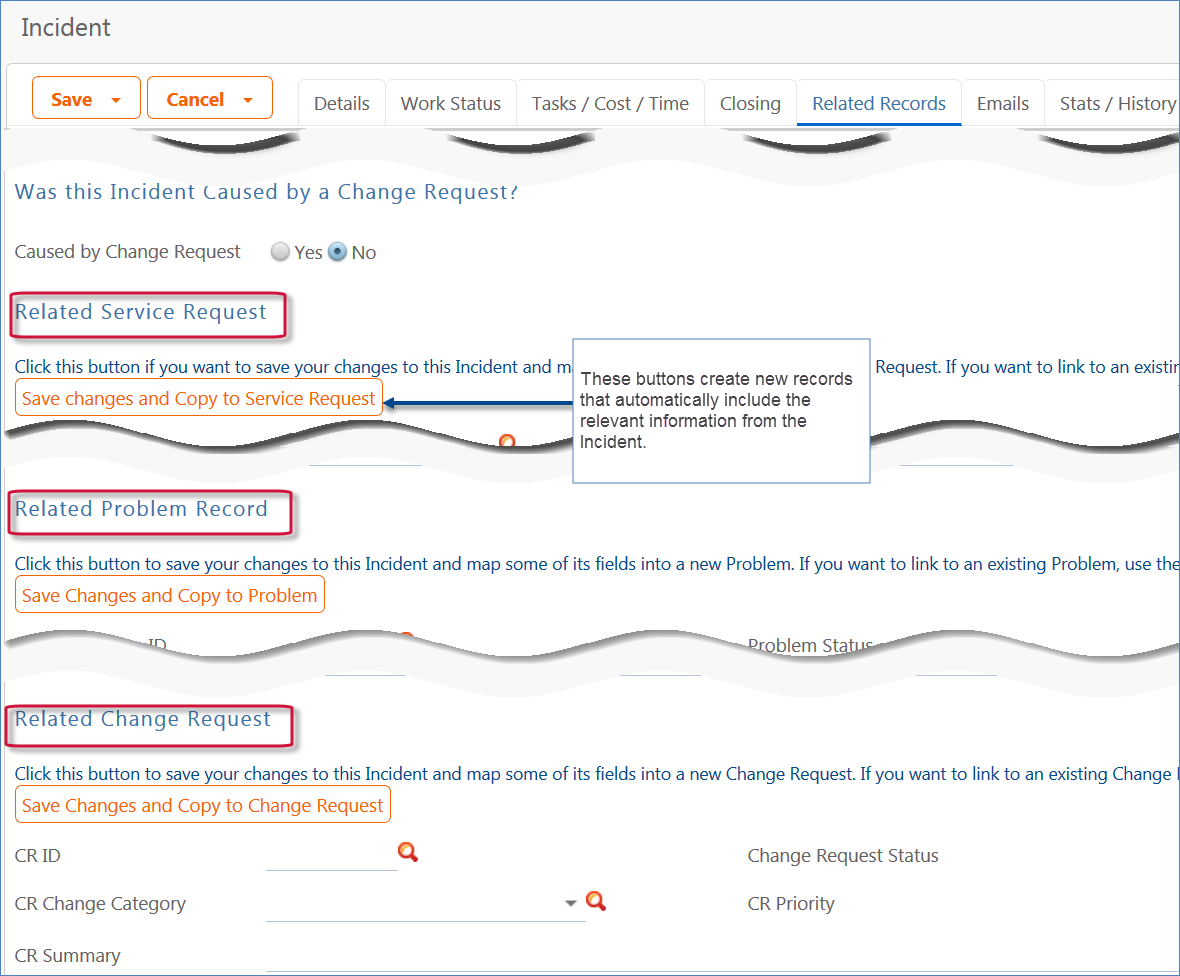
The Related Records tab allows problems, service requests, and change requests to be generated from the incident. To create a service request, for example, click Save Changes and Copy to Service Request. That will open a new service request record with some information automatically populated, including the Summary, Submitter, Business Service, and Description. Clicking Save Changes and Copy to Problem or Save Changes and Copy to Change Request will each open the new record on the screen so that it can be updated before saving, and the basic information is again mapped from the incident.
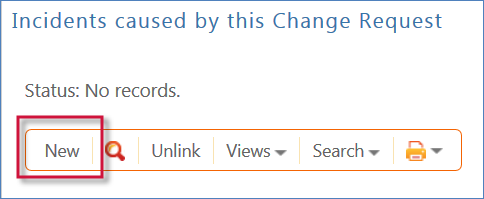
These sections – Related Service Request, Related Problem Record, and Related Change Request - also allow you to link the incident to an existing service request, problem, or change request. If the incident was caused by a change request, Caused by Change Request should be set to Yes, which makes visible a link to change requests. The source change request can be selected using the lookup. If the incident was created from within a change request by adding a new Incident in the area called Incidents caused by this Change Request, then the Caused By Change Request field in the incident will be populated automatically.
Cloning Incidents
If a new incident to be reported is almost identical to an existing incident, the older incident can be cloned from the main table view of incidents. To do this...
- Select the incident in the table view and then click Clone Incident in the action bar. This opens a new Incident record with most of the basic information pre-filled based on the cloned incident.
- Make any desired changes to the newly cloned Incident, then save the record.
Note: The submitter information is not mapped from the older incident, but instead defaults to whoever clicked the Clone Incident button.
It is also possible to copy all information from an existing incident into a new incident. We don't recommend this as it also copies the date created and other fields such as SLA due date. But if it is desirable to copy everything, you can select the incident, hover over Actions in the table menu, and click Copy.
Linking Related Incidents
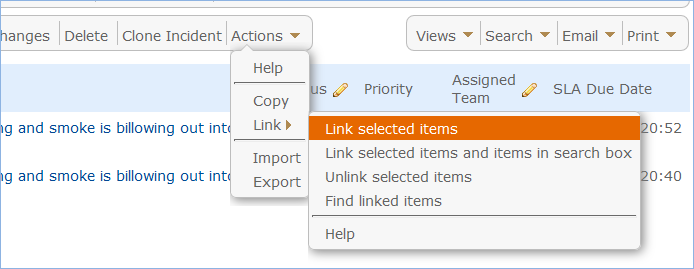
When incidents are cloned or several incidents are submitted about the same problem, it is easy to link them together so they can all be dealt with together. Get the incidents you want on the screen, and then in the action bar choose Actions > Link > Link Selected Items.
This will link each incident to the others. Later, when you want to address all of them, you can find all incidents linked to any one of them by selecting one incident and mousing over the same menu shown above and selecting Find linked items. That will bring all of the incidents on the screen. From there, you may select them all and click the Mass Edit button to close or update them all at once.
Relating Incidents to Problems
If an incident has an underlying problem that needs to be addressed, the technician may quickly convert the Incident into a related Problem record. Or she may use the Linked Problem lookup to search for existing Problems that may be the cause of this incident, and if one is found, link the Incident to that Problem. When an Incident is linked to a new or existing Problem, the Incident may be automatically updated from the Problem record when a workaround or solution to the Problem is identified.
Within the Problem record, a button may be pressed to copy the workaround for the problem into all related Incidents, set the Status of the Incident to Workaround Provided, and email the assigned person, the submitter, and any cc's. Another button may be pressed to populate the Problem's Solution into the related Incidents, set their Status to Closed, and email the customers.
Reporting Time Spent
Technician users may easily report the time they spend on handling Incidents. On the Tasks / Costs / Time tab, the Time Spent, Time Description, and Add Time fields are used to report time. Entering values there will automatically create a new Time Entry record after clicking Add Time. The time entry will show the work done by the technician and the current date.
All the time entries for a request can be seen on the Time tab as well. If a technician needs to report time that was spent on a different day or by a different user, click the New button on the Time spent table to submit a time entry directly and change the date or "Done by" field. All time entered is totaled in the All Time Spent field, which can be used in reporting or billing.
Note that this same time entry methodology is used in the Service Request, Problem, Change Request, and Task tables.
Customer Updates
If the customer updates the Incident at any point, an email notifies the assigned person or assigned team (if no assigned person) of the update. When the customer replies to an email they receive or edits their Incident while it has a status of Pending Customer, the status changes to Updated by Customer and an email notifies the assigned person or the assigned team, if assigned person is empty, that the customer has replied. The customer is able to update the Additional Information field directly and any email reply from the customer is also mapped to that same field.
The closing email to customers includes a hotlink back to the record if they wish to reopen it and instructs them to explain why they are not satisfied with the solution. Clicking the hotlink will automatically change the "I Would Like To Reopen My Incident" field to Yes, which in turn sets the Status of the Incident to Reopened and notifies the assigned person.
Workflow
Ownership
Records in the Incident table are "owned" by the individual submitter. This means each record is associated with a particular employee login and no other "end user" employee will be able to edit that record. All technician users are able to edit any Incident by default.
Reporting and Statistics
This section describes a few of the out-of-the-box reports and describes some of the statistics available for Incidents.
Fields Used in Reports
Several fields are included that are used for statistical reporting. The following fields may be of interest:
- Number of Assignees – is auto-incremented each time the assigned person changes
- Number of Teams Assigned – is incremented each time a different team is put in the Assigned Team field
- Number of Reopens – is incremented each time a closed request is reopened by a customer
- Total Hours to Close – elapsed time between Date Created and Date Closed
- Working Hours to Close – elapsed time between Date Created and Date Closed minus the non-working hours of the team in the Assigned Team field and the time during which the Status was Pending Customer
Reports
There are default reports measuring Total Time Spent by Type of Problem, Average time to close by Type of Problem and by person who closed, as well as averages for number of people assigned, number of teams assigned, number of reopens, and so on. With the field structures already there, it is easy to add reports to slice and dice the information the way you need it. Some of the reports included are:
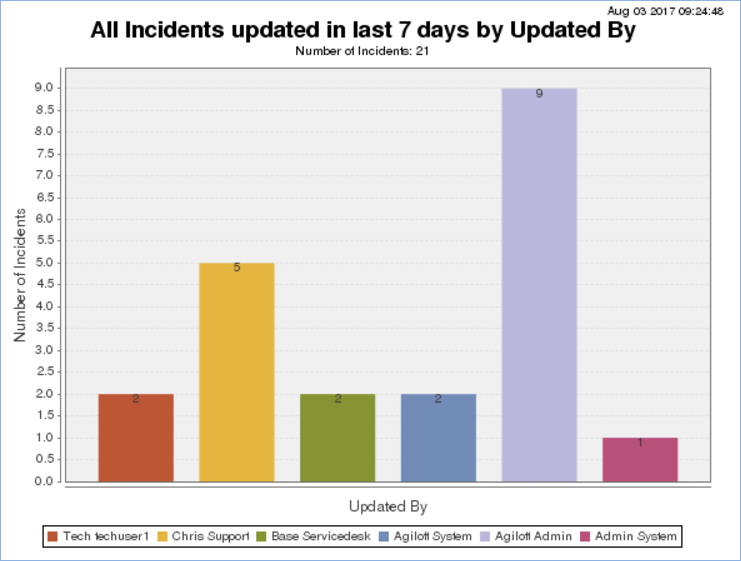
All Incidents updated in last 7 days by Updated By
This report contains a graphical bar chart displaying the number of incidents edited by each user. It also includes an HTML portion with more details on each incident that was edited, including the last Date Updated, grouping by user and showing the most recent update last.
Closed Incidents, grouped by Closure Category
This report contains a graphical bar chart displaying the number of incidents closed, grouped by closure category, and also includes an HTML report.
All Incidents by CI Manufacturer
This report contains a graphical bar chart displaying the number of incidents reported for each CI Manufacturer, grouped by closure category, and also includes an HTML report.

