Chat
Agiloft contains a support chat interface that can be made available to end users. When a user requests a chat, a notification pops up for any staff on the team assigned to chat requests, asking them to accept the request. You can make chat functions available to power users by adding Chat Status to the navigation menu.
Setting Up Chat
Getting the chat feature up and running in your system requires a few different configuration changes:
- Enable Chat from the Setup > Chat menu, and configure the settings that allow power users to accept chat requests.
- Add the chat to the interface end users will access, so end users can initiate chat sessions. Chat is generally added as a tab in the End User Interface (EUI), but it can also be added to a custom webpage or portal if necessary.
Enabling Chat for Power Users
To turn on the chat interface for your knowledgebase:
- Click the Setup gear in the top-right corner, go to Chat, and edit the default session.
- On the General tab, enter a session title. This appears on the chat pop-up window seen by customers, so choose something user-friendly like "Chat with a Support Rep" or "Chat about a Sales Question."
- Enter a Session Nickname. This is shown to power users when a chat request comes in, so they know which session it is. Keep the nickname short to save space.
- Select the launch mechanism for the chat. In most cases, you should select "Web page outside the program," which provides access to a session hash code that you will need in order to add the chat to the EUI. This is also the option you must use if you want to embed the chat in some other webpage or portal.
- Choose when the chat option appears in the EUI:
- Always: The chat always appears.
- Only if a chat power user team member is logged in: The chat appears in the EUI only when someone who handles chat requests is logged in. This is determined by the settings on the Access tab of the Chat wizard.
- During the working hours of the teams: The chat appears only during the working hours of the selected teams. This can prevent situations where a power user who responds to chat requests logs in outside of their normal hours and inadvertently activates the Chat option.
- Click Next.
This opens the Access tab, which controls the power user side of the chat session. When a user requests a chat session, the session only begins when a staff member responds to the request. This prevents the user from waiting in an empty chat room. In a normal chat sequence, a user requests a chat, power users are notified, one of them responds, and the chat session begins.
With that in mind, configure the relevant settings:
- On the Access tab, select the end user groups that can create chat requests, and the power user groups that can respond to those requests. To select multiple groups in the list, hold Ctrl.
- Choose how to present incoming chat requests to the power user groups. You can send the request to everyone at once, or use an automatic round robin assignment to notify one power user at a time. Make sure to select all the groups you want to respond to requests.
If you selected round robin assignment, enter the waiting period for a user to accept the request before the next user is notified.
By default, Agiloft checks for and notifies team members of new chat requests every 5 minutes. You should select a greater frequency for teams that receive chat messages. For more information, see Teams Wizard.
- Choose how to inform customers who request a chat session that no power users are online to respond. You can enter a hard-coded status message that appears on the request page; direct the user to another page in the EUI; or direct the user to another URL outside of Agiloft.
- Enter an idle timeout period, after which the system informs the customer that no one is available. When choosing a timeout period, consider how many power users you chose to notify as an indication of how long you can reasonably expect it to take for a response if someone is available.
- Choose how to inform customers that no power users are available.
- Select a moderator, or turn the feature off. Moderators have the authority to silence individuals in the chat session or remove them entirely.
- Click Next.
This opens the Appearance tab, where you can configure how the chat window looks.
In the Include End-User HTML section, choose whether to use the default End User Look and Feel settings in the chat window. You can use the scheme with or without the header and footer HTML.
The background color of the chat window is configurable using the Form Background Color setting of the Look and Feel scheme.
- Set the refresh rate for the chat window.
- Select a field to use as the Nickname in the chat window.
- If desired, upload a sound file to play when the chat request arrives.
- Click Next.
The rest of the configuration is done on the Mapping tab.
- On the Mapping tab, first select an option for handling the chat transcript.
- If desired, you can set metadata for the chat session, including Type of Chat, Deletable, and Demo Data. These options can keep chat records tidy and searchable.
- If desired, set up conversion mapping to place the chat transcript into other tables or fields.
If you selected "Web page outside the program" on the General tab, the HTML tab appears at the end of the wizard. On this page, you can access the session hash code you will need to set up the chat for end users. Copy the contents of the HTML page into a word processor or other program so you can access it later in the setup.
Adding Chat for End Users
Adding the chat for end user access can be done on any webpage, but is usually done using the EUI. In the EUI, you can launch a chat session with the #ew_chat() macro, when the macro is added to a button or menu item. The #ew_chat() macro uses the session hash code from the text you copied from the HTML tab.
Chat implementation is flexible, and your exact configuration might look different depending on your needs. You might want to make multiple types of chats available to different users based on group membership, or you might just need a simple chat button to show up for the whole Customer group. This page covers the basic ingredients of a successful chat implementation, but you can extend or modify these examples using other EUI tools. For more information about EUI configuration, see End User Interface.
Simple Chat Setup Example
This example describes how to set up a Sales chat button to users in the Customer group.
- Edit
menu.htmin the EUI Templates table. - Use your browser's Find tool to locate the following line of code:
<!--<li id="chat"><a href='#ew_forward("chat.html")'>$ewText.get("menu.chat")–>. This code would create a tab called Chat in the EUI, if it weren't wrapped in the <!-- -> comment tag. Simply removing this comment tag wouldn't be enough, because there is nochat.htmlEUI template. Replace the line of code with the code block below. The script section is a piece of JavaScript that opens a small pop-up window. The conditional text below it is the Agiloft-defined Velocity macro that evaluates whether the user is assigned to the Customer group. Then,
$ew-Text.get("menu.chat")finds the appropriate localized name for "Chat" from thetranslation.propertiesEUI template. For more detail about localization in the EUI, see Text and Localization in the EUI.- Open the document or note where you pasted the HTML contents from the Chat wizard.
- Copy the string between
sessionHash=and&project=. This is the session hash, a unique value that identifies the chat configuration. If you were configuring multiple chat options for users, you would repeat these steps for each Chat configuration in Setup > Chat, since each one would have its own hash code.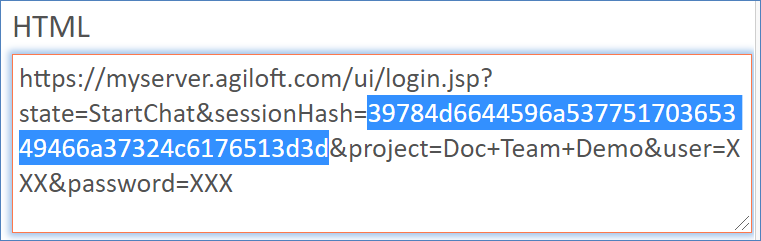
- Go back to the
menu.htmEUI Template and paste the session hash into the "hash" placeholder in the#ew-chatmacro, in the code you added in step 3. Make sure that after you paste the hash, it is still contained in quotation marks.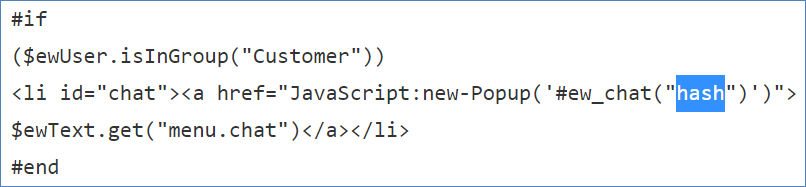
Save this EUI template.
To test your work, log in as anyone in the Customer group to see the new Chat tab. Depending on the Chat configuration settings, you might need to have someone else sign in as a power user who is available to accept the chat, and you might need to do your testing during the receiver group's working hours.
Complex Chat Setup Example
While the example above provides a basic setup for one available type of Chat, if you wanted to have more types of Chat available, it isn't user-friendly to add separate tabs for each type. This is best handled with this menu.htm code mentioned above in step 2:
<li id="chat"><a href='#ew_forward("chat.html")'>$ewText.get("menu.chat")</a></li>
In this code, chat.html refers to the page which should be first set up to show multiple chat options, which can optionally be hidden using the #if...#end Velocity macro options. For instance, a company might have internal customers who might want to chat with support staff or HR staff. In that case you would set up a separate HTML page as an EUI Template record called chat.html. To do this, perform the following steps:
In the EUI Templates table, locate and select the
newsupport_case.htmEUI Template and go to Actions > Copy.- In the Copy Records window, name the new record
chat.html. Edit the new
chat.htmlrecord.- Change the <title> from
$ewText.get("newsc.title")to$ewText.get("menu.chat"). - Change the <h2> from
$ewText.get("newsc.header")toAvailable Chat Teams, with no macro. This bypasses the localization feature of$ewText.get()but keeps the explanation short. Replace the
<div id="main_frame">contents with the new code, replacing the hash1 and hash2 placeholders with the session hash for each Chat configuration:
This provides two different chat sessions for users in the Customer and Guest group, while those who are only in the Guest group see only the Sales Chat option. This setup requires you to set up a second chat definition in the Chat wizard at Setup > Chat and copy the session hash in each #ew_chat() macro for the appropriate chat definition.