The Agiloft Contract Assistant for Outlook can fulfill multiple different functions between Microsoft Outlook and Agiloftis a powerful tool that helps you work with contracts. With the Agiloft Contract Assistant for Outlookapp, you can easily:
- Add attachments from existing records to an outbound email
- Add email information, such as attached files and email text, to existing records
- CC
CC Agiloft in an email to ensure responses are automatically captured in the systemCompanyname
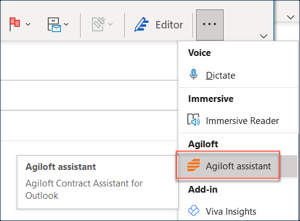
These functions are covered in the Use Cases section in this article; the first function listed above is covered in the first use case and the second and third functions are covered in the second use case. To begin using the app, click the large A icon on the top right corner of Microsoft Outlook. You can also launch the app using the three dots found on the far-right of an email message.
...
Before you can use the app, you need to configure it in your KB and install it in Word.
Logging In
To log in, follow the steps below. If this is your first time logging in to the app, consult the Initial Use section.
- Open Microsoft Outlook.
- Open an email,
...
- or create a new email draft.
...
- The app should now be clickable from either:
- The ribbon:

- The three dot menu:
- The ribbon:
- Choose your KB.
- Input your
credentials, and click Log in.Companyname
| Anchor | ||||
|---|---|---|---|---|
|
...
The first time you open the app, you need to connect to a KB. To do so, follow these steps:
- Open the app and click Add KB.
- Input the URL and Name of your KB.
- A button appears that begins with "Authenticate In..." and then your KB name. Click this button.
- Input your Agiloft login information and click Submit.
...
- Microsoft Outlook.
- Open an email, or create a new email draft.
- The app should now be clickable from either:
- The ribbon:
- The three dot menu:
- The ribbon:
- Open your KB in your web browser.
- Copy the URL from directly after the
https://through.com. Thehttps://is included by default in the app, so you don't need to copy that part of the URL. Any additional URL string will result in an error in step 6.
- Paste the shortened URL into the Your
website field.Companyname - Click Continue. If you get a network error, check that you entered the URL correctly by repeating steps 5 and 6.
- Select your KB from the drop-down list. If you see a field instead of a drop-down list, copy the KB Name from the top right-hand side of
, just to the left of the Help icon, and paste it in the field.Companyname - Click Add.
- Enter your login information for the KB you opened in step 3. Then, click Log in.
Connecting to additional KBs
You can connect the app to multiple KBs. To add KBs, simply click the server icon, click Add KB, and enter the KB information. Once you've connected to additional KBs, you can select a KB when you log in:
- Open Microsoft Outlook.
- Click the app from the top right-hand side of Outlook.
- Click Add KB. If you don't see the option to Add KB, click the server icon and click Add KB.

Draft
When you click the Agiloft icon while drafting an email, the app includes the following options. Points of interest are designated by numbers.

- The "Search In" field drop-down list shows tables that were selected during the configuration process. You can configure multiple tables to appear here; in most cases, the list includes Contracts.
- Use the "Search records" bar to run a simple text search in the selected table. The text search searches against the fields that were selected during the configuration process.
- Select a record from the list of results for an additional section to appear at the bottom of the pane.
Selecting a record causes this pane to appear. The pane shows a few key record fields, based on how the feature was configured. Clicking the link next to Attachments allows you to view and select Attachments that you'd like to add to the response. The "Add this Contract as a Recipient" button adds the email address from the selected record to the CC field of the open email.
Note Superseded attachments are not included in the Attachments list.
Existing Email
When you click the Agiloft icon after opening an existing email, the app includes the following options. The first three numbers are the same as above, with the only difference in the fourth being the button.
- The "Search In" field drop-down list shows tables that were selected during the configuration process. You can configure multiple tables to appear here; in most cases, the list includes Contracts.
- Use the "Search records" bar allows to run a simple text search in the selected table. The text search searches against the fields that were selected during the configuration process.
- Select a record from the list of results for an additional section to appear at the bottom of the pane.
- Selecting a record causes this pane to appear. This pane is configurable to show different fields from the records of whichever table is selected under the "Search In" drop-down list. The "Add to this Contract" button adds the email to the record.
Use Case
This section showcases a sample use case of the Agiloft Contract Assistant for Outlook.
Push Email Information to Existing Records in Agiloft
You can push email information, such as attached files and email text content directly to an existing record in Agiloft. While this feature is commonly used with emails in your inbox, you can use the below method for emails in any folder, including Sent.
- Open the KB in your web browser.
- Copy the URL from directly after the
https://to.comonly. Thehttps://is included by default in the app, so you don't need to copy that part of the URL. - Paste the shortened URL in the Your
website field.Companyname - Select your KB from the drop-down list. If you see a field instead of a drop-down list, copy the KB Name from the top right-hand side of
, just to the left of the Help icon, and paste it in the field.Companyname - Click Add.
Working with the App
For information about adding email information to records, or adding record information to emails, consult the sections below.
Adding Email Information to Records
Use the app to attach emails, and their attached files, directly to existing records in Agiloft. This is often used for emails in the inbox, but you can use it in any folder in Outlook. For example, if you sent a follow-up email and later decide you want to add it to the record, you can go to the Sent folder and add it from there.
- Open Microsoft Outlook.
- Open an email that contains information you'd like to add to a record.
- Open the
app and log in.Companyname - Select the table you'd like to work with from the drop-down list at the top of the app. This populates the app with all the records from the table you selected.
- Search for a specific record, or simply scroll through the list. Select
- Open Microsoft Outlook. On Desktop, launch the app by clicking the Agiloft icon on the top right-hand corner of your ribbon. On Web, do so by opening an email and clicking the three dots found on the far-right of the email message. For example purposes, let's assume we received an email with an NDA agreement from a third-party company called Acme, and we want to upload the contract to Agiloft.
- Click Sign In on the pane that appears. Input your credentials and click Submit. You can also log in via SAML or OAuth using their respective buttons.
- After logging in, use the Search In drop-down list to select the table you'd like to work with. For our example, we'll select the Contracts table, but you can use any table in your system. This populates the app with all the records from the Contracts table. You can also search for records from the selected table using the Search records bar. In this example, we might search for Acme in order to pull up existing Contract records in the selected table that mention the third-party company.
- The search for Acme reveals a Contract record called "NDA for Acme" that is in the Pending Approval status. Select the record to open a small window at the bottom of the app. This window contains information about the fields that were selected during the Configuration process.
- Click Once you've verified the information in the small window, click Add to this Contract [Table Name] to send the information found in the attachment email to Agiloft. Clicking this button creates
.Companyname - The email information is sent to
as a new recordCompanyname
- in the
- Email Communication History table that is linked to the record selected in step
- 5. This record contains the original recipient, subject, actual text content of the email, the actual attachment, and the date the record was created.
- The email information is sent to
Respond to Emails using the Agiloft Contract Assistant
You can use the app to easily add relevant information when crafting response emails. You can also ensure that any responses to your email are recorded automatically in Agiloft. We'll build off of the NDA agreement example in the previous section.
- If the email has a file attached, the file is sent to
as a new Attachment record that is linked to the record selected in step 5.Companyname
- If the email has a file attached, the file is sent to
Emails that have been sent to Agiloft are marked with a blue icon.
Adding Record Information to Emails
Follow the steps below to add information from your KB directly into email drafts, and ensure responses to your emails are recorded automatically in
.Companyname
- Open Microsoft Outlook.
- Open In the email you'd like to respond to, and click Reply or Reply All. For our example, this is the same NDA agreement email we pushed to Agiloft in the previous section.
- Open the Agiloft Contract Assistant,
app and log in if prompted.Companyname - Select the Contracts table. Search for the ID of the same NDA agreement Contract record from step 4 in the previous section and select it.table you'd like to work with from the drop-down list at the top of the app. This populates the app with all the records from the table you selected.
- Search for a specific record, or simply scroll through the list. Select the record to open a small window at the bottom of the app.
- Click the link In the small window that appears, click the numerical hyperlink in the Attachments field to view the record's attached files. Building off of the previous example, we would see the NDA agreement we added listed here along with any other attachments.
- Click an attachment to add it to the email. There is no specific limit to the amount of attachments you can add to an email from the app, but if you add a significant amount you may not be able to send due to the standard Outlook parameters for email size. You can add attachments from multiple different records simply by opening a new record in the app after adding an attachment from a previous record., you might exceed Outlook's email size limits.
- Click Now that the email draft has some attached files, click Add this Contract as a Recipient. This adds the inbound email address from the configuration process to the CC field of the email draft. If the recipient to the draft email responds any recipients respond with the inbound email still CC'd, Agiloft automatically captures the email response
creates a new record in the Emails table and links the new Email record linked to the existing record selected in the Contract tablestep 6.Companyname - If you click Add this Contract as a Recipient on multiple records, the
- email is
- linked to the record selected most recently.
- If you don't have inbound email set up, you can still click Add this Contract as a Recipient
- to
- push
- email information into the Email Communications embedded table, as long as you send the email soon after the button is clicked.
- Send the email.
| Hide If | ||||||||||
|---|---|---|---|---|---|---|---|---|---|---|
| ||||||||||
Related articles
|
...