| Companyname |
|---|
| Tip |
|---|
This release marks the beginning of a new, simplified version naming scheme, starting with this release, 21. |
Minor
| Companyname |
|---|
This page covers updates for:
...
Release Number
...
Build Number
...
10.6
...
for Release 25.2.
You can find the latest
| Companyname |
|---|
| Previous Release |
|---|
...
| Current Release |
|---|
| Release 25.1 |
New Interface Updates and Options
These new features for user interfaces offer a fresher look and new options to help users with their workflows.
Updated top toolbar with Setup, Preferences, and My Profile access
The top toolbar has been modernized and reorganized to make key features accessible while adding more space for tables, assignments, and searches in the left pane. The Setup menu has been moved to a new gear icon on the top toolbar, and a new drop-down user menu holds Preferences and My Profile along with the Language selection menu and the Logout button.
You can adjust the top toolbar settings by going to Setup > System > Customize Header Menu. There, you can choose whether to show the KB name, Help icon, or user profile image. You can also specify the URLs for the primary Help resource, KB-specific documentation, and more. Users can also edit their individual preferences.
Pop-ups replaced with modals
Pop-up windows have been replaced with modern modal dialogs to make them easier to use, help keep the user organized during nested tasks, and prevent window saturation on the taskbar. Modals appear as an overlay within the same browser window, where they can still be resized and moved around as needed without creating stacks of windows to navigate between. The header includes the full breadcrumb path taken to reach the current editing window, so you can easily reference the other edits you're working on, and you can click any previous step in the path to jump back to that point.
To resize a modal dialog, click the lower-right corner and drag. To move it around on the screen, click the header and drag. During long or ongoing processes, such as progress windows while Mass Edit is applied, you can use the pop-out icon to open a new window while the process completes. This allows you to keep working in your KB while long processes run. A few pop-up windows, like Formula Help, have not been converted to modal dialogs yet.
To modify the appearance of the new pop-ups, go to Setup > Look and Feel > Power User Interface, edit a scheme, and go to the Body tab. You can adjust the title of the pop-up, the current active item in the breadcrumb path, and the past inactive items in the breadcrumb path.
Modal windows will be further refined in coming releases.
Make next steps more obvious with primary and secondary action buttons
Draw users' eyes to the right action buttons by designating buttons as primary or secondary. You can use this option to make the most common buttons more obvious, and guide users more intuitively through your workflows.
By default, all action buttons are marked Primary, and both primary and secondary action buttons have the same appearance. To take advantage of this new feature, you need to designate some action buttons as secondary, and update the Look and Feel:
- Edit the action button you want to show as secondary.
- Choose Secondary as the Button Type in the "This field is displayed as" section.
- Go to Setup > Look and Feel.
- Select either End User Schemes or Power User Interface.
- Navigate to the Forms tab.
- Scroll down to the Form Primary Action Buttons section. This and the following Action Buttons sections allow you to configure button appearance.
When you edit the Look and Feel, you can also configure the appearance of primary and secondary navigation buttons, such as Save, Cancel, Next, and Finish. Navigation buttons are coded as primary or secondary, so you can't change a navigation button from one to the other, but changing their appearance to match the action buttons can be helpful to users.
New look for warning and error messages
Warning and error messages have a new look, with clearer, eye-catching boxes and icons.
The appearance of these messages can also now be adjusted individually, with a new Error Messages and Warnings sections on the Forms tab of the Look and Feel editor.
Input instructions shown in pop-ups to keep layouts tidy
Input instructions no longer take up extra space or appear out of alignment on record forms. Instead, input instructions are now shown in pop-ups, either over the field label or over a question mark icon next to the label. If you choose to show the pop-up over the field label, the label is underlined to indicate that it has input instructions.
The pop-up location is determined by the Look and Feel scheme of the user. To set the pop-up location, go to Setup > Look and Feel, select the interface, and edit a scheme. Then, on the Forms tab, go to the Pop-up Hints section and select the location in the "Show Hints On" field.
If you previously used code in the input instructions in order to insert an icon with a tooltip, you need to update them to contain only the instruction text. Otherwise, your existing icon will be nested inside the native pop-up, which might not work properly or might be confusing to users.
About Agiloft page updated to reflect new release numbering scheme
The About Agiloft page has been updated to reflect the new release numbering convention, and begins with release 21. This follows release 2019_02.
AI Updates and New Word Add-in
Learn how to pull useful content out of attached files and, if you have AI enabled in your system, analyze it automatically. This section also covers some updates to AI features that don't relate to the Word add-in.
Introducing the Agiloft Add-in for Microsoft Word
The new Agiloft add-in for Microsoft Word allows you to integrate an Agiloft KB with Microsoft Word, meaning you can import and export data between your KB and a Word document directly. This add-in was created to draft, import, negotiate, and analyze text found within both new and existing contract documents using Agiloft. Once deployed, the new add-in appears in Word on the right side of the ribbon in the form of an orange gear. You can use the Agiloft add-in with or without AI enabled.
The add-in is primarily used for analyzing Contract documents. When you upload a Contract document to Word, you can use the new add-in to extract clauses and metadata from the document if you have AI enabled. You can also manually identify clauses and metadata easily yourself, which doesn't require AI. You can use the add-in to categorize and vet the metadata and clauses included in the contract, and then send it directly to your Agiloft KB, where the information gets stored as records. You can also use the add-in to directly compare and add vetted clauses and metadata from your KB to the Contract document. For more information about using the add-in, see Using the Word Add-in.
Before you can begin using the Word add-in, you must properly configure it with your KB. This ensures that the add-in knows the correct tables and fields for importing and extracting data. You can configure the add-in by visiting Setup > Integration and then clicking Configure under Word Add-in. For more information on configuring the add-in, see Configuring the Word Add-in.
Automatically update Contract record values from attached file edits
Until now, if contract details were changed during the approval or review process, someone had to update those details in the Contract record to keep them in sync with the document. Now, if you use a print template to generate the document, or if you use the Agiloft add-in for Microsoft Word to manually tag metadata elements, the system can automatically keep contract metadata and clauses up to date. For example, if the Expiration Date is updated in the document, that new Expiration date value can be pushed to the Expiration Date field in the Contract record that represents the contract document.
The Print Template wizard has new options that allow you to configure print templates to push updates back to preexisting records in Agiloft. Select the "field and formula references" checkbox to track metadata updates, or select the "tag references" checkbox to track clause updates. These new options assign content controls to clauses and metadata in a Microsoft Word file based on the field and formula references within the text of the document, so you can push those changes back to the record when you finish working with the file. Additionally, if a document is created this way and then opened using the Word add-in, the metadata and clauses tagged by the Print Template wizard automatically show up on the Annotations page of the add-in.
We recommend additional configuration for this feature to add redlining for clause updates using a script action. With this configuration in place, you can push the data back to Agiloft in two ways:
- Use the "Sync to Agiloft" button in the Word add-in.
- Save the file and use an action button in the Attachment record to update the metadata. The clause data is updated automatically when the file is saved, using a rule.
| Show If | ||
|---|---|---|
| ||
For more information on the additional recommended configuration, see Setting up KBs to use the Agiloft Contract Assistant. |
Easily request access to published AI models
Easily request access to published AI models right from the AI setup page instead of requesting access through the Support portal. Previously, users needed to request access via Support, and then wait for their Access Key and Secret Key. Now, an admin can instantly request access to generic models and obtain the required Access Key and Secret Key by clicking the "Get Keys" button. Creating Machine Learning actions that work with the generic NER, CE and Classification models is only possible after the Access Key and Secret Key have been added to the AI Credentials record.
You can access the AI Credentials table and the Get Keys button by following Setup > Integration > AI.
Automatically deploy or reject new trained AI models
The AI Model table in Agiloft now contains a new rule that, when enabled, no longer requires users to select Deploy Trained Model or Reject Trained Model after an AI Model has a status of Complete following a training session. Instead, this rule automatically deploys or rejects the model based on predetermined success metrics. For example, if a new AI Model's training metrics exceed the successful metric value and the metric direction is Maximize, the new model is deployed.
For more information about the rule, the success metrics, and how to configure them, see Training AI Models.
Select specific labels to use with ML models
A new tab in the Machine Learning action wizard allows users to select a subset of the model's available labels. These selections tell the model which labels to identify and which labels to ignore when they are used to extract data from a contract document.
Previously, when a ML model was used in an action, every label would be identified by default. Being able to choose a subset of labels accelerates document processing, as the model is only working to return data that is actually needed. The Labels tab contains a list of the model's labels, and they are all selected by default. There are labels that work well with almost any contract type, as well as labels that are specifically designed for certain contract types.
The Labels tab also has a search field for quick filtering. If your model contains submodels, the Labels tab shows a list of every submodel's label, with the submodel defined under the Group column.
Integrate Agiloft with LightTag for machine learning projects
Integrate your machine learning projects in Agiloft directly with LightTag, a tool used to optimize the document annotation component of the AI training workflow. LightTag annotation allows users to label specific clauses or metadata within a document, such as a termination clause or introductory greeting, based on text content. The labeled content is then used to train machine learning models to recognize similar labels in other documents.
By directly integrating LightTag and Agiloft, you can send information, such as project data, annotators, labels, and document sets, between Agiloft and LightTag with the click of a button. These buttons run Annotation actions that are specially designed to synchronize information between the two platforms. For more information about how to configure Annotation actions, see LightTag Integration.
LightTag integration is useful only with an Enterprise Extended license. Without this license, the system cannot train machine learning models, which is the principal benefit of LightTag integration. To enable integration with LightTag, input relevant data in the tabs of the LightTag wizard by following Setup > Integrations > LightTag Annotations in Agiloft. The information found in the tabs of the LightTag wizard are used to configure an Annotation action, which are used to share or synchronize relevant data directly between Agiloft and LightTag.
Package multiple models in one container
This release made several behind-the-scenes changes that are helpful for administrators who work with ML models. The Agiloft AI Core model container is now able to use and support ML models from Huggingface. This opens access to several hundred models, which have all been pre-trained on various different language tasks.
The AI Core model container can now also package multiple ML models together. One model may combine up to 20 submodels, depending on the number of labels. From the user perspective, multiple models packaged into one container appear as one large model in the KB. This mechanism has been added to solve two problems:
- Models are now much easier to extend and maintain. Now, models can be added each time a new label is created. Existing models can also be swapped out for better models if necessary.
- Fine-tuning model labels is also much easier. Now, models compile many different datasets each for one small number of labels, whereas before one dataset contained training data for all labels. You can use the Labels tab of the Machine Learning action wizard to determine which labels should be identified by the model.
New S-BERT model for similarity scoring
Agiloft now offers a SEMANTIC-TEXTUAL-SIMILARITY model, referred to as S-BERT. This AI model evaluates semantic textual similarity of an input field against a field that contains existing data, both of which can be configured by the user.
The existing data field can either be a Text field or a linked field with multiple values, meaning you can compare the input against one value or many. For example, if you upload a contract clause to the input field, the model can compare that clause against a single clause, or against all of the clauses of the same type in the Clause Library. The model assigns potential matches with a similarity score between 0 and 1. You can choose to run the model with either cosine (default) or chebyshev metrics. For more information, visit Similarity Scoring with AI.
CML KB limit change to "AI Requests Model Time allowed per model per day"
The Central Model Library limit per model has been changed. Instead of using the number of requests per day as the limit, the time spent using a model is now the primary limit.
A new "AI Requests Model Time allowed per model per day" field has been added to designate that time limit with a default of 1200 seconds. It can be customized for individual users. When a new inference request arrives, it adds up all Model Response Time(s) of this client's model over the last 24 hours.
ML actions can now map extracted data to File fields
You can now map data from extraction models to File fields, in addition to the previously available Text fields.
New Integrations
Check out new and improved integrations with
| Companyname |
|---|
Integration with Tableau 
Connect Agiloft data to Tableau by using any saved search as a Web Data Connector (WDC). This allows you to pull the saved search data into Tableau for analysis. You can configure multiple connectors using any number of saved searches.
To set up a saved search to use with Tableau, follow the setup steps in Tableau Integration.
Connect KBs to Boomi with new Agiloft connector
The Agiloft connector makes it easy to exchange data between Agiloft and applications on the Dell Boomi platform. When you've connected the two systems, you can configure your connector to do any or all of the following:
- Pull data using Get, GetChoiceListId, Query, and Retrieve Attachment
- Add or update data using Create, Update, Delete, Attach, and Remove Attachment
If multiple users need to work with the connector on the Boomi platform, or if one user needs to connect to multiple KBs, configure a connector for each user-KB combination. Access to KB data is controlled by the permissions attached to the Agiloft credentials you use to configure the Agiloft connector in Boomi. The Agiloft connector integrates with Agiloft using REST API calls with the JSON request/response format over an HTTPS connection.
For more information and details on setting up your KB to work with Boomi, see Boomi Integration.
Real-time, record-specific Salesforce syncing
You can now configure Salesforce integrations to sync individual records, in addition to the existing option to sync the entire data set. To use this record-specific option, create a Sync action with an existing Salesforce sync configuration and select the "Sync a single record only" checkbox. Make sure this action is used in a context where records are selected, either by selecting records in the table view and using the Actions option in the toolbar; creating an Action Button to use inside individual records; or using a rule targeting a specific record or set of records. If you use the action in a time-based rule or other non-record-specific context, no records are synced.
On the Salesforce side, you can use these URL parameters to sync a particular record: &explicittables=SF_TABLE_NAME&explicitids=SF_RECORD_ID
New DocuSign authentication method for systems with 2FA
If your system is configured to use two- or multi-factor authentication (2FA) during user login, users have to authorize access with 2FA every time they use DocuSign. To avoid this, you can use the new JWT authentication configuration, which uses the Client ID, Account ID, and RSA Key listed in the DocuSign Account Admin settings. This allows DocuSign to authenticate the user instead of using the KB login credentials to do it.
To use this new authentication method:
- Go to Setup > Integration and click Configure under DocuSign Extension.
- Complete the Client ID, Account ID, and RSA Key fields with the information found in the Account Admin section in DocuSign.
- Click Save and navigate to the DocuSign Users table.
- Create or edit a DocuSign User record.
- In the Authenticate field, select JWT.
- Save the record. Repeat steps 4-6 for other user records as needed.
With this configuration, when a user accesses DocuSign, their session is authenticated with an OAuth token and they no longer need to confirm their identity using 2FA.
Use REST API to trigger Actions
Use a new REST endpoint, EWActionButton, to trigger an action button in the system. This calls the action button asynchronously and then requests the status of the operation. For more information, see REST - Action Button.
Deprecated integrations with Ephesoft, Skype, Skype for Business, and Google OpenID 2.0 SSO
Integration with Ephesoft, Skype, and Skype for Business has been deprecated, and these options have been removed from the Integration setup menu.
Because Google no longer supports OpenID 2.0, the Google option under Setup > Access > Single Sign-On is no longer available. Google Oauth 2.0 single sign-on is still supported and remains the preferred method for SSO with Google.
Enhancements for Email
This release includes changes to enhance user experience working with emails in the system.
Updated email and HTML editors
The style of the email and HTML editors has been given a smoother, modern update.
Email signatures in
| Companyname |
|---|
Email signatures are now supported in outbound email accounts in Agiloft. Once signatures have been configured, they can be inserted by following Insert > Insert signature > Search... in the email editor.
Enable email signatures by following these steps:
- Go to Setup > Email and SMS.
- Click All Communications Table Outbound Behavior.
- At the bottom, select Email Signatures.
- Under Name Field, select the Signature Name field.
- Under Content Field, select the Signature Content field.
Administrators and users can create signatures to use in the system:
- Open the user menu and click My Profile.
- Go to the Emails tab.
- In the Signatures section, click New to create a new Signature record.
- Enter a name, set the visibility, and enter the content of the signature.
Clearer SMTP server setup for TLS and SSL
The email server configuration now offers clearer guidance in the SMTP Server Info section by using radio buttons to indicate the type of connection. Previously, these options were all listed as checkboxes, even though only one option should be selected.
Admin Improvements
Review new features specifically for admins to make troubleshooting easier and address requests from users.
Identify records with lots of History entries
Administrators now have access to a new report that shows records with a large number of History entries, which can be useful in troubleshooting space issues or problems with excessive or duplicate History entries. The report shows the total size of History data in each table, and the individual records with the most History entries.
To access the report, go to Setup > System > History Report.
Show visibility dependent fields in table views and HTML reports
A new global variable gives you the option to always show visibility-dependent field values in table views and HTML reports. The new variable, "Always display visibility dependent field values in table views," is set to Yes by default, so these field values always appear. If you set the variable to No, these field values appear only when their visibility conditions are satisfied.
Improved options for Left Pane changes
Now, when you make changes to the configuration of your Left Pane, you have three options for how to push the changes to users in the selected teams. These options are:
- Do not push changes to users: This option doesn't push any changes to existing users, but it still allows you to save updates to the configuration for future use.
- Force changes upon users: This updates the Left Pane for all affected users automatically.
- Notify users about optional changes: This notifies users that updates were made to their Left Pane configuration, and they can choose to accept those updates or leave their Left Pane the way it is. For users without permission to modify their own preferences, this option works the same way as "Force changes upon users," and the changes are made automatically.
If you choose to notify users, you must enter a message to show with the notification. Previously, you had to enter a message in order to show the notification, but this was not enforced if you left the field blank. Past messages are stored and shown in the wizard.
Convert Document Format actions support more formats and options
Use the Convert Document Format action type to convert files to a wide range of formats, with more control than ever over the content being converted.
Convert Document Format actions now offer the following conversion types:
- MS Word to PDF
- MS Word to HTML
- MS Word to Text
- PPT to PDF
- HTML to Text
- HTML to HTML
- PDF to MS Word
- PDF to Text
When configuring the action, you can also select options on the new Output Format tab. The options here depend on the format you selected, but can include any or all of the following:
- Use Hosted MS Office Service to convert documents, if your system does not have MS Office installed to run the conversion
- Remove HTML code added by MS Word, if you want to remove Word-only elements from a final HTML product
- Exclude all attributes, if you want to strip formatting and other attributes from the source material, with the option to list exceptions
- Filter data in these tags, if you want to strip content contained in certain tags such as <div>
- Filter these attributes, if you want to strip formatting and other select attributes
For more information, see Convert Document Format Action.
Specify page size for merged documents
Control the output page size of merged documents with a new option for Merge Document actions. When you select the page size you want to use, you can also scale the source documents to fit the selected size, if necessary. This makes it easier to ensure that merged documents match the documents in other file fields, and that they are correctly configured for your printer paper.
Improved options for syncing layouts
Entity set sync now offers the option to overwrite the layout in the target KB, if you don't want to attempt to merge them. Overwriting the layout updates the target KB with an exact copy of the source KB layout, including adding new tabs and removing obsolete ones. Any fields in the target KB that weren't included in the source KB layout are moved back to the pool of available fields. If you select the Overwrite option, but the entity set doesn't include all the fields that appear on the layout, a warning appears when you click Finish.
If you do want to merge the layouts, you can still select the Merge option, which moves fields to match the source KB but does not remove tabs.
Include related table records in external system sync integrations
External system sync now offers the option to include records in related tables when syncing data, provided the related table and the desired linked records are all selected explicitly in the Relation Mapping tab.
To sync records in related tables, go to Setup > Sync, edit the external system sync, and select the "Include records in related tables" checkbox.
Better Choice value matching during sync
Entity set sync logic has been improved to compare Choice list values by content rather than ID. This way, Choice values with the same name but different IDs are recognized as matches, so the sync process does not create duplicate values.
Export all versions of attachments
KB exports in Excel formats now support exporting all versions of attachments, instead of only the most recent version of the attachments. To export all versions, select "Export all attachment versions" on the Options tab of the Export wizard.
Set a maximum disconnect_timeout for the server
To prevent lagging and memory issues from unexpired user sessions, a new server-level global variable now sets a maximum value for how long a user can sit idle before their session expires automatically. If a KB admin tries to set the KB-level disconnect_timeout value to be higher than the set maximum value, the system shows a warning and informs them of the maximum value allowed.
The max_disconnect_timeout server-level variable is set in the admin console.
Set PDF files to open in browser instead of download
Easily open PDF files using your preferred method with a new global variable called "Open PDF in Browser." Set the variable to Yes to open PDFs in a new browser tab, or set it to No to download PDFs to the desktop and open them unless overridden by the browser's settings. By default, this variable is set to No.
Default wfstate field now labeled Status instead of Workflow State when created automatically
When you set up a new workflow, you no longer need to edit the default wfstate field to relabel it. These fields are now labeled Status by default, rather than Workflow State.
Improved third-party software options during upgrade
When upgrading your Agiloft system, you now have the option to go back to the third-party software options and change your selection between locally stored files and online downloads. In addition, the upgrade utility now includes the package version for the software in addition to the name. For example, it lists MySQL 5.7 rather than just MySQL.
Updated web server options in Agiloft Setup
The web server options in Agiloft Setup have been updated. Misleading fields have been removed, and the help text for the Main HTTP port has been improved.
Port values are now validated in both Windows and Linux.
| Release 25.2 |
Use generative AI to streamline contract negotiation, review, and redlining
When you review a contract, you often find a few clauses you'd like to modify. With Agiloft's new generative AI capabilities, you can easily align contract clauses with your standard Clause Library equivalent, or leverage AI to directly revise the clause based on your instructions.
- Align Clauses: Improve third-party clauses in your contract draft by using Align Clauses to bring them in line with approved, vetted clauses from your Clause Library. For example, this can take a non-standard Force Majeure clause and adjust it to match the Force Majeure clause in your Clause Library.

- Revise with AI: You can give AI direct suggestions about how to revise a clause through text prompts. This is especially useful if you don't have a Clause Library, or if your library doesn't have a comparable clause. For example, you could prompt the system to change your Limited Liability clause to a Mutual Limited Liability clause.

In both cases, Agiloft uses AI to generate a suggested new draft for the clause, which you can then tweak as needed and insert into the contract. You can run these workflows in the Agiloft Contract Assistant for Word once you have created a contract and stored it in Agiloft.
For more information, visit Generative AI.
Make contract relationships obvious at a glance with tree view
Make your contract relationships easy to see with the new tree view option. This collects child records underneath each parent, and makes it easy to expand or collapse different branches of your record's family tree. This is especially useful if you already use a diagram field to see this information, since the tree view helps to make that relational data visible directly in the table grid.
We recommend using this option when showing related records inside a record form, provided you have already established hierarchical relationships between your records. For example, you might update your Contracts table so that the Related Contracts section shows the relationships between the records. When shown in an embedded table, tree view also shows a breadcrumb trail to aid in navigation, especially for records that have many relations.
In addition, tree view includes a numeral next to each parent record that shows the number of direct descendants, and when you search or filter on a table that is using tree view, the parents of a search result are included in lighter opacity. That way, you can see which record matched your search without losing the contextual information you get from the family tree.

To configure your own Contract table this way:
- Go to Setup Contracts and open the Layout tab. In the layout, select the tab that contains information about related contracts. In the example above, the tab is named Renewal / Related Contracts. Note the name of the field that shows the related contract records.
- Next to the Layout tab, open the Fields tab and edit the field you noted in step 1. In newer KBs, this is an Embedded Search Result field named All Related Contracts.
- On the Permissions tab, find the Additional Filters section and edit the current saved search.
- If it includes a condition that ID does not equal $contract.id, click the trash can icon to delete it. This condition hides the current record from the table, and when using the tree view option, it is more intuitive to include the current record. In the example above, this step is the reason that Raynor-Collins Amendment 1 to Statement of Work 1 is included in the tree.
- Go to the Options tab for the saved search and under "When the search is run," select "Change the view" and choose an appropriate view from the drop-down. Note the name of the view you selected. If you don't have a view configured for viewing related contract records, you can create one in the next step instead, and then return to these steps to select it.
- Click Finish to save the search and then click Finish again to save your changes to the field.
- Go to the Contracts table, go to Views > Manage, and edit the view you selected in step 5. If you need to create a view, select Views > New and create one for this purpose.
- Select the Show Tree View checkbox.
- Select the field that stores the ID of the record's parent and establishes the parent-child relationship. For example, Parent Contract ID.
- Select the field that should show the plus and minus icons, and nest to indicate hierarchical relationships. In the example above, this is configured as Contract Title, so the title is where the icons appear and where the text is indented.
- Choose how many records you want to show at a single level. If there are more records at a single level than the number you choose here, the list includes a Load More button at the end of the list. This setting can impact performance if your hierarchies include many records on each level.
- Make any other updates to the view as needed and then click Finish.
- Open a contract that has linked family members and test the changes you made, so you can make any necessary adjustments.
Browse attachments, approvals, and more directly in table view
Browse attached files, approvals, and more directly from the table view, without needing to open the contract at all. With the new insight popover, you can configure related tables, some linked fields, and embedded search results to allow users to quickly browse the field's entire contents directly in the table view. For example, see all of a contract's attachments without opening the contract at all.
The insight popover is also a powerful tool when used inside another related table, such as giving the user easy access to a contract's attachments inside the Related Contracts section.

To take advantage of this feature, simply edit the field you want to use, configure the insight popover display, and add that field to a view. For details, see the Insight Popover section of Configuring Views.
Introducing the Agiloft Google Docs App
Agiloft is excited to offer a new Google-based contract assistant for Google Docs, which introduces workflows in Google Docs similar to the Agiloft Contract Assistant for Microsoft Word.
With the Agiloft Google Docs App, you can easily perform the following tasks, directly in Google Docs:
- Tag clauses in a contract, and send them to your KB as records
- Tag key terms in a contract, and send them to your KB as field values for Contract records
- Edit existing tags, and instantly sync those changes to your KB
The Agiloft Google Docs app is available on the Google Store. To take advantage of the Google Docs app, you also need to set up the new Google Drive Integration.
For more information about using, installing, and configuring the app, visit Agiloft Google Docs App.
Automatically highlight required clauses missing from a contract
Improve your contract review workflows by configuring the Word app to highlight clause types that appear to be missing from a contract. With this feature, whenever a contract is opened in the Word app, the system checks the contract for clauses required by the Contract Type, and flags any absent Clause Types in the Missing Clause Types field. You can select a missing clause in the field to easily add it to your contract.
To set up this feature:
- Navigate to Setup > Integrations and click Configure under Agiloft Contract Concept Mapping.
- Scroll to the bottom of the General tab and edit a table.
- Under Missing Clause Types, select the field where the system will store any clause types that are flagged as potentially missing. In the default template, this is the Missing Clause Types field. If you don't have this field, you can create it by creating a linked field to the Clause Type field of the Clause Types table.
- Click Save twice.
In order for Missing Clause Types to populate in the field, you need to establish which Clause Types are required by each Contract Type. You can assign required Clause Types to a Contract Type by editing a Contract Type record and adding Clause Types to the Required Clause Type field, which is usually located on the General tab.
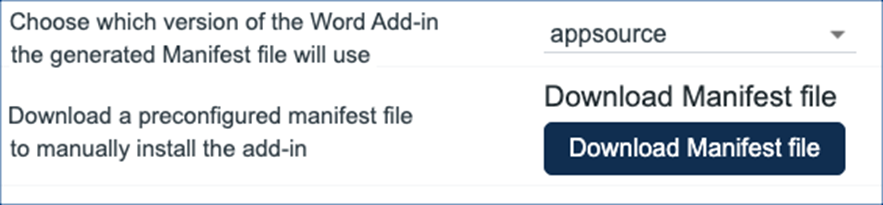
Word app manifest file improvements
Manage your organization's Word app installation with a new and improved manifest file source that:
- Makes it easier to add or remove users from the O365 group, which helps with accessibility changes.
- Eliminates the need for users to manually enter a URL and KB name.
- Automatically keeps the Word app up to date.
To enjoy these benefits, download a new copy of your manifest file and select the appsource option on the Download Manifest tab of the Agiloft Contract Concept Mapping wizard. Then, follow the rest of these steps to publish the file to the O365 access group.
AI labels now automatically kept up to date
Keep your system up-to-date with the latest improvements and additions to your AI labels library. Now, your system automatically updates the AI label library on a nightly schedule, and any time you navigate to Setup > Integration and click Configure under AI. For a list of available labels, visit AI Platform Labels.
Evaluate model performance directly in the document viewer
If you have AI enabled, you can evaluate the performance of the models you are working on in an AI Label Training project by uploading a sample contract and clicking Generate AI Suggestions. This button appears in the top right corner of the document viewer in the AI Suggestions tab, but only appears in documents that are linked to an AI Label Training project, and only when the AI Suggestions tab is empty.

For more information, see AI Trainer.
Annotate contracts directly in the document viewer with AI
Easily access the Analyze Contract button directly in the document viewer, so you can quickly run an AI model and complete the annotation workflow for an AI Project, with fewer steps and screens.
In order for the Analyze Contract button to appear in the document viewer:
- Your KB must have AI enabled in Setup > Integrations > Agiloft Contract Concept Mapping, and the "Action Button field to use when requesting clause extraction" field must point to an action button that runs the Data Analysis action used for extraction. In the default template, this is Analyze Contract.
- The action must be configured to have a Processing Type value of Single Document.
- The action button must be configured to not run in background mode.
- The Attachment record that you open in the document viewer must be linked to a Contract record.
If all the above criteria are met, the Analyze Contract button appears on the top right corner of the document viewer. When you click this button, the AI model annotates your document and shows all the tagged labels in the right pane.
Open .docx files for editing directly from doc viewer
Jump directly from the doc viewer in Agiloft into Microsoft Word with the new Edit in Word button. This method is faster and more intuitive than downloading a copy of the file, editing it locally, and re-uploading it to the record.
The button appears only when the file field is configured to allow direct file editing. To turn on direct editing for a file field, edit the field and go to the Options tab, then set Enable Versioning? to Yes and Direct File Editing to "Allow direct editing of MS Office document and directly save back to the file field."
As part of this change, some other controls on the toolbar have been rearranged.
New API support for the Integration Hub
Expand your integrations with new API support for Integration Hub, which opens the door for even more flexible interconnectivity between Agiloft and the other systems you use. This offers several advantages:
- Secure Traffic Forwarding: Create secure pathways, known as API proxies, for data to move from one place to another. This feature is not available on the base platform.
- Data Sharing: Utilize API recipes, which expose certain functionalities as API endpoints so you can share data with partners or use it in other recipes. Without the API Platform, this process is more manual.
- Access Control: Control who has access to your data endpoints on a more granular level than you can with the base platform.
- Lifecycle Management: The API Platform supports the smooth transition of APIs from development to testing to production. Managing the lifecycle of APIs without the API Platform would require additional tools or manual processes.
The Integration Hub now also includes the API Platform tab, where a dashboard makes it easy to monitor your APIs and track their usage and performance.
For more information, visit Workato's documentation on the API Platform.
New Table field in Integration Hub to improve load times
When you edit a recipe in Integration Hub, the system automatically retrieves a comprehensive list of table metadata. For a larger KB, this process can be rather slow and may lead to errors. Now, you can enter a single table name, so that the Hub only retrieves the metadata for the specified table. This cuts down on load time as well as potential errors.
Use Quick Search to find multiple values
When you search on a field in the Quick Search pane, use the new "is contained in" and "is not contained in" operators to apply more sophisticated filtering to your searches. For example, you might use "is contained in" to find all contracts whose status is any of the selected options, instead of having to search for only one status at a time.

To select more than one value in a drop-down list, hold the Shift key as you click. For other field types, you can enter multiple search terms separated by a comma.
Improved DocuSign event tracking and separate Certificates of Completion
This release includes two improvements to your DocuSign integration:
- The new Latest Event field tracks a more granular list of events, so you can see what last occurred with an envelope and its recipients and get additional context beyond the existing status fields. This field is available in both the DocuSign Envelopes and DocuSign Recipients tables. Simply add the field to your record layout or view to take advantage of this new feature.
- Completed DocuSign envelopes can now include both a Certificate of Completion for the envelope and a separate final, signed copy of all the documents in one unified file. If you have configured your envelopes to save a combined file with both the signed documents and the Certificate of Completion in one, you will continue to receive combined files unless you change your settings. To review your settings, follow the steps in the Certificate of Completion section of DocuSign Account Settings.
To take advantage of these improvements, go to Setup > System > Manage Global Variables and locate the DocuSign API Version variable. Edit the variable, set it to "v2.1", and save it. Then, go to Setup > Integration > Configure DocuSign Extension, edit your DocuSign integration, and Disable and then Enable DocuSign Connect.
In addition to these changes, the configuration settings for DocuSign Users now offer only the JWT authentication method, now that the alternate authentication methods are no longer supported by DocuSign. For more information about setting up DocuSign authentication, see DocuSign Setup.
Machine to Machine (M2M) authentication for REST API
The Agiloft REST API now supports client credentials flow, which enables machine-to-machine (M2M) authentication. M2M is beneficial because it enhances security, centralizes API management, standardizes configurations, and eliminates the need for human intervention in the authentication process.
To create the Client Credentials API application:
- Go to Setup > Integration > OAuth2 Client Setup.
- Click New.
- Under Authorization Grant Type, select Client Credentials.
- Add a Name and a Display Name.
- Select a user under Associate this Application with the Contract ID field. This specific user's permission settings are used by the server when handling API calls. In most cases, it is useful to use a dedicated account for this purpose.
- Add the Redirect URI.
- Click Save or Apply Changes.
For more information about M2M use cases, visit the Microsoft documentation on client credentials flow.
...