The Change Requests table is used for Change Management. A Change request is created when a change is needed to an asset or to any other business object that may require a set of approvals before the change can be completed.
Once a change request is created, it can be assigned to the appropriate teams or individuals for one or many approvals. It can then be moved along in the process, from approval, to scheduling, to action by staff members actually making the change, to completion, testing, and release.
Of course each organization has its own definition of types of change that may need to be managed in this way, but we have prepopulated the service catalog with a list of common change types. You can easily add your own change categories and types to the services table.
Change Requests differ from Service Requests in that they are not visible by default to end users and typically follow a stricter set of procedures and approvals.
Use Case
Change Requests (CRs) may be directly created by technician users or may be created by conversion from a Service Request or a Problem, in which case they are linked back to the generating record.
End User Record Submission
By default, Change Requests are not visible to end users and cannot be created by them. This is defined by group permissions, and if you would like to allow end users to submit change requests, you can simply change the group permissions of the relevant groups to enable this.
Technician Record Submission
When a technician submits a Change Request, the Submitter contact information fields automatically populate based on the details in the user's record. In the default setup, a request cannot be submitted on behalf of a user who has no user record in the system. However, the creator can select a different person if needed.
The user is required to select a service after selecting a service category. When the service is selected, the user will see a description of the service and any special instructions for that service.
When a technician creates the CR they may choose the Change Management Team and the Change Manager from the drop-down fields. If they do not choose the team, when the record is saved, the request will be assigned to the Service Responsible team, if any, or to the Change Management Team, if there is no responsible team defined for the service.
New CRs are created in the Status of Open by default. During creation, a technician may click the Submit for Review button to change the status to Pending Change Manager.
The Change Request table pulls its services from linked entries in the Services table. A user creating a change request chooses the category of service from a drop-down, and then sees all the active services that belong to that category in a second drop-down list called Service Title. The default service categories for change requests can be seen in the Assets table or by creating a CR record and opening the drop-down list. When the service is selected, several additional fields are pulled in with the service, including fields defining whether approvals are needed and the approval generation type.

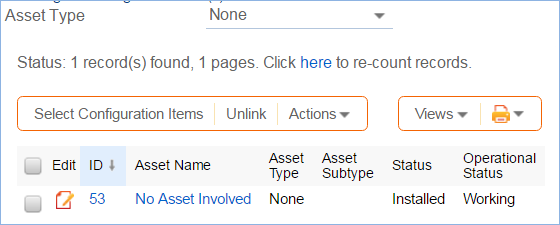
Once the main fields are filled in, the user navigates to the Assets tab. This allows the user to look up several assets. The assets can be filtered by first choosing an Asset Type and then clicking the Select Assets lookup.

Note that if no assets are involved in the change request, you are still required to select one because of the way tasks are managed in change requests. Use the No Asset Involved asset record with the Asset Type of None in this situation. This allows all task generation and other functionality to work as expected.
Once the assets have been selected, to further process the change request, the user needs to click the Submit for Review button:
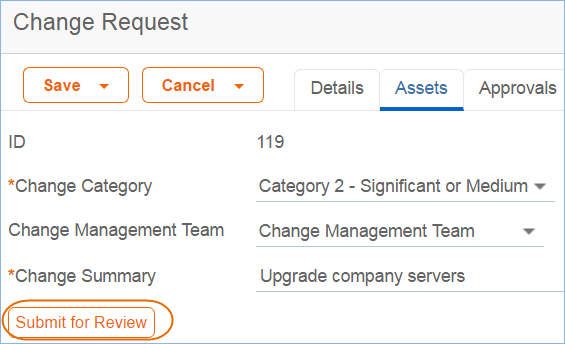
This saves the change request, validates the required fields, sets some background fields that control visibility of the approval and task buttons, and sets the status to Pending Change Manager.
Automatic Emails Sent upon Submission
If the status is not Closed when saved, the system sends the submitter an acknowledgement email and will also send an email to either the Change Manager, if there is one, or to the Change Manager Team (Rule: CR- All Creation Actions).
Changing Assigned Team or Change Manager
If a technician needs to reassign the Change Request to a different Change Management Team or Change Manager, they simply change the field(s) and the system will email the new assignee notifying them of the reassignment (Rule: CR - Edit Actions (API Enabled), Action: Assignee Change Notifications).
Managing the Approval Process
Change requests can use different approval methods, discussed in the Approvals for Change Requests section above. Based on the approval method defined in the service record, approvals will typically be created and launched within the change request using buttons.
If the change service does include approvals, then at least one approval record must be created and approved in order to proceed to generating and launching any tasks and moving the status forward.
Once the request has been sent for review, if it was for a service that requires approvals, the change manager can review it and generate any needed approvals:
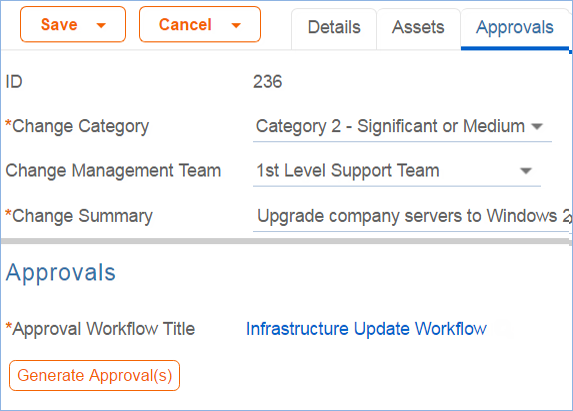
Clicking the Generate Approval(s) button will generate the approvals based on the predefined approval workflow. If the change request service allows ad hoc approvals, options will be available to generate additional approvals as needed. Approvals are generated in a Status of Queued by default. Once the approvals are generated, new buttons appear:
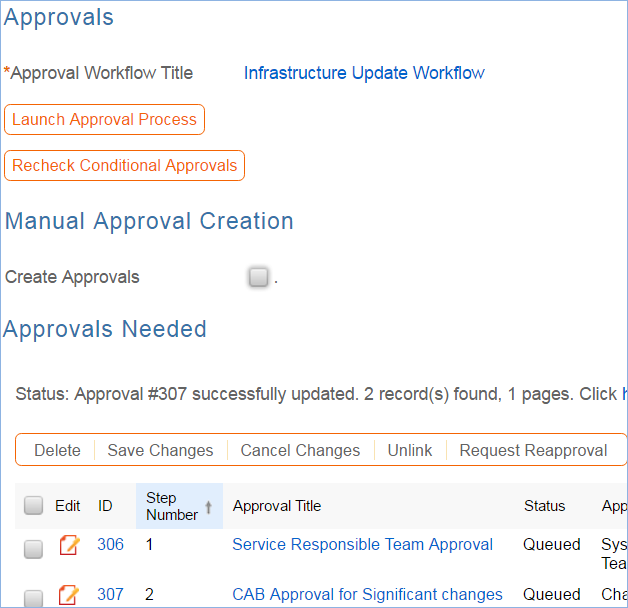
When the change manager is ready for the approval process to start, she clicks the Launch Approval Process button, which will set all approvals with the lowest step number to Pending Approval. It will also update the Status of the Change Request to Pending Approval:

When an approval's status is set to Pending Approval, the approval team and/or Approver are notified by email.
The approval process is controlled by the step numbers. Approvals with the same step number value are launched at the same time, when the approvals with the next lower step number are completed.
This is a different model than in the task workflows, in which the sequence field is not functional. With approvals, the step number controls the process and there are no separate sequences or threads in the approval process.
Another way in which approval generation is different from the handling of tasks is that conditional approvals are not created at all unless their condition is met at the time of generating the approval. Since these conditions generally depend on the meta data and fields in the change request, it is important to make any critical fields required to hold a value before getting to the point of generating approvals. The Recheck Conditional Approvals button does allow the technician to recheck the condition if after generating the first approvals, the meta data changes. But it is best to ensure that any needed meta data is filled out first.
As the first approvals are completed, those with the next step number are set to Pending Approval and their assignees notified. Any approval notes put into the approvals are copied up to the change request in the running All Approval Notes field.
Two fields below the approvals table track the Number of Approvals Needed and the Number of Approvals Completed, and once those two numbers are equal and great than or equal to 1, the Status is changed to Approved and the Requester and the Change Management team are notified.
Creating Tasks for the CR
Tasks can be created for the CR before the approvals are done. The only requirement is that the user must first enter the Change Window Start Time and Change Window End Time, as the End Time will be used as the Date Due for the tasks:

Depending on the task generation method, one or more tasks will be created for each selected asset. If the task generation method is CR Single Task from Template, then the predefined template will be shown:
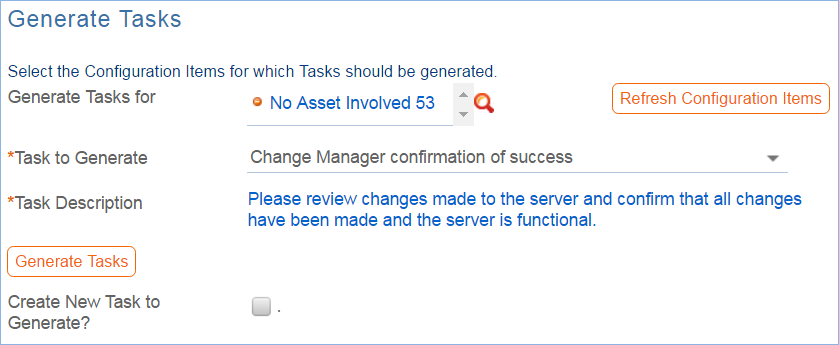
Here the default task template is the one called Upgrade Windows OS. Clicking the Generate Tasks button will generate one task for each of the selected assets.
The user may then select another task to generate when that is done, if desired. They may also check the box for Create New Task to Generate? to create another task template that can be generated for all the selected assets. Checking that box will display fields to fill in for the ad hoc task:
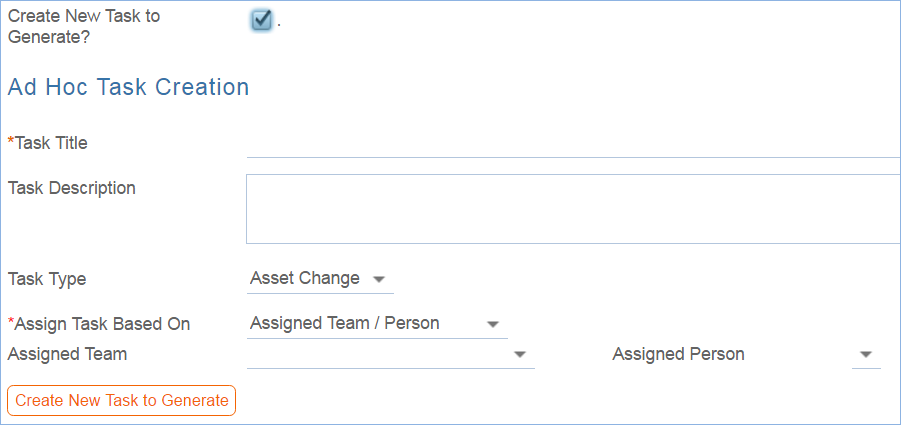
Clicking the button to Create New Task to Generate will create a new Task Template, save the change request, and reopen it to edit, with the new task selected in the Task to Generate field. From here, you can click the Generate Tasks button again to add the Task to this CR for each Asset that is selected.
Launching Tasks
Tasks may not be launched until any approval process is completed. This is to ensure that no work is started without approval.
Once the approval has been received, click the Launch Tasks button to set the first tasks, those with no prerequisite or with any prerequisites completed or not needed, to a status of Assigned. It will also set the Status of the Change Request to In Progress, if it is not already in that status.
See the Task Templates and Task sections above for more details on how tasks are launched and processed.
Completing the Change Request
When all tasks are completed, the Change Manager is notified. Based on whether the tasks were all completed or whether some of them failed, the change manager will then set the Status of the Change Request to Completed or Completed with Failures. Validation prevents the user from choosing Completed as the status if there are tasks whose status is Failed.
Changing the status to Completed or Completed with Failures will send an email to the Requester informing him that the change is completed.
Working Notes
The Work Notes field is updated from the running working notes for all of the related Tasks.
Related Records and Removing Tasks
During the working process, some tasks may be removed as not needed by the change manager. The action bar above the Tasks table in the change request includes a button to remove one or more tasks:

This changes the status of the selected tasks to Not Needed and they move into the Inactive Tasks table shown on the Inactive Tasks tab:

From this area, if it turns out that the task actually is needed, the change manager can select one or more tasks and click the Reassign Task to set their status to Assigned and move them back into the active Tasks table.
Parent-Child Change Request Structure
Previously we used parent-child change requests to manage multiple changes to assets. That possibility is still available but the fields for relating parent and child change requests have been removed from the layout, since that was a more cumbersome process. If there is a need to relate change requests in a parent child structure, this logic can be used again.
Reporting Time Spent
Technician users may easily report the time they spend on handling change requests. There are two fields and an action button: Time Spent, Time Description, and Add Time on the Work Notes tab of the layout. Entering values there will automatically create a new time entry record when the Add Time button is clicked. The time entry will show the work done by the technician and on the current date.

All the time entries for a request can be seen on the Time tab as well. If a technician needs to report time that was spent on a different day or by a different user, they may click the New button on the Time spent table to submit a time entry directly and change the date or "Done by" field. All time entered is totaled in the All Time Spent field, which can be used in reporting or billing.
Note that this same time entry methodology is used in the Incident, Problem, Service Request, and Task tables.
Workflow
The workflow is used to send the email when the change request is completed. Otherwise, it controls the state transitions, as shown in the screenshot below: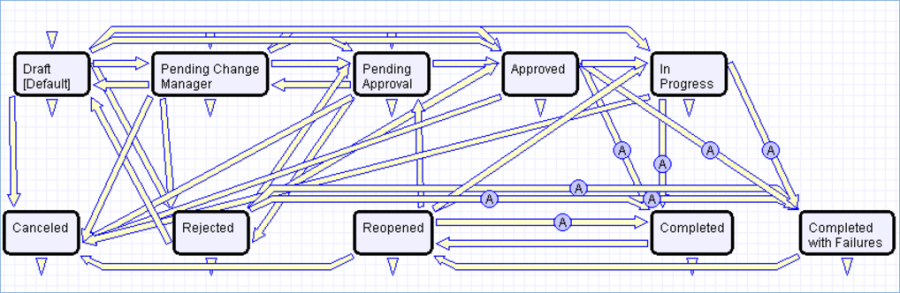
Ownership
Records in the Change Request table are owned by the person whose login matches the Creator Login field.
Reporting and Statistics
Forward Schedule of Change
The Forward Schedule of Change represents approved changes and the proposed implementation dates. More generally, it is a list of Change Requests set to occur in the future. Functionally it might include CRs with restricted criteria, such as approved changes only, but by default the Forward Schedule of Change simply shows all Change Requests that are not in a status of Completed, Completed with Failures, or Canceled.
The Forward Schedule of Change is a saved search available from the vertical navigation menu under the Change Request table name. Change Requests are listed in order of Requested Date of Completion. This search is also used in a structured HTML report of the same name. The report groups the CRs by requested date of completion (by week) and shows summary data, including the sum of the Estimated Time to Complete for all records. The report can be configured to be sent in a weekly email to the Change Management team.
Accomplished Change
Accomplished Change is the complement to the Forward Schedule of Change and by default shows all completed Change Requests, sorted by Date Closed.