...
To set up your own Adobe Sign account, go to Setup gear in the top-right corner > Integration > Configure Adobe Sign to open the account form.


Decision About Who Documents Come From
...
- You can use the Adobe Sign account's main email address for all sending. This is the "admin" account you are going to set up in just a moment. The emails to signers will appear to come from that address (they actually come from EchoSign), but they can include the actual person who is sending them in the subject or content of the email. This is currently the most reliable sending model, and unless you find the generic email address objectionable, we recommend using this approach, for simplicity.
- You can create "sub-account" users for each user at your organization who will need to send a document for signature, and let them send under their own identity. We have an automated process to create such users for your account, but due to a current Adobe Sign limitation, this is not 100% reliable. The limitation is as follows: if a person has ever signed an Adobe Sign document or if their email address is already associated with another Adobe Sign account, they cannot be automatically created via the integration API as a sub-account of your new Agiloft Adobe Sign account. Instead, they are in a locked or pending status at Adobe Sign, and only the Adobe Support team can create this user in a usable status so they can send documents for signature.
In the screenshot shown abovebelow, the option: "Choose an email field from the People table to identify the sender" is used to define the email account to use for sending. When a person tries to send a document for signature, the system looks at the value in the field defined here in the sender's user record to know what login (email) to use for the sending at Adobe Sign. If you choose the Email field, then the system will try to send under the user's own email address. You will need to make sure each user is created as a user in the Adobe Sign account, or their sending will be unsuccessful. If you prefer to have the documents sent under the admin account, then choose an email field here that will hold the admin email account in the user records for the users who you want to be able to send. We have provided a default email field called Adobe Sign Sending Account in the people table. If you have an older Agiloft KB you can add such a field yourself:


You can add the Adobe Sign admin email address to this field (located on the history tab, it is only accessible to admin users) for all users who should be able to send documents for signature. Then when they send, the system will use the value in that field as the login for the sending. It is of course, also possible to set up some users as senders and put their own email address in that field, and then only use the admin account for those who cannot be successfully set up at Adobe Sign.
...
Back in the Agiloft setup screen, click on the Proceed with Account Setup button to refresh the screen with some additional options. Enter the Knowledge Base Server URL - this is the custom URL that is used as the hostname of the Agiloft server, i.e. https://mycompany.agiloft.com. When you have entered that URL and verified your Adobe Sign account, you can click the Grant Access to Adobe Sign Connect button. This will bring up an Adobe Sign login screen. Enter the credentials for your new account. You will be asked to allow access to Agiloft:


Click the Allow Access button. Go back to the Setup screen and click the Grant Access to Adobe Sign Connect button again. The screen will refresh and you should see that value in the Access Granted field is now Yes. Now, you are ready to start using the integration, unless this is a production account.
...
- Manage Account: Takes you to a view of your account showing the number of Agreements you have purchased and sent, and allows you to also buy Agreements from there.
- Deactivate Account: Takes you to a view of your account where you can begin the deactivation process.
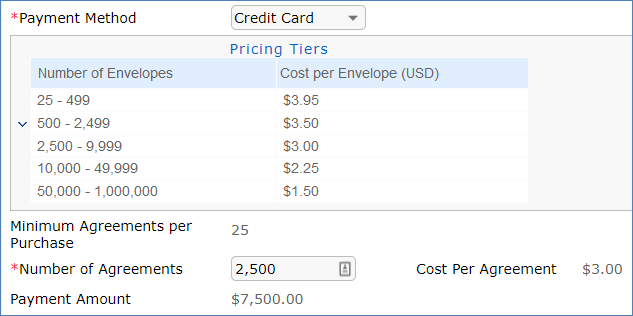
- Buy Agreements: Brings Brings up the purchase screen where you can enter a credit card to purchase Agreements:
 .
.
The current pricing tiers are shown on the purchase screen, and the price per agreement depends on the volume purchased. The default minimum purchase is 25 agreements, unless you have special volume discounted pricing. After you purchase agreements, you can start sending contracts for signature.
...
There is also an edit rule on the employee table that runs if the Adobe Sign Sender field just changed. It handles the creation or removal of a user at Adobe Sign:


So to create users at Adobe Sign, you just need to identify the users and update that field (located on the History tab). Only admin users can modify that field. Naturally, if you have not yet set up an Adobe Sign account, these actions will fail.
...