These topics describe the process of integrating DocuSign with a standard
| Companyname |
|---|
| Companyname |
|---|
Through the DocuSign API,
| Companyname |
|---|
Terminology
...
| Info | ||||
|---|---|---|---|---|
| ||||
|
Terminology
...
DocuSign envelope
...
You'll see the following terms in the articles about DocuSign:
- DocuSign Envelope: A container used to send one or more documents for signature using the DocuSign system. Envelopes can contain multiple documents and can be sent to several recipients. The documents can have multiple pages. For more information, see
...
- the DocuSign website. In
, there is a DocuSign Envelopes table which contains the records of your DocuSign envelopes.Companyname - DocuSign
...
- Recipients: People who receive a DocuSign Envelope, usually to sign the documents within them. They are specific to the DocuSign envelope and each recipient is assigned a specific DocuSign Role
...
- (these roles comes from DocuSign, and are distinct from DocuSign Signing Roles). For more information about recipient roles, see here. In
you can select any of the following roles, which are listed with the role and status they correspond to in DocuSign:Companyname - Signer
...
- : Needs to Sign
- CC
...
- : Receives a Copy
- Editor
...
- : Allow to Edit
- Certified Delivery
...
- : Needs to View
- Agent
...
- : Specify Recipients
For more information about recipient roles, see here.
...
DocuSign signing roles
...
DocuSign Signing Roles: Users inAnchor 1 1
that define who the signer is, such as an employee or a customer. They are system-wide definitions and not specific to any envelope. The DocuSign Signing Roles table enables you to manage and create roles inCompanyname
. Note that these roles are used inCompanyname Companyname
...
- .
DocuSign
...
Users: Users in the
KB who are authorized to create and send DocuSign envelopes. A record in the DocuSign User table must be linked toCompanyname
...
an
user record in the People table or one of its subtables.Companyname
...
...
- DocuSign Tags: Formulas or variables placed within documents that tell the DocuSign API where signatures, signed dates, initials, and other DocuSign fields must go, as well as which signer each field belongs to. They are usually formatted in white font so that the tag text is not visible in the document. For more information,
...
- see here.
...
Setup
To integrate with DocuSign, follow the instructions in DocuSign Setup.
Workflow
After setting up the DocuSign integration, you can create and send out DocuSign Envelopes that have their progress monitored by the system. When all signatures are received, the system automatically updates related records and generates a new document. An example workflow is detailed in the steps below:
- A contract user who is an authorized DocuSign user fills in the appropriate signer fields in the record
...
- . Then, the user either creates an attached document using the
...
- document template containing the DocuSign tags, or attaches a document that has already been created.
...
- The user clicks Create DocuSign Envelope
...
- to convert the information into DocuSign Envelope and DocuSign Recipient records that correspond to the signers.
...
- The user previews the envelope and then sends it out
...
- . DocuSign sends an email with a signing link to the first signer(s). As each signer signs the document, DocuSign emails the next signers on the list until everyone has signed the document, at which point the envelope is marked as completed and the signed document is sent back
...
- to
in PDF format.Companyname
...
- When
Companyname
...
- receives the completed document, the system marks the DocuSign Envelope record as completed, generates a new Attachment record for the signed PDF document, and changes the Status of the contract to Signed. If the Contract Start Date has passed, the Status of the contract
...
Set Up a Test Account
You can test your DocuSign setup with a free developer account before using your enterprise account details. The process is identical to setting up a production account.
...
To set up a test account:
- Go to: https://developers.docusign.com/
- Click Create Sandbox. You can create an unlimited number of test developer accounts.
- In the DocuSign website for the account, click Admin at the top. In the sidebar, click Permission Profiles.
- Click on the admin permission profile to open it.
- Go to the User Permissions tab.
- Ensure that the "Allow send on behalf of other users through API" check box is selected. If the option is disabled, create a copy of the permission set and then select this option.
...
After setting up a developer account with DocuSign:
- Log in to your KB as an admin user.
- Navigate to Setup > Integration > DocuSign Extension and click Configure.
- Click Change Server.
- For the initial setup and testing, select the Demo server.
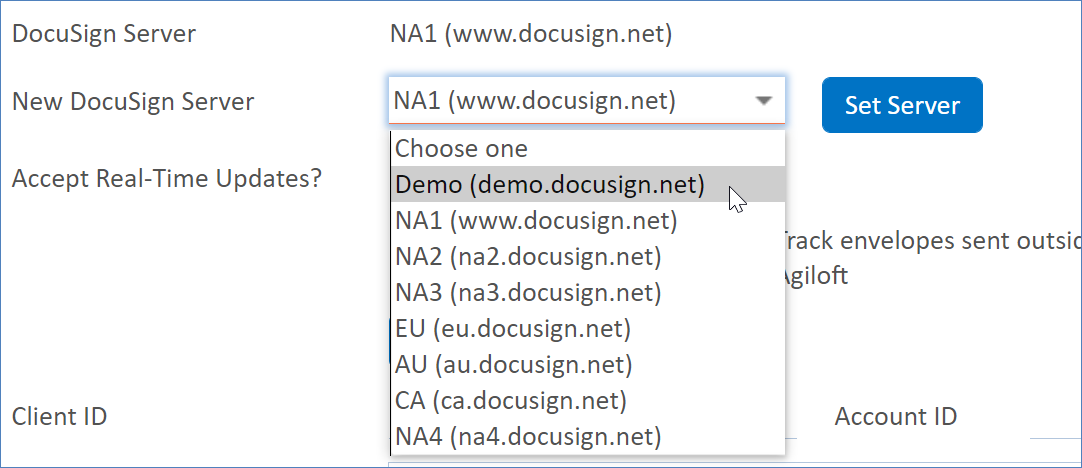
- Click Set Server.
- Optionally, set "Track envelopes sent outside Agiloft" to Yes or No. If you select Yes,
will create records in the DocuSign Envelopes table when envelopes are created outside theCompanyname
system. If you select No,Companyname
will only accept DocuSign data for envelopes that already have a corresponding record in the DocuSign Envelopes table.Companyname - Optionally, if you have multifactor authentication set up in your system and you don't want users to need to confirm their identity every time they use DocuSign, you can configure your integration to use DocuSign to authenticate users instead. For more information on how to complete this optional process, refer to the Avoid Redundant User Authentication section.
- Click Save.
Add a DocuSign Administrator
The first user that you grant DocuSign access to with the password will be the DocuSign Administrator. The user should therefore have admin rights in the KB. They will be able to add and remove users and manage other aspects of the DocuSign setup.
| Tip |
|---|
After you do this the first time, you can change the DocuSign Administrator by going to Setup > Integration, clicking Configure under DocuSign Integration, and selecting the new administrator in the Account Administrator drop-down menu. Note you will only be able to select users who are set up to use DocuSign. |
- Create a new DocuSign User record using either of these methods:
- Go to Setup > Integration, click Configure under the DocuSign Extension section, and click New in the DocuSign Users related table.
- Go to the DocuSign Users table and click New.
- Use the lookup for the Login or Full Name to find the Agiloft user you'd like to make the DocuSign Administrator.
- Choose the "With username" option. Alternatively, you can use the JWT option to bypass additional verifications if you have the DocuSign API Username for the DocuSign admin account you are linking with
. For more information, visit the Avoid Redundant User Authentication section.Companyname - Once selected, enter the DocuSign username and password you used to create the user on the DocuSign website.
- Click Grant Access to DocuSign to add the user to the DocuSign account. This user will be the DocuSign Administrator.

Create Additional DocuSign Users
...
| Companyname |
|---|
...
- is
...
| Companyname |
|---|
...
| Companyname |
|---|
...
To create additional users:
- Create a new DocuSign User record using either of these methods:
Go to Setup > Integration, click Configure under the DocuSign Extension section, and click New in the DocuSign Users related table.
Tip In the DocuSign Extension settings, you can set a Default DocuSign Group at the bottom to automatically assign new DocuSign users to a specific permission profile. This can speed up the process of adding new DocuSign users, especially if you want to automate it.
- Go to the DocuSign Users table and click New.
- In the DocuSign User record, use the lookup for the Login or Full Name to find the Agiloft user.
- In the Authenticate field, select one of the options:To authenticate users with DocuSign instead of the KB, select JWT. This allows users to work with DocuSign without triggering multifactor authentication in the KB. This allows you to login to DocuSign using the DocuSign API Username instead of providing a username and password.
- Acquire the DocuSign API Username value from the DocuSign account that will be linked to the DocuSign User record in Agiloft. This value can be found in the user's DocuSign account in the Users and Groups section on the user's profile under API Username.
- In the DocuSign User record in
, add the API Username value to the DocuSign User ID field. If this field doesn't appear, add it to the common area of your record layout.Companyname
- To use a unique login for the user, choose the "With username" option. This allows you you to set up an Agiloft account directly using your existing DocuSign user login and password.
- Enter the DocuSign login email into the DocuSign User Name. Optionally, enter a password.
- To share another user's DocuSign account with this user, choose the "As another user" option. This allows an Agiloft user to use a pre-existing DocuSign account that isn't directly linked. This is ideal for Agiloft users that would like to use a shared DocuSign account.
- Use the lookup to find and import the account name from the DocuSign Users table.
- Click the "Grant Access to DocuSign" button.
| Tip | |
|---|---|
When you set up a user with their own unique login, the user will receive an email from DocuSign to activate their account. Until they complete this activation, they won't be able to perform DocuSign functions in
|
...
If you have multifactor authentication set up for your
| Companyname |
|---|
| Companyname |
|---|
To configure this feature, you require access to both
| Companyname |
|---|
- Go to Setup > Integration and click Configure under DocuSign Extensions to access the DocuSign Extension tab in
.Companyname - In another browser tab, open DocuSign and go to Admin > Apps and Keys. Copy the API Account ID, which can be found under the "My Account Information" section. Keep this browser tab open.
- In the DocuSign Extension tab of
, paste the API Account ID into the Account ID field.Companyname - In DocuSign, copy the Integration Key value, which can be found under the "Apps and Integration Keys" section.
- In the DocuSign Extension tab of
, paste the Integration Key value into the Client ID field.Companyname - In DocuSign, copy the RSA Keypairs (ID) value, which can be found under the Service Integration section. If there isn't a value present already, you can generate one by clicking the Add RSA Keypair button. This value may also be referred to as the RSA public key.
- In the Document Extension tab of
, paste the RSA Keypairs (ID) value into the RSA Key field.Companyname 
...
- set
...
- Under DocuSign Users, click New. All DocuSign users created here should already have DocuSign accounts. Create the user as usual, but choose "JWT" next to the Authenticate section. This is what allows you to log in to DocuSign without needing to provide a username and password.
- Acquire the DocuSign API Username value from the DocuSign account that will be linked to the DocuSign User record in Agiloft. This value can be found in the user's DocuSign account in the Users and Groups section on the user's profile under API Username.
- In the DocuSign User record in
, add the API Username value to the DocuSign User ID field. If this field doesn't appear, add it to the common area of your record layout.Companyname - Click the "Grant Access to DocuSign" button.
Add, Update, and Remove Users with Actions
After DocuSign is deployed in a knowledgebase, two actions are automatically added to the People table, and can be included in rules and action buttons:
- Add/Update DocuSign User
- Remove DocuSign User
However, as we saw earlier, adding a DocuSign user requires you to configure several settings. The Add/Update DocuSign User action can link the user to a DocuSign account automatically, but it does not add the user to the
| Companyname |
|---|
...
- Active
...
- .
...
- password=abcdef
- forgottenPasswordQuestion1=question1
- forgottenPasswordAnswer1=answer1
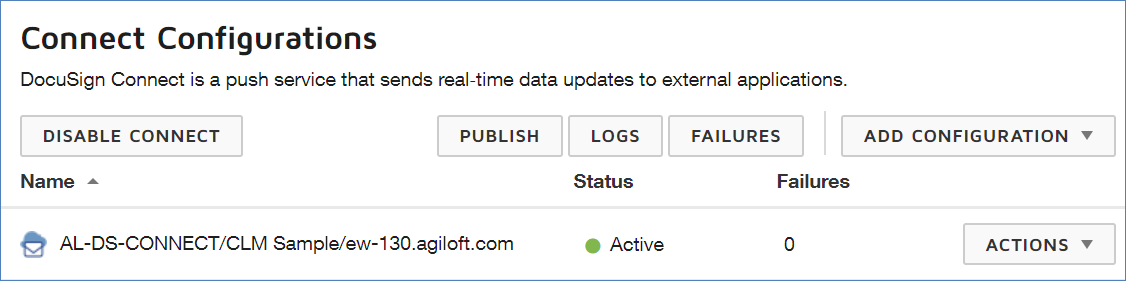
Enable DocuSign Connect
DocuSign Connect allows
| Companyname |
|---|
Log in as the DocuSign Administrator.
Go to Setup > Integration and click Configure under DocuSign Extension.
Click Enable DocuSign Connect. If DocuSign is successfully enabled, you are returned to the Integration menu and a status notification appears at the top of the page. You can also confirm your connection by clicking Configure again under DocuSign Extension and confirming that a Connect ID now appears.
Note You may see an error message if the hotlink server URL is set to the localhost by default. To update this value, set the Hotlink Server URL global variable value to your hosted server.
...
Enable DocuSign Connect with a Closed Server
If your server is not openly accessible to the web, follow these steps to enable secure port access for DocuSign Connect.
- Open port access: In the web server, open up access to port 443 for the specified DocuSign IP ranges listed in the DocuSign security whitelist in the Trust section.
- Configure proxy: If there is an active proxy or firewall, configure it to also allow URL and port forwarding from https://external-address:443/extension.
- Update the DocuSign certificate: Your SSL certificate must be updated. Download the latest public DocuSign Connect certificate from this location and add it to the server.
Manage hotlinks: All hotlinks for the server should be pointing to https://external-address. This will mean that when an admin creates a DocuSign Connect configuration and clicks the Enable DocuSign Connect in the DocuSign wizard,
will use the external address to create the configuration in the DocuSign website.Companyname Tip If you receive an error message when using DocuSign that mentions the Publish URL, go to the DocuSign Connect configuration and check the value in the URL to Publish field.
...
The next step is to configure the Create DocuSign Envelope action. This action determines:
- The total number of signers
- Which DocuSign templates to use
- Which attached file field holds the documents
- The subject line for the DocuSign email to recipients
To create or edit the Create DocuSign Envelope action:
- Go to Setup > Integration and click Configure under DocuSign Extension.
- Either:
- To edit an existing action, locate the Action drop-down menu, select Create DocuSign Envelope, and click Edit Action.
- To create a new DocuSign Envelope action for a table, locate the Table drop-down menu, select the table from the list, and click Add Action. When you create a new action, you must also also add a Name and Description for the action.
- Complete the fields to name and describe the action, optionally assign a template, specify the attached file field that holds the documents intended for the envelope, and configure a subject line for the email sent to the recipients.

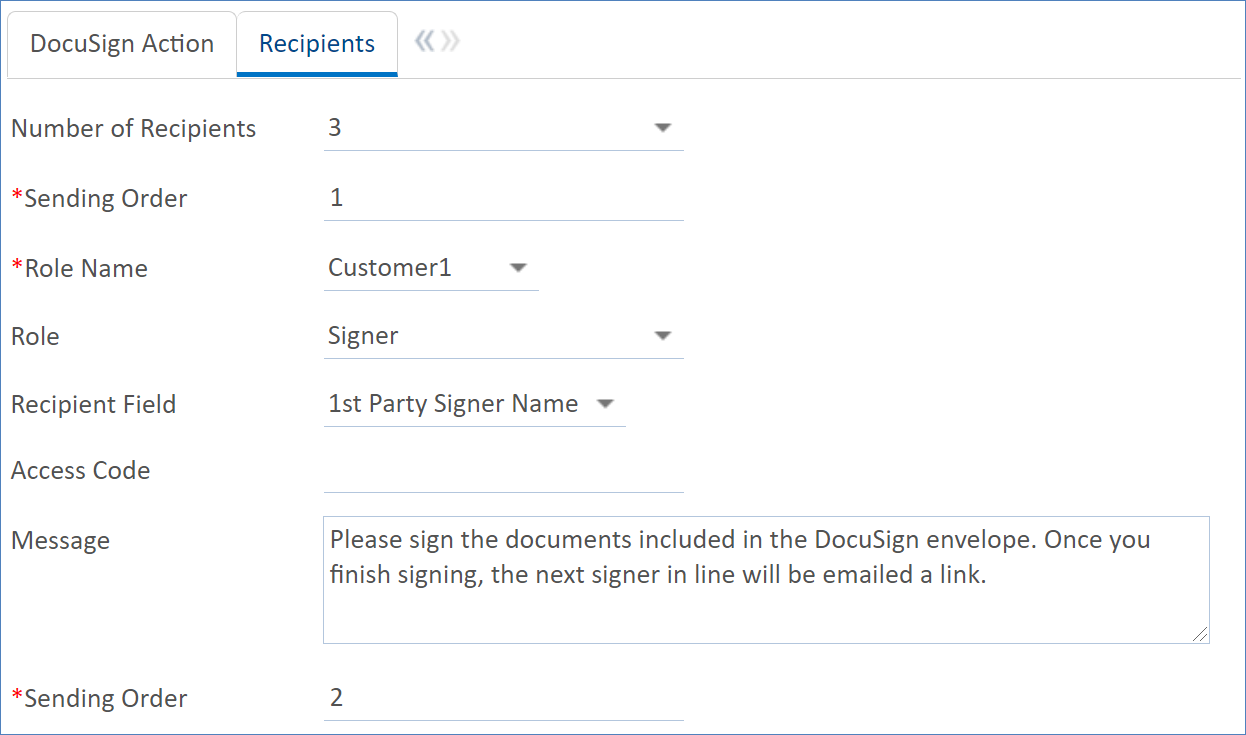
- Click the Recipients tab and complete the fields for each recipient. At the top, specify how many people will receive the envelope. Then, for each recipient in the sending order, configure the Role Name (defined in the DocuSign Roles table), Role, Recipient Field, optional Access Code, and message contents.
- Click Save.
| Tip |
|---|
If you need to create multiple DocuSign actions at once, use the Actions tab of the table's setup menu to set up your Ext: actions. You can create multiple DocuSign actions for the same table. Normally we create multiple DocuSign actions to toggle the signing order of the signers (such as Internal Signs first vs. External Signs first). |
Create and Send DocuSign Envelopes
Once you have created a document with DocuSign Tags by using a print template or manually adding the tags to a single document, you are ready to create a DocuSign Envelope.
| Tip | ||
|---|---|---|
For an in-depth discussion of creating documents with DocuSign Tags, see Create Print Templates with DocuSign Tags. Here are some tips to keep in mind:
|
Create a DocuSign Envelope
- Open the contract record that contains the attachments you want to put in the envelope.
- Go to the Attachments tab and scroll down to the All Contract Attachments related table.
- Send any attachments you want to include in the envelope:
- To send just one attachment, edit the To Be eSigned field and set it to Yes.

- To send multiple attachments, select all the attachments, mouse over Select Files, and click Add to E-Sign Packet.
- To send just one attachment, edit the To Be eSigned field and set it to Yes.
- When you've added all the attachments you need, go to the Signature tab and locate the Esignature Files section.
- Click Refresh Files. If you are using the standard signer setup with the hard-coded fields, make sure that the signer email addresses are filled in.
- After checking the listed documents and entering all of the signer information, click Create DocuSign Envelope to convert the information into a DocuSign Envelope record. A DocuSign Recipient record is created for each signer and linked to the envelope.
The DocuSign Envelope is created with a Status of Draft and appears in a pop-up window. The Status fields for both the DocuSign Envelope and the DocuSign Recipients are locked from editing and will only be updated by action buttons or updates from the DocuSign API.
Although we now have the DocuSign Envelope record in the
| Companyname |
|---|
Send the DocuSign Envelope
When you've made any necessary adjustments to the fields in the
| Companyname |
|---|
- Verify all the information in the fields is correct. After this step, you'll have to go out of your way to make any more changes.
Click Create and Preview to create the envelope and show it in the DocuSign web interface. Here, you can make changes before you send the envelope, such as adding or moving DocuSign elements and adjusting settings for the envelope and its recipients.
Tip Make sure to preview your envelope before you click Send to make sure your tags are positioned properly. If you click Send first, DocuSign will create the envelope in the background and immediately distribute it to the recipients to begin signing.
In the DocuSign interface, notice the DocuSign fields that were placed wherever you had DocuSign Tags placed in the print template. The recipients are listed in the upper left, and you can add new DocuSign fields such as signer initials by dragging a field from the left pane to the body of the document. Similarly, existing DocuSign fields in the document can be removed or dragged to new locations. Make any such changes you need to.

After the edits are finished, click Send to start the signing process and send the document to the first signers.
Note Do not close the DocuSign window via the browser. If you are not sending the envelope out right away and need to come back to it later, always make sure to click on the Other Actions drop-down and choose to Save and Close or Discard. If you simply close the browser window, the DocuSign Envelope may become locked from editing.
Track Envelope Progress
The Status value of the envelope record and recipient records is updated as each signer receives and signs the document.
Once all signers have signed the documents in the DocuSign Envelope, the DocuSign API will send the finished signed PDF back to
| Companyname |
|---|
| Companyname |
|---|
DocuSign sends out email notifications to the administrator and the recipients when the envelope is completed. Notification settings can be changed in the DocuSign account.
| Note | |
|---|---|
The option to attach a Certificate of Completion can be enabled using the Attach Certificate of Completion field in the DocuSign Envelope record in
|
If a recipient reports an issue with delivery, or if you want to remind recipients of the envelope by sending it again, you can click Send again even if the envelope is Sent or Delivered already. If the Send button doesn't appear in the record, go to Setup DocuSign Envelopes, edit the Send action button field, and edit the visibility condition on the Options tab to include the Sent or Delivered statuses.
...
An
| Companyname |
|---|
| Companyname |
|---|
To enable this feature:
- The DocuSign Account Administrator must be added in
at the Setup > Integration > Configure DocuSign Extension screen.Companyname - The DocuSign account must have Account-Wide Rights and Send On Behalf Of Rights (API) Permission settings enabled. This can be done by a DocuSign administrator through the Classic DocuSign Experience web application or by contacting your DocuSign Account Manager.
- The
user that will be sending the DocuSign Envelope via SOBO must be registered as a Sender on the DocuSign website with an email address that matches the email address of theirCompanyname
user record.Companyname
Switch to a Production Server and Finalize Setup
Once you have set up and tested the DocuSign API functionality in your KB using the developer sandbox account, you can switch to a DocuSign production server and link your enterprise license to finalize the setup by following the steps below.
- Make sure you are signed into
as the DocuSign admin user.Companyname - Go to Setup > Integration and click Configure under DocuSign Extension.
- Click Disable DocuSign Connect. This disables the DocuSign Connect link to the current developer sandbox account.
- In the DocuSign Users table, edit each DocuSign User that has been granted access and click Revoke Access.
- Return to Setup > Integration and click Configure under DocuSign Extension.
- Click Change Server and change the DocuSign Server to the production server where your enterprise license account resides.
- Once you set the right production server, connect your production account using the same steps you used to enable and connect the developer account.
- Optionally, set the Create external envelopes option to Yes or No. If you select Yes,
will create records in the DocuSign Envelopes table when envelopes are created outside theCompanyname
system. If you select No,Companyname
will only accept DocuSign data for envelopes that already have a corresponding record in the DocuSign Envelopes table.Companyname - Be sure to test the full DocuSign API integration from beginning to end by creating an envelope, sending it out, and completing the signing process.
| Note |
|---|
In order for DocuSign Connect functionality to work on DocuSign's production servers, you must have an enterprise license and DocuSign Connect must be enabled on the DocuSign account. To view this, click your account icon and then Go to Admin. Under Integrations, click Connect and make sure it's enabled. If the option is grayed out, you can contact DocuSign to refresh this for you. |
Troubleshooting
If DocuSign envelopes aren't being received, try resetting the connection to the DocuSign server:
Log in as the DocuSign Administrator.
Go to Setup > Integration and click Configure under DocuSign Extension.
- Click Disable DocuSign Connect. This brings you back to the Integration menu.
- Click Configure under DocuSign Extension.
- Click Enable DocuSign Connect.
When a connection is established, you need to resend any envelopes that were sent and not received. In
| Companyname |
|---|
| Companyname |
|---|
- Go to the DocuSign Envelopes table.
- Open the envelope you want to resend.
- Click Send.
Otherwise, you can resend them through DocuSign:
- Log in to DocuSign as the administrator.
- Click Manage on the toolbar.
- Check each folder and resend any envelopes that failed.

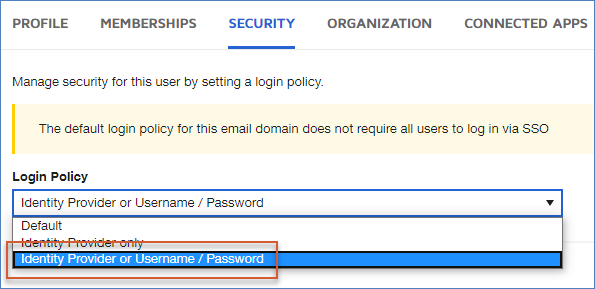
Bypass Single Sign-on (SSO) Requirements
When SSO is enabled, you might want to exclude certain users from the SSO requirement so that they can still log in with their DocuSign username and password. For example, maybe you want to give administrators or other privileged users the ability to bypass the SSO requirement to allow them to address potential SSO configuration issues.
To configure this permission for certain users, see How to exclude specific users from SSO requirements? on the DocuSign website. Follow the instructions on the page, and for each desired user, choose the "Identity Provider or Username / Password" option for the Login Policy dropdown on the Security tab.
| Hide If | ||||||||
|---|---|---|---|---|---|---|---|---|
| ||||||||
RelatedArticlesarticles
|