...
A customer can submit a service request from the default end user interface home page by either:
- Clicking on Create a Service Request or hovering over New and selecting Service Request from the home page.
 When a service request is created in this way, the user is required to select a service after selecting a business service. When the service is selected, the user will see a description of the service, any special instructions for that service, and any additional dependent fields defined to be visible for that service.
- Clicking on View My Service Catalog under the Service Catalog section on the home page.
This brings the user to a list of business services with descriptions.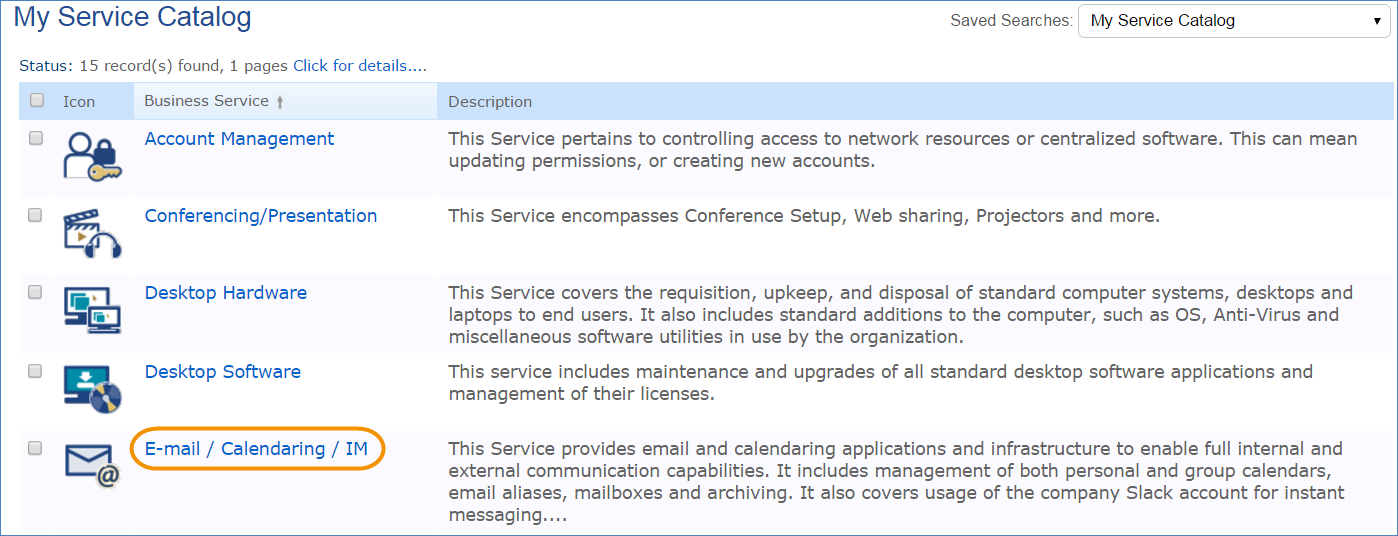

After selecting one of the business services, the user can choose from a list of relevant services. The services shown, in addition to being filtered to services for the business service item selected, are also limited based on the user's SLA Customer Group. For instance, the user in this example is in the Sales Department SLA Customer Group, and therefore can only view services in which the Available SLA Customer Groups contains the Sales Department. The The Create Request button can be used to generate a new Service Request or Incident, depending on the Request Type defined for the service. If the user clicks Create Request for Set up Email Account, a new service request record opens with the service information prepopulated pre-populated – the first categorization chosen maps into the Business Service, and the service offering selected maps into the Service. - Clicking on one of the Quick Links that have if one has been preconfigured to identify the business service and service.

When a customer submits a Service Request using any of When a customer submits a Service Request using any of these methods, the submitter information fields automatically populate based on the details in the user's Person record. In the default setup, a request cannot be submitted on behalf of a user who has no user record in the system. This may be changed by modifying the linked fields from the User table to enable "non-source" values.
...
When users submit a request that involves a purchase, they see the Items Requested for Purchase section at the bottom top of the formItems / Costs / Time tab. To choose the items for the purchase, click the Select Item link to bring up a new item requested form. 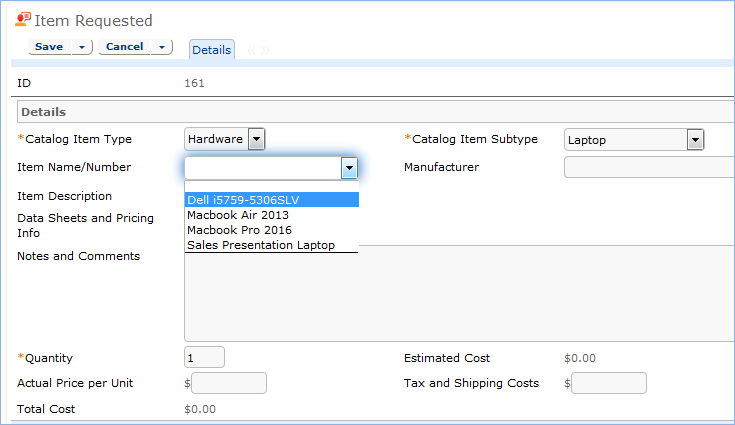
To complete the purchase request:
- Select the Type and Subtype. Only those values made accessible in the service record will be selectable, and then look up the available models from the Catalog, shown as the drop-down called Item Name/Number, and select one. After selecting the item, the latest price and an estimated cost are displayed.
- Save the Item Requested form and return to the Service Request. Users can create additional request items if the purchase involves more than one item; for instance, for a new computer, the user could create items for the main processor, the mouse, and the monitor to be ordered. Once the items are created, they are shown in the Service Request screen.

- Click Save to save the Service Request formClick Save to save the Service Request form, which will send an email acknowledging that the request was received.
...
Customers may return to the portal to check on the status of their service requests by clicking View My Service Requests on the home page. 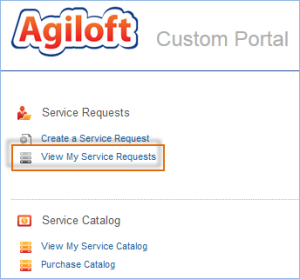

They will see all of their Service Requests displayed, and can click the Summary link to view and add more information.

Technician Record Submission
...
The common area, shown above all tabs of a service request record, contains the ID, Summary, Status, Assigned Team, Assigned Person, and SLA Due Date for the service request.


- Summary is required and allows the user to briefly describe the request.
- Status defaults to Open and changes as the service request progresses to Pending Approval, Approved, In Progress, Pending Customer, Updated by Customer, Closed, Canceled, and Reopened.
- The Assigned Team and Assigned Person can be entered upon creation manually by a technician; otherwise a rule sets the Assigned Team automatically when the new service request is saved.
- Once the service request is saved, the SLA Due Date populates.
- The common area also has a button to Cancel the Request which appears after the record is saved for the first time.
...
If the service is marked as billable and the Service Cost function is turned on, there are two additional required fields shown above Description:

 '' and '' fields are required when the service is billable.
The list of cost centers available is filtered to those where the Department matches the Submitter's Department. See Cost Centers for more details on this background table.
...
If the service requires approvals, fields on this tab will allow creation, editing, and launching of approval Approval records. Depending on the approval method of the service, either Predefined Workflow Only, Manually Created in Request Only, or Both Options Available, different fields will be available. In the example image, the service is Desktop Computer, which has Both Options Available for approval generation.


A workflow will be selected automatically if the service has a Default Workflow, but may be changed manually by privileged users. The approvals in the workflow are generated for this service request by clicking Generate Approvals. If additional A workflow will be selected automatically if the service has a Default Workflow, but may be changed manually by privileged users. The approvals in the workflow are generated for this service request by clicking Generate Approvals. If additional approvals need to be added, the checkbox Create Approvals in the Manual Approval Creation section can be selected, which will make new fields appear. Additional details on approvals can be found in the Managing Approvals section below.
Items, Tasks, Costs, and Time Tabs
, which will make new fields appear. Additional details on approvals can be found in the Managing Approvals section below.
Tasks Tab
If the service for the request is marked as being billable, for instance a Desktop Phone or Headset Purchase, cost information appears on this tab. In addition, if the service involves a purchase, the items that the user has requested will be displayed in the Items Requested for Purchase section. If the service has a task workflow, it can be launched and managed on this tab. For instance, the "Computer hardware installation tasks" workflow contains the following tasks by default: Unpack and test the hardware to ensure it is functional; Install the hardware in its new location and connect to company network; Install any necessary software and test; Update the Configuration Item record with changes.


Based on the Service selected and the Assigned Team for the Tasks, each Task generated in this tab may also be tied to an OLA Target, with a Resolution Time and Resolution Time warning threshold, allowing progress to be tracked against them as needed and notifying the appropriate parties - i.e. Assigned Team Manager - when those thresholds are breached. For more information on OLA Targets, see Service Level Management.more information on OLA Targets, see Service Level Management.
Items / Costs / Time Tab
If the service for the request is marked as being billable, for instance a Desktop Phone or Headset Purchase, cost information appears on this tab. In addition, if the service involves a purchase, the items that the user has requested will be displayed in the Items Requested for Purchase section.

The Items requested for Purchase table shows any items being purchased for this service request. Below the table is an Estimated Cost of Order based on the Estimated Cost of the Item Requested, a Total Cost of Order based on the Actual Price per Unit of the Item Requested, a count of the Number of Items Requested, and a count of the Number of Incomplete Items Requested based on the Items Requested that are not yet installed.
...
- Click Generate Approval(s). Any approvals generated based on the workflow will appear in the table of Approvals Needed below.


- If the service also allows manually created approvals, the user can create additional approvals by selecting the Create Approvals checkbox.
- This causes the ' Manual Approval Creation ' section to appear. Enter an Approval Title, give the approval a Step Number, and click Generate Approval.
 Generate Approval.
- After clicking Generate Approval, the new approval will be added to the table of Approvals Needed. This process can be repeated to create multiple ad hoc approvals.
- This causes the ' Manual Approval Creation ' section to appear. Enter an Approval Title, give the approval a Step Number, and click Generate Approval.
- Once all approvals are created, click Launch Approval Process. Launching the approval process sets the approval(s) with the lowest Step Number from Queued to Pending Approval. In addition, an email is sent to the Approver, or the Approval Team.
- Approvers have three options for taking action upon approval records. They can click Approve, Require Changes, or Permanently Reject.
- Approve sets the Status of the approval record to Approved and triggers launching of the approval(s) in the next highest step number, provided there are no other approvals with the same step number waiting to be approved.
- Require Changes results in an email to the Assigned Person of the service request.
- Permanently Reject sets the Status of the approval to Permanently Rejected, sets the Status of the service request to Canceled, sets the Status of any other Queued or Pending approvals for the service request to Not Needed, and triggers an email to the Submitter and Assigned Person for the service request to notify them of the rejection.
- Once the first step approval is approved, the next one(s) in the sequence is set to Pending Approval. Once all approvals are approved, the Status of the service request is set to Approved. SLA timeframes for the service request are then updated, using the date the service request was approved as the start time.
...
Tasks are created with a status of Queued or Conditional (if the task is marked as a conditional task, that is, the task is only needed if some particular field condition is met, defined in the task template). A rule running on creation handles assignment. Once the tasks have been generated, the Launch Tasks button becomes visible. When the Launch Tasks button is clicked, all tasks that have no prerequisite tasks are set to a Status of Assigned, and the assigned team or person is notified with an email. The Date Due and OLA Target dates (if OLAs are used) are set to start the clock from when a task is assigned.
Below is an example of tasks for a service request that were generated from a task workflow in which two of the tasks have prerequisite tasks:
 . The Date Due and OLA Target dates (if OLAs are used) are set to start the clock from when a task is assigned.
The Sequence field indicates the general sequence of tasks. If all the tasks have a Sequence value of 1, this indicates that they are likely all parallel tasks triggered at the same time. If a task has one or more prerequisite tasks, its sequence value is automatically set to the highest sequence value of its prerequisite tasks plus 1. So if a task has prerequisites whose Sequence values are 1 and 4, it will be set to 5. This numbering does not "do anything", it is just descriptive of the general order in which the tasks are expected to be done.
...
Technicians may easily report the time they spend on handling service requests. There are two fields: Time Spent and Time Description, and an action button: Add Time, on the Time tab of the layout. Entering values there will automatically create a new time entry record when the Add Time button is clicked. The time entry will show the work done by the technician and on the current date.  Technicians enter time on the Items / Tasks / Costs / Time tab. They must enter Time Spent in hours and minutes, then click the ' Add Time ' button is clicked. The time entry will show the work done by the technician and on the current date.
All the time entries for a request can be seen on the Time tab as well. If a technician needs to report time that was spent on a different day or by a different user, click the New button on the Time spent table to submit a time entry directly and change the date or "Done by" field. All time entered is totaled in the All Time Spent field, which can be used in reporting or billing.
...
When the service request is resolved, the technician sets the Status field to Closed and enters the solution notes into the Resolution field. If a similar incident has been resolved and marked as a standard solution, a technician can click on the lookup icon next to the Resolution field:  .
.
This opens a new window. Use the search bar at the top to look for the most relevant service requests. If a service request with a similar resolution exists, technicians use the Import/Replace button to copy the service request's Resolution into the current service request. The standard resolution can be modified further if needed. The technician can also select a Closure Category, which is used for reporting. The options for Closure Category are:

The closure category table holds these values, and they used for reporting. The Closure Category values are determined by the Closure Category Table, and can be modified to match your company's needs.
...
Customers may alternatively be sent a link to submit a survey, in which case the following window appears: A customer satisfaction Survey with five questions. These use Excellent / Very Good / Good / Fair / Poor ratings. The final input box offers free text for suggesting improvements. Once the survey is saved, it is added to the Surveys table where it can be included in reports and used to inform service improvement plans.
 Image highlights a newly saved survey in the Surveys table.
Validations and other Automation
...