The Service Requests table holds all customer service requests. A service request (SR) is created when an internal customer needs a new service, a standard ( preapproved ) change to an existing service, a password reset, or some other kind of assistance or information. Service requests are also used to order request the purchase of equipment, supplies, or new services or software.
When the user needs to report an interruption in service or a problem with an existing service, an Incident incident should be created instead. We have chosen to separate
| Companyname |
|---|
The easy way to distinguish Service Requests from Incidents is to recognize that Service Requests are the kinds of things you will choose would select from a service catalog, such as application assistance, password resets, new employee setup, documentation, or copying services, and so on.
If a user creates a Service Request when it should have been an Incident, the technician may click the Save Changes and Copy to Incident button on the Related Records tab of the SR service request form to easily convert that Service Request into an Incident and have all the fields mapped appropriately.
A user creating a service request chooses the business service from a drop-down, and then sees all the active services for that business service in a second drop-down list. The default business services for service requests can be seen in the business services table, or by creating a an SR record and opening the drop-down list.
Creating Service Requests
Service Requests (SRs) may be created by telephone support staff or technicians on behalf of customers or by customers directly through the web interface or by inbound email, should an inbound email account be set up.
| Anchor | ||||
|---|---|---|---|---|
|
End User Record Submission
A customer can submit a service request from the default end user interface home page by either:
...
- Clicking on Create a Service Request or hovering over New and selecting Service Request from the home page.
...

...
When a service request is created in this way, the user is required to select a service aft er selecting a business service. When the service is selected, the user will see a description of the service, any special instructions for that service, and any additional dependent fields defined to be visible for that service.
- Clicking on View My Service Catalog under the Service Catalog section on the home page.
- This brings the user to a list of business services with descriptions.
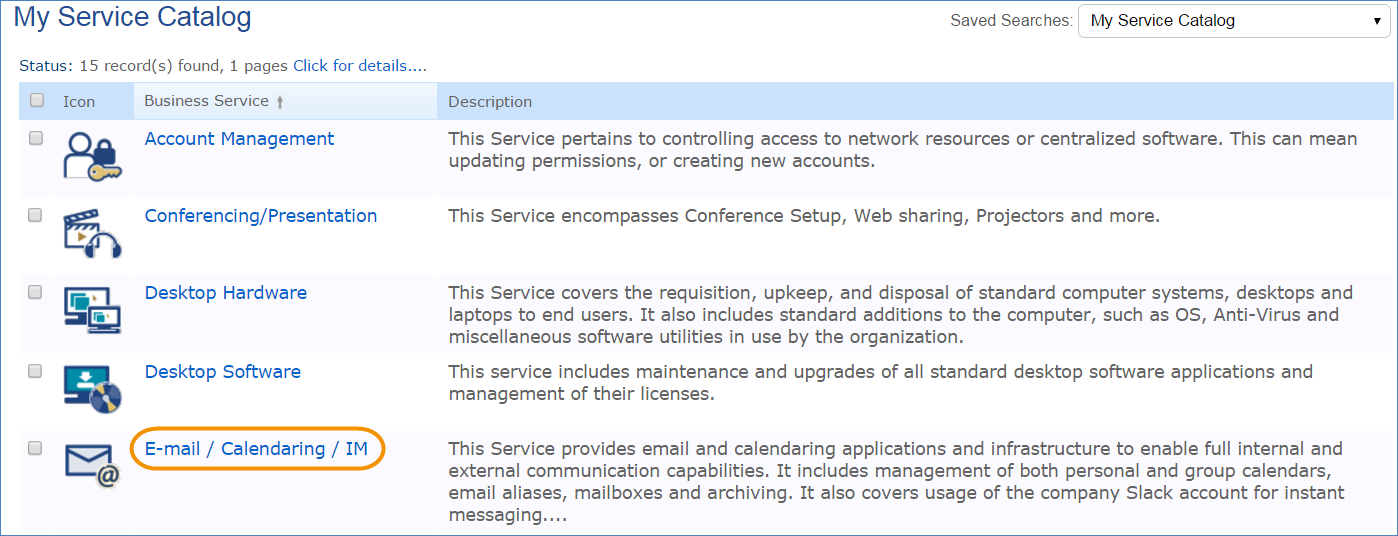
- After selecting one of the business services, the user can choose from a list of relevant services. The services shown, in addition to being filtered to services for the business service item selected, are also limited based on the user's SLA Customer Group. For instance, the user in this example is in the Sales Department SLA Customer Group, and therefore can only view services in which the Available SLA Customer Groups contains the Sales Department.
- The Create Request button can be used to generate a new Service Request or Incident, depending on the Request Type defined for the service.
- If the user clicks Create Request for Set up Email Account, a new service request record opens with the service information prepopulated – the first categorization chosen maps into the Business Service, and the service offering selected maps into the Service.
- This brings the user to a list of business services with descriptions.
- Clicking on one of the Quick Links that have been preconfigured to identify the business service and service.

When a customer submits a Service Request using any of these methods, the submitter information fields automatically populate based on the details in the user's Person record. In the default setup, a When a customer submits a Service Request using either method, the contact information fields automatically populate based on the details in his/her user record. In the default setup, a request cannot be submitted on behalf of a user who has no user record in the system. This may easily be changed by modifying the linked fields from the User table to enable "non-source" values to be used..
| Anchor | ||||
|---|---|---|---|---|
|
When
...
users submit a request that involves a purchase, they
...
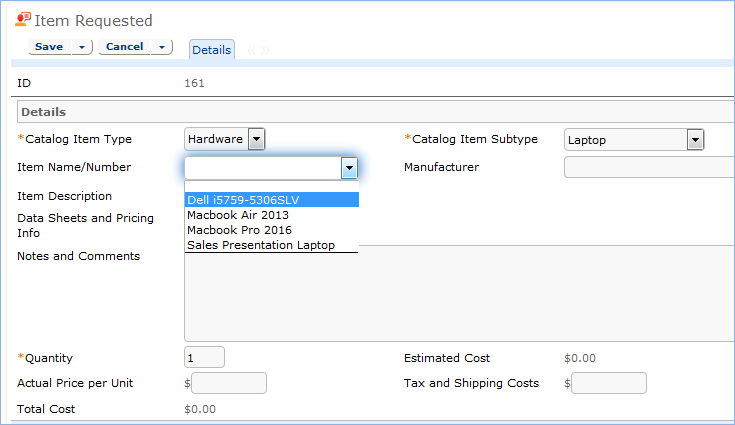
see the Items Requested section at the bottom of the form. To choose the items for the purchase, click the Select Item link to bring up a new item requested form.
To complete the purchase request:
- Select The user must select the Type and Subtype – only . Only those values made accessible in the service record will be selectable – selectable, and then look up the available models from the Catalog - , shown as the drop-down called Item Name/Number - , and select one. Once After selecting the item is selected, the latest price will be shown and an estimated cost are displayed.
- When Save the user saves the Item Requested , they can repeat the process form and return to the Service Request. Users can create additional request items if the purchase involves more than one item; for instance, for a new computer, the user could create items for the main processor, the mouse, and the monitor to be ordered. Once the items have been are created, they will be are shown in the Service Request screen.

- Click When finished filling out the service request, the user must click Save to save the Service Request form, after which they will receive send an email acknowledging receipt of that the request was received.
...
Actions on
...
Users may return to the portal to check on the status of their service requests by clicking on View My Service Requests on the home page.
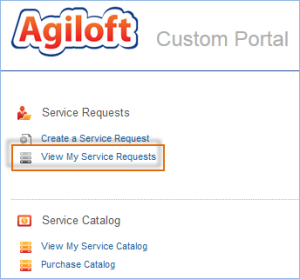
They will see all of their Service Requests displayed, and can click the edit icon to add more information to them:

Technician Record Submission
If a technician creates the SR, he may choose an assigned team and assigned person from the drop-down fields, and his changes will not be overwritten – the rule only assigns if the Assigned Team field is empty when the record is saved.
New SRs are created in a Status of Open by default. During creation, a technician may change the Status to In Progress – if they wish to indicate they are already starting work on it – or Closed – if they were able to resolve the issue immediately and want to capture the request for reporting purposes.
Automatic Emails Sent upon Submission
If a Support Staff technician creates a record in a status of Closed an email is sent to the customer telling them how to reopen the Service Request. This email is sent by a workflow action and is displayed as a checkbox that can be turned off by technician users. This option is set in the workflow options, and can be modified. If the status is not Closed when saved, the rule named All New Service Request Actions will send the customer an acknowledgement email and will also send an email to either the Assigned Person, if there is one, or to the Assigned Team.
Service Request Fields
This section describes the information that can be stored for service requests.
Common Area
The common area, shown within all tabs of a service request record, contains the ID, Summary, Status, Assigned Team, Assigned Person, and SLA Due Date for the service request. Summary is required and allows the user to briefly describe the request. Status defaults to Open and changes as the service request progresses to Pending Approval, Approved, In Progress, Pending Customer, Updated by Customer, Closed, Canceled, and Reopened. The Assigned Team and Assigned Person can be entered upon creation manually by a technician; otherwise a rule sets the Assigned Team automatically upon saving the new service request. Once the service request is saved and reopened, the SLA Due Date will be populated. In addition, the common area has a button to Cancel the Request.
Details Tab
The Details tab contains information about the user who submitted the request, the service being requested, the request's importance, and notes about the request. The Submitter fields default to the user who created the service request, but can be updated by a technician if the request was created on behalf of another user. Upon submission, the user must choose a Business Service. Based on the Business Service chosen, a list of relevant Services will be available for selection. Alternatively, if the submitter requested the service through the service catalog, these fields will be prepopulated for them.
Impact and Urgency are also required. Upon saving the record, a Priority will be chosen automatically based on the Impact and Urgency. If the Impact or Urgency is changed, the button Set Priority can be used to refresh the Priority field based on the new values. To manually override the priority, Override Priority can be set to Yes. The submitter can enter more details about the request in the Description field. After submitting a service request, the submitter can enter additional notes in the Additional Information field. Any relevant files can be added to the Attached File field.
If the service selected is marked as being billable, there are two additional fields shown above Description:

The Cost Center must be selected for a service request for a billable service. The list of cost centers available is filtered to those where the Department matches the Submitter's Department.
Approvals Tab
If the service requires approvals, fields on this tab will allow creation, editing, and launching of approval records. Depending on the approval method of the service, either Predefined Workflow Only, Manually Created in Request Only, or Both Options Available, different fields will be available. In this example, the service is Desktop Computer, which has Both Options Available for approval generation:

A workflow will be chosen automatically if the service has a Default Workflow, but can be changed manually by clicking the lookup icon. The approvals in the workflow can be generated for this service request by clicking Generate Approvals. If additional approvals need to be added, the checkbox Create Approvals in the Manual Approval Creation section can be selected. Additional details on approvals can be found in the Managing Approvals section below.
Items, Tasks, Costs, and Time Tabs
If the service for the request is marked as being billable, for instance a Desktop Phone or Headset Purchase, cost information is shown on this tab. In addition, if the service involves a purchase, the items that the user has requested will be displayed in the Items Requested for Purchase section. If the service has a task workflow, it can be launched and managed on this tab. For instance, the Computer hardware installation task workflow contains the following tasks by default:

Based on the Service selected and the Assigned Team for the Tasks, each Task generated in this tab will also be tied to an OLA Target, with a Resolution Time and Resolution Time warning threshold, allowing progress to be tracked against them as needed and notifying the appropriate parties - i.e. Assigned Team Manager - when those thresholds are breached. For more information on OLA Targets, see Service Level Management.
The Items requested for Purchase table shows any items being purchased for this service request. Below the table is an Estimated Cost of Order based on the Estimated Cost of the Item Requested, a Total Cost of Order based on the Actual Price per Unit of the Item Requested, a count of the Number of Items Requested, and a count of the Number of Incomplete Items Requested based on the Items Requested that are not yet installed.
In the Service Cost Information, the Cost Model field is set automatically upon creation of a new service request to match the Cost Model field in the service. The options are Fixed for the Service, Based on Items Purchased, Based on Task Costs, and Based on Time Spent. Depending on the option chosen, different fields are available in the service request. For instance, if the Cost Model is Fixed for the Service, a field for Fixed Cost appears.
SLA / Work Status Tab
The SLA / Work Status tab displays all of the information from the SLA defined for the Service Request based on the user's department and SLA group. For more information on this, see Service Level Management. The SLA Title is displayed, along with the support hours for the SLA, the SLA Target Response Time, Actual Response Time, SLA Target Resolution Time, SLA Warning Date, and whether or not the SLAs for Response and Resolution were met. If the SLA was breached, a Reason for SLA Breach field becomes visible where the breach can be explained. There are also Staff Working Notes with time stamps, and a Resolution field that can pull from the Known Error database if needed along with an Attached Files field.
Related Records Tab
If the service request was created from within an incident, that incident will automatically be shown in the Spawning Incident section. A Spawning Incident can also be selected manually.
If the service request results in an incident or change request, buttons here can be used to map information from the service request into the new incident or change request. Clicking Save Changes and Copy to Incident, for example, opens a new incident record with the Summary, Submitter Assigned Team, Assigned Person, Business Service, Description, Configuration Item, Location, Additional Information, Staff Only Notes, and Resolution prepopulated based on the service request. In addition, the incident will automatically show the originating service request in the Spawning SR fields. Once the new incident is saved, the service request will be automatically updated to show the related incident information.
If the service request is related to a release, the release can be selected in the Related Release section. Any other service requests created by the same Submitter will be shown in the All Service Requests submitted by this user section, allowing technicians to compare the current request to previous ones for the same user. At the bottom of this tab, any configuration items assigned to the submitter are listed in a table.
Processing of Records
This section describes some of the most common actions a technician will perform when working on a service request. Throughout the process, the technician can enter working notes in the Staff Only Notes field, which is an append-only field that is not visible to the customer.
Request Assignment
When a new request is saved, it is automatically assigned to a team based on the values in three fields pulled from other tables (Rule: All new Service Request actions, Action: Assign Service Request). The related service has a Responsible Team associated with it and a field called Give Service Team Priority over CI Team that has Yes/No values. If a Configuration Item was identified for the request, then there is also a CI Responsible Team field that will be populated in the SR.
The current assignment logic is: if the Service Request involves a specific configuration item (CI), then the request is assigned to the responsible team for that CI, unless the Give Service Team Priority over CI Team field is set to Yes. In this case, or If no CI is defined, then it is assigned to the Responsible Team for the Service. If there is no Responsible Team for the Service, then it is assigned to the 1st Level Support Team.
Naturally, this logic may easily be changed to suit your organization. You can simply set a default value such as the 1st Level Support Team or you may choose some other logic to use based on different fields. The current logic is implemented in the SR rule named "All New Service Request Actions" and may be modified there.
If the technician needs to reassign the Service Request to a different team or person, he or she simply changes the Assigned Team and/or Assigned Person field and the system will email the new assignee notifying them of the reassignment (Rule: Assigned team or person changed; Action: I: Notify team or person of new assignment).
Requesting Information from the Submitter
If a technician working on a Service Request needs more information from the customer in order to take further action, she can set the status to Pending Customer. A workflow action will automatically send an email to the customer requesting further information and including the content of the Additional Notes field, an append-only field that is used to communicate with the customer. The email includes a hyperlink for the customer to click to edit the Service Request directly.
Managing Approvals
For service requests that need to be approved, approvals are managed in the Approvals tab. The methods available for approval generation for a service request depend on the service.
As described in the Service Catalog and Portfolio Services, there are three options for approval generation methods for a service:
- Using a predefined workflow: If a service's Approval Generation Method is Predefined Workflow Only, a button appears to Create New Approval Workflow. Clicking this button opens a new approval workflow record, where one or more approval templates can be added and sequenced. Once the new workflow saved and the Refresh button is clicked within the service, the new workflow appears as an option in the Default Approval Workflow Title dropdown. When selected as the Default Approval Workflow, the approval templates are shown in the Default Approval Workflow Templates table below.

- Manually creating approvals within the service request: If Manually Created in Request Only is selected as the Approval Generation Method, no further action needs to be taken within the service. Additional fields will be available in the service request itself in order to generate approvals manually.
- Both methods can also be available for a service: If Approval Generation Method is set to Both Options Available, the fields visible for the Predefined Workflow Only method are visible. In addition, for a service request created for this service, the option to manually create approvals will also be available.
If the service for the request allows for a Predefined Workflow, the Approval Workflow Title will appear and be populated with the Default Workflow for the service. It can be changed by clicking on the lookup icon. To create approvals based on the workflow...
- Click Generate Approval(s). Any approvals generated based on the workflow will appear in the table of Approvals Needed below.

- If the service also allows manual creation of approvals, the following section will be visible:

- To create an approval manually, select the Create Approvals box, fill out an Approval Title, give the approval a Step Number, and click Generate Approval. An individual approval may also be selected.
- After clicking Generate Approval, the new approval will be added to the table of Approvals Needed.
- Once all approvals are created, click Launch Approval Process. Launching the approval process sets the approval(s) with the first Step Number from Queued to Pending Approval. In addition, an email is sent to the Approver, or, if there is no individual Approver, the entire Approval Team.
- Approvers have three options for taking action upon approval records. They can click Approve, Require Changes, or Permanently Reject.
- Clicking Approve sets the Status of the approval record to Approved and triggers launching of the approval(s) in the next highest step number.
- Clicking Require Changes results in an email to the Assigned Person of the change request.
- Clicking Permanently Reject sets the Status of the approval to Permanently Rejected, sets the Status of the service request to Canceled, sets the Status of any other Queued or Pending approvals for the service request to Not Needed, and triggers an email to the Submitter and Assigned Person for the service request to notify them of the rejection.
- Once the first step approval is approved, the next one(s) in the sequence is set to Pending Approval. Once all approvals are approved, the Status of the service request is set to Approved. SLA timeframes for the service request are applied using the date the service request was approved as the start time.
Using Tasks for a Service Request
Some services are defined to have a set of tasks that should be completed. The task method is defined in the service record as described in Tasks for Service Requests. If tasks are associated with the service, they are generated by the technician responsible for the service request when ready, on the Tasks tab. For the user-selected tasks, the Generate Tasks button remains visible in case the user decides to check additional boxes after generating the first tasks. Validation prevents the same tasks from being created a second time for the same service request.
Tasks are created with a status of Queued or Conditional (if the task is marked as a conditional task, that is, the task is only needed if some particular field condition is met, defined in the task template). A rule running on creation handles assignment. Once the tasks have been generated, the Launch Tasks button becomes visible. When the Launch Tasks button is clicked, all tasks that have no prerequisite tasks are set to a Status of Assigned, and the assigned team or person is notified with an email. The Date Due and OLA Target dates are set to start the clock from when a task is assigned. Below is an example of tasks for a service request that were generated from a task workflow in which two of the tasks have prerequisite tasks:

...
Submission
The system runs the following actions when a new Service Request is submitted.
Automatic Assignment and setting of Priority and SLA Dates.
When a new request is saved, it is automatically assigned to a team based on the values in three fields pulled from other tables. The related service has a Responsible Team associated with it and a field called Give Service Team Priority over CI Team that has Yes/No values. If a Configuration Item was identified for the request, then there is also a CI Responsible Team field that will be populated in the SR.
The current assignment logic is: if the Service Request involves a specific configuration item (CI), then the request is assigned to the responsible team for that CI, unless the Give Service Team Priority over CI Team field is set to Yes. In this case, or if no CI is defined, then it is assigned to the Responsible Team for the Service. If there is no Responsible Team for the Service, then it is assigned to the 1st Level Support Team.
Naturally, this logic may easily be changed to suit your organization. You can simply set a default value such as the 1st Level Support Team or you may choose some other logic to use based on different fields. If technicians need to reassign the Service Request to a different team or person, they simply change the Assigned Team and/or Assigned Person field and the system will email the new assignee notifying them of the reassignment.
In addition, the priority is set based on the Impact and Urgency, and the correct SLA is applied, if SLA's are in use, based on the submitter, the service, and the configuration item, if any. If the request does not require approval first, then the SLA target dates are set based on the SLA and the priority.
Notifications
When a service request is submitted, if it does not require approval first, a pop-up appears to the submitter stating the SLA target date. For a new request that is not Closed, which can happen when technicians take a phone call, an acknowledgement email is sent to the submitter. If the selected service had a value of Yes in the field "CC Manager", then the submitter's manager is also emailed.
If the assigned person field has a value, that person is emailed, otherwise the assigned team is emailed about the new request. If the request requires approval, they will launch the approval process; otherwise, they will work on completing the request.
Following Progress on Their Requests
Customers may return to the portal to check on the status of their service requests by clicking View My Service Requests on the home page.
They will see all of their Service Requests displayed, and can click the Summary link to view and add more information.

Technician Record Submission
If technicians create the SR, they may choose an assigned team and assigned person from the drop-down fields and the changes will not be overwritten: the rule only assigns the record if the Assigned Team field is empty when the record is saved.
New SRs are created in a Status of Open by default. During creation, a technician may change the Status to In Progress, if they wish to indicate they have already started working on it, or Closed if they were able to resolve the issue immediately and want to capture the request for reporting purposes.
Automatic Email Sent if Request is Closed during Technician Submission
If a Support Staff technician creates a record in a status of Closed, an email is sent to the customer telling them how to reopen the Service Request. This email is sent by a workflow action and is displayed as a checkbox that can be deselected by technician users. This option is set in the table's Workflow, and can be modified.
The Service Request Layout
This section describes the default layout screens and fields for service requests.
Common Area
The common area, shown above all tabs of a service request record, contains the ID, Summary, Status, Assigned Team, Assigned Person, and SLA Due Date for the service request.

- Summary is required and allows the user to briefly describe the request.
- Status defaults to Open and changes as the service request progresses to Pending Approval, Approved, In Progress, Pending Customer, Updated by Customer, Closed, Canceled, and Reopened.
- The Assigned Team and Assigned Person can be entered upon creation manually by a technician; otherwise a rule sets the Assigned Team automatically when the new service request is saved.
- Once the service request is saved, the SLA Due Date populates.
- The common area also has a button to Cancel the Request which appears after the record is saved for the first time.
Details Tab
The Details tab contains information about the user who submitted the request, the service being requested, the request's importance, and notes about the request. The Submitter fields default to the user who created the service request, but can be updated by a technician if the request was created on behalf of another user. Upon submission, the user must choose a Business Service. Based on the Business Service chosen, a list of relevant Services will be available for selection. Alternatively, if the submitter requested the service through the service catalog, these fields will be prepopulated for them.
Impact and Urgency are also required. Upon saving the record, a Priority will be chosen automatically based on the Impact and Urgency. If the Impact or Urgency is changed, the button Set Priority can be used to refresh the Priority field based on the new values. To manually override the priority, Override Priority can be set to Yes. The submitter can enter more details about the request in the Description field. After submitting a service request, the submitter can enter additional notes in the Additional Information field. Any relevant files can be added to the Attached File field.
If the service is marked as billable and the Service Cost function is turned on, there are two additional required fields shown above Description:
The list of cost centers available is filtered to those where the Department matches the Submitter's Department. See Cost Centers for more details on this background table.
Approvals Tab
If the service requires approvals, fields on this tab will allow creation, editing, and launching of approval records. Depending on the approval method of the service, either Predefined Workflow Only, Manually Created in Request Only, or Both Options Available, different fields will be available. In the example image, the service is Desktop Computer, which has Both Options Available for approval generation.

A workflow will be selected automatically if the service has a Default Workflow, but may be changed manually by privileged users. The approvals in the workflow are generated for this service request by clicking Generate Approvals. If additional approvals need to be added, the checkbox Create Approvals in the Manual Approval Creation section can be selected, which will make new fields appear. Additional details on approvals can be found in the Managing Approvals section below.
Items, Tasks, Costs, and Time Tabs
If the service for the request is marked as being billable, for instance a Desktop Phone or Headset Purchase, cost information appears on this tab. In addition, if the service involves a purchase, the items that the user has requested will be displayed in the Items Requested for Purchase section. If the service has a task workflow, it can be launched and managed on this tab. For instance, the "Computer hardware installation tasks" workflow contains the following tasks by default: Unpack and test the hardware to ensure it is functional; Install the hardware in its new location and connect to company network; Install any necessary software and test; Update the Configuration Item record with changes.

Based on the Service selected and the Assigned Team for the Tasks, each Task generated in this tab may also be tied to an OLA Target, with a Resolution Time and Resolution Time warning threshold, allowing progress to be tracked against them as needed and notifying the appropriate parties - i.e. Assigned Team Manager - when those thresholds are breached. For more information on OLA Targets, see Service Level Management.
The Items requested for Purchase table shows any items being purchased for this service request. Below the table is an Estimated Cost of Order based on the Estimated Cost of the Item Requested, a Total Cost of Order based on the Actual Price per Unit of the Item Requested, a count of the Number of Items Requested, and a count of the Number of Incomplete Items Requested based on the Items Requested that are not yet installed.
In the Service Cost Information, the Cost Model field is set automatically when new service requests are created to match the Cost Model field in the Service record. The options are Fixed for the Service, Based on Items Purchased, Based on Task Costs, and Based on Time Spent. Depending on the selected option, different fields are visible in the service request. For instance, if the Cost Model is 'Fixed for the Service,' a field for Fixed Cost appears.
If your company tracks the time spent on requests, the fields for entering time spent appear near the bottom of this tab. Users may put in an amount of time and a brief description, and click the Add Time button to generate a time entry linked to the service request.
Work Status Tab and SLA fields
The Work Status tab displays all of the information from the SLA defined for the Service Request based on the user's SLA group. For more information on this, see Service Level Management. The SLA Title is displayed, along with the support hours for the SLA, the SLA Target Response Time, Actual Response Time, SLA Target Resolution Time, SLA Warning Date, and whether or not the SLAs for Response and Resolution were met. If the SLA was breached, a Reason for SLA Breach field becomes visible where the breach can be explained. There are also Staff Working Notes with time stamps, and a Resolution field that can pull from the Known Error database if needed along with an Attached Files field.
Note that these fields will be hidden if you turn off the SLA function in the ITIL Functions table. Also, the SLA targets will be blank for service requests that require approval until the request is approved, at which time the target due dates are calculated.
This tab also includes the main fields used to communicate the resolution to the customer and to communicate with other staff members. The Staff Only Working Notes field is only visible to members of the Base Service Desk group, so customers cannot see the notes in that field.
The Resolution field is used to put in the final resolution that is sent to the customer when the request is set to Closed. There are several other fields that appear below only once the status is set to Closed: the Closure Category, Reason for SLA Breach, if relevant, and the Standard Solution and Review for Knowledgebase fields.
Related Records Tab
If the service request was created from within an incident, that incident is automatically displayed in the Source Incident section.
If the service request should be converted into an incident or change request, buttons here can be used to map information from the service request into the new incident or change request. Clicking Save Changes and Copy to Incident, for example, opens a new incident record with the Summary, Assigned Team, Assigned Person, Submitter Information, Business Service, Description, Configuration Item, Additional Information, Staff Only Notes, and Resolution prepopulated based on the service request. In addition, the incident will automatically show the originating service request in the Source SR fields. Once the new incident is saved, the service request will be automatically updated to show the related incident information.
The same thing applies to converting a service request to a change request. The source SR is shown in the change request and the change request information is linked back to the service request.
If the service request is related to a release, the release can be selected in the Related Release section.
All Service Requests submitted by this user shows any other service requests created by the same Submitter, allowing technicians to compare the current request to previous ones for the same user. At the bottom of this tab, any configuration items assigned to the submitter are also listed in a table.
Processing of Records
This section describes the most common actions a technician will perform when working on a service request. Throughout the process, the technician can enter working notes in the Staff Only Notes field, which is an append-only field not visible to the customer.
Requesting Information from the Submitter
If a technician working on a Service Request needs more information from the customer in order to take further action, set the status to Pending Customer. A workflow action will automatically send an email to the customer requesting further information. The email includes the contents of the Additional Information field on the Details tab, an append-only field used for communicating with the customer. The email includes a link for the customer to open the Service Request directly.
Changing the Assigned Team or Person
Technicians may reassign a request to a different team or a different person. Any time either field is changed, an automatic notification is sent. It is sent to the new assigned person, if there is one and it is not the person who just set it, or to the new team.
Managing Approvals
For service requests that need to be approved, approvals are managed in the Approvals tab. All of the approval fields are dependent on the Service Approval Required field having a Yes value. If it has a No value, then no approvals are needed and this tab can be skipped.
The methods available for approval generation for a service request depend on the service. As described in the Service Catalog and Portfolio Services, there are three options for approval generation methods for a service:
- Using a predefined workflow: If a service's Approval Generation Method is Predefined Workflow Only, then the default approval workflow will be shown, with the button to Generate Approval(s).
- Manually creating approvals within the service request: If Manually Created in Request Only is selected as the Approval Generation Method, the user will just see the option to Create Approvals in the service request, and will define approvals manually.
- Both methods can also be available for a service: If Approval Generation Method is set to Both Options Available, the fields visible for the Predefined Workflow Only method are visible, along with the option to manually create approvals.
If the service for the request allows for a Predefined Workflow, the Approval Workflow Title appears and populates with the Default Workflow for the service. To create approvals based on the workflow:
- Click Generate Approval(s). Any approvals generated based on the workflow will appear in the table of Approvals Needed below.

- If the service also allows manually created approvals, the user can create additional approvals by selecting the Create Approvals checkbox.
- This causes the 'Manual Approval Creation' section to appear. Enter an Approval Title, give the approval a Step Number, and click Generate Approval.

- After clicking Generate Approval, the new approval will be added to the table of Approvals Needed. This process can be repeated to create multiple ad hoc approvals.
- This causes the 'Manual Approval Creation' section to appear. Enter an Approval Title, give the approval a Step Number, and click Generate Approval.
- Once all approvals are created, click Launch Approval Process. Launching the approval process sets the approval(s) with the lowest Step Number from Queued to Pending Approval. In addition, an email is sent to the Approver, or the Approval Team.
- Approvers have three options for taking action upon approval records. They can click Approve, Require Changes, or Permanently Reject.
- Approve sets the Status of the approval record to Approved and triggers launching of the approval(s) in the next highest step number, provided there are no other approvals with the same step number waiting to be approved.
- Require Changes results in an email to the Assigned Person of the service request.
- Permanently Reject sets the Status of the approval to Permanently Rejected, sets the Status of the service request to Canceled, sets the Status of any other Queued or Pending approvals for the service request to Not Needed, and triggers an email to the Submitter and Assigned Person for the service request to notify them of the rejection.
- Once the first step approval is approved, the next one(s) in the sequence is set to Pending Approval. Once all approvals are approved, the Status of the service request is set to Approved. SLA timeframes for the service request are then updated, using the date the service request was approved as the start time.
Using Tasks for a Service Request
Some services are defined to have a set of tasks that should be completed. The task method is defined in the service record as described in Tasks for Service Requests. If tasks are associated with the service, they are generated by the technician responsible for the service request when ready, on the Tasks tab. For the user-selected tasks, the Generate Tasks button remains visible in case the user decides to check additional boxes after generating the first tasks. Validation prevents the same tasks from being created a second time for the same service request.
Tasks are created with a status of Queued or Conditional (if the task is marked as a conditional task, that is, the task is only needed if some particular field condition is met, defined in the task template). A rule running on creation handles assignment. Once the tasks have been generated, the Launch Tasks button becomes visible. When the Launch Tasks button is clicked, all tasks that have no prerequisite tasks are set to a Status of Assigned, and the assigned team or person is notified with an email. The Date Due and OLA Target dates (if OLAs are used) are set to start the clock from when a task is assigned.
Below is an example of tasks for a service request that were generated from a task workflow in which two of the tasks have prerequisite tasks:

The Sequence field indicates the general sequence of tasks. If all the tasks have a Sequence value of 1, this indicates that they are likely all parallel tasks triggered at the same time. If a task has one or more prerequisite tasks, its sequence value is automatically set to the highest sequence value of its prerequisite tasks plus 1. So if a task has prerequisites whose Sequence values are 1 and 4, it will be set to 5. This numbering does not "do anything", it is just descriptive of the general order in which the tasks are expected to be done.
If there are tasks that have prerequisite tasks, those tasks remain in the Queued or Conditional status until all of their prerequisites are completed, at which point any conditions are checked (for the conditional tasks) and the status is set to Assigned or Not Needed (if the condition for a conditional task is not met). In the example above, the last task is Queued waiting for its preceding tasks to be completed. The two sequence 2 tasks were assigned at the same time, since their sequence 1 prerequisite task was Completed/Approved.
When tasks are used, two fields track the number of tasks and the number of completed tasks - those with a terminal status. When these two fields match, meaning that the final task has been completed, a rule notifies the assigned person or assigned team (if no assigned person) that the final task is done.
Reporting Time Spent
Technicians may easily report the time they spend on handling service requests. There are two fields: Time Spent and Time Description, and an action button: Add Time, on the Time tab of the layout. Entering values there will automatically create a new time entry record when the Add Time button is clicked. The time entry will show the work done by the technician and on the current date.

All the time entries for a request can be seen on the Time tab as well. If a technician needs to report time that was spent on a different day or by a different user, click the New button on the Time spent table to submit a time entry directly and change the date or "Done by" field. All time entered is totaled in the All Time Spent field, which can be used in reporting or billing.
The Add Time action button converts the time fields into a Time Entry record and then blanks out the current values so they will be empty. Note that this same time entry methodology is used in the Incident, Problem, Change Request, and Task tables. So time spent on each type of request will be held in a single table (Time Entries) from which reports may easily be run for all kinds of time.
Canceling Requests
At any point after creation of a service request, a user can cancel their own requests by clicking the Cancel the Request button in the common area. After clicking Cancel the Request, users must confirm the cancellation in a new pop-up window. If confirmed, the service request's status will change to Canceled, any pending approvals for the request will be marked as Not Needed, any open tasks will be set to Not Needed, and any items requested will be marked Canceled.
Closing Requests
When the service request is resolved, the technician sets the Status field to Closed and enters the solution notes into the Resolution field. If a similar incident has been resolved and marked as a standard solution, a technician can click on the lookup icon next to the Resolution field:

This opens a new window. Use the search bar at the top to look for the most relevant service requests. If a service request with a similar resolution exists, technicians use the Import/Replace button to copy the service request's Resolution into the current service request. The standard resolution can be modified further if needed. The technician can also select a Closure Category, which is used for reporting. The options for Closure Category are:

The closure category table holds these values, and they can be modified to match your company's needs.
When a service request is marked as Closed, fields in the Knowledge Management section appear, provided that this function is turned on. Standard Solution can be set to Yes when the service request is common or has a resolution that might apply to future service requests. Once Standard Solution is Yes, the Resolution in this service request can be selected and pulled into new service requests' Resolution fields using the lookup icon next to the field.
Setting Review for Knowlegebase? to Yes indicates that a knowledge article will be created based on this service request. Once Review for Knowledgebase? is Yes, the Knowledge Document Status and Create Knowledge Article fields are visible. The default value of Knowledge Document Status is Pending Review, and once Create Knowledge Article is clicked, the Knowledge Document Status is automatically updated to Created. If it turns out the knowledge article is not necessary, change the Knowledge Document Status to Not Needed. Clicking Create Knowledge Article opens a new knowledge article record with some information mapped from the service request, such as the Title, Purpose, and Content. Additional required fields must be populated before saving the record. Once the new knowledge article is saved, it is automatically linked back to the originating service request. In addition, the knowledge article will automatically include details from the source service request.
Closing a service request triggers a workflow email to the customer that includes the content of the Resolution field and tells the customer that the request has been completed.
Customer Updates
If the customer updates the Service Request at any point, an email notifies the assigned person or assigned team (if there is no assigned person) of the update.
When the customer replies to an email or edits a Service Request in a status of Pending Customer, the status changes to Updated by Customer and an email notifies the assigned person or the assigned team (if assigned person is empty) that the customer has replied. The customer is able to update the Additional Notes field directly, and email replies are mapped to that same field.
The email sent to customers when their ticket is closed includes a link back to the record if they wish to reopen it and instructs them to explain why they are not satisfied with the solution. Clicking the link will automatically change the "I Would Like To Reopen My Service Request" field to Yes, which in turn sets the status of the service request to Reopened and notifies the assigned person. It also increments the # of Times Reopened by 1.
Customers may alternatively be sent a link to submit a survey, in which case the following window appears:

Once the survey is saved it is added to the Surveys table where it can be included in reports and used to inform service improvement plans.

Validations and other Automation
Following are some of the validations and other automation managed by the system:
- If a technician sets the status to Pending Customer, they must put notes into the Additional Information field to be sent to the customer.
- If approvals are required, the status cannot be set to Approved, Closed, or In Progress until there is at least one approval and the approvals are all completed.
- When the status is changed to Closed, there must be text in the Resolution field, all tasks must be completed, and all items requested must be completed (for a purchase).
- If the priority or the SLA is changed for an SR, the SLA targets are reset based on the new priority/SLA.
- If Review for Knowledgebase changes to Yes and the Knowledge Document Status is empty, the Knowledge Document Status is set to Pending Review, while if the Review for Knowledgebase is set to No, it is changed to Not Needed.
- When the status changes from Open to any other status, if SLA function is included and SLA Response met is empty, if the actual response time is greater than the SLA target response time, SLA Response Met is set to No, otherwise it is set to Yes.
Workflow

Ownership
Records in this table are "owned" by the person whose login matches the Submitter Login. This means each record is associated with a particular login and no other "end user" employee will be able to edit that record. All technician users are able to edit any service request by default.
Reporting and Statistics
Several fields are included that are used for statistical reporting. The following fields may be of interest:
- Number of Assignees – is auto-incremented each time the assigned person changes
- Number of Teams Assigned – is incremented each time a different team is put in the Assigned Team field
- Number of Reopens – is incremented each time a closed request is reopened by a customer
- Total Hours to Close – elapsed time between Date Created and Date Closed (default value)
- Working Hours to Close – elapsed time between Date Created and Date Closed minus the non-working hours of the team in the Assigned Team field and the time during which the Status was Pending Approval
There are default reports measuring Total Time Spent by Service Category, Average time to close by service category and by person who closed, as well as averages for number of people assigned, number of teams assigned, and so on. With the field structures already there, it is easy to add reports to slice and dice the information the way you need it. Below are a few examples of the default reports.
Service Demand Report
This is a Trend graph that shows a trend analysis of the service demand over time based on the number of Service Requests for each Service.

Billable Service Report
This is a Bar Chart that shows the dollar amount of Billable Services provided for each Department.

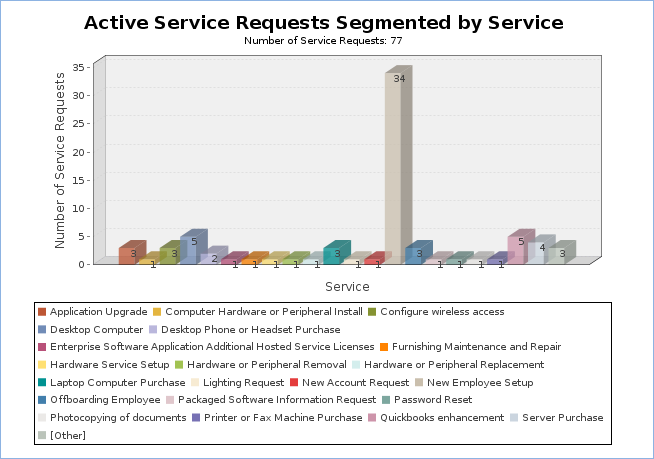
Active Service Requests Segmented by Service
This is a Bar Chart that shows the number of active Service Requests for each Service.
If there are tasks that have prerequisite tasks, those tasks remain in the Queued or Conditional status until all of their prerequisites are completed, at which point, any conditions are checked (for the conditional tasks) and the status is set to Assigned or Not Needed (if the condition for a conditional task is not met). In the example above, the last two tasks are Queued waiting for their preceding tasks to be completed. The top two tasks were assigned at the same time, since they had no prerequisites.
When tasks are used, two fields track the number of tasks and the number of completed tasks - those with a terminal status. When these two fields match, meaning that the final task has been completed, a rule notifies the assigned person or assigned team (if no assigned person) that the final task is done (Rule: Tasks Just Completed; Action: Notify Assigned team or person of completed tasks).
Reporting Time Spent
Technicians may easily report the time they spend on handling service requests. There are two fields: Time Spent and Time Description, and an action button: Add Time, on the Working Notes tab of the layout. Entering values there will automatically create a new time entry record when the Add Time button is clicked. The time entry will show the work done by the technician and on the current date. 
All the time entries for a request can be seen on the Time tab as well. If a technician needs to report time that was spent on a different day or by a different user, he may click the New button on the Time spent table to submit a time entry directly and change the date or "Done by" field. All time entered is totaled in the All Time Spent field, which can be used in reporting or billing.
The Add Time action button converts the time fields into a Time Entry record and then blanks out the current values so they will be empty. Note that this same time entry methodology is used in the Incident, Problem, Change Request, and Task tables. So time spent on each type of request will be held in a single table (Time Entries) from which reports may easily be run for all kinds of time.
Canceling Requests
At any point after creation of a service request, a user can cancel their own requests by clicking Cancel Request in the common area. Upon clicking this button, the user will first have to confirm the cancellation in a new popup window. If confirmed, the service request's Status will change to Canceled, any pending approvals for the request will be marked as Not Needed, any open tasks will be set to Not Needed, and any items requested will be marked as Canceled.
Closing Requests
When the technician has completed work on the service request, he can set the Status field to Closed and put the solution notes into the Resolution field. If a similar incident has been resolved and marked as a standard solution, a technician can click on the lookup icon next to the Resolution field:
The technician can use the search bar at the top of the new window that appears to look for service requests most relevant to the one that is currently being closed. If an service request with a similar resolution is found, it can be selected and the Import/Replace button can be clicked. This will copy the service request's Resolution into the current service request, where it can be modified further if needed. The technician can also select a Closure Category, which is used for reporting. The options for Closure Category are:
When a service request is marked as Closed, fields in the Knowledge Management section appear. Standard Solution can be set to Yes when the service request is common or has a Resolution that might apply to future service requests. Once Standard Solution is Yes, the Resolution in this service request can be selected and pulled into new service requests' Resolution fields using the lookup icon next to the field.
Setting Review for Knowlegebase? to Yes indicates that a knowledge article will be created based on this service request. Once Review for Knowledgebase? is Yes, the Knowledge Document Status and Create Knowledge Article fields are visible.The default value of Knowledge Document Status is Pending Review, and once Create Knowledge Article is clicked, the Knowledge Document Status is automatically updated to Created. If it turns out the knowledge article is not necessary, Knowledge Document Status can be changed to Not Needed manually. Clicking Create Knowledge Article opens a new knowledge article record with some information mapped from the service request, such as the Title, Purpose, and Description. Additional required fields must be populated before saving the record. Once the new knowledge article is saved, it is automatically linked within the originating service request: In addition, the knowledge article will automatically include about the source service request:
Closing a service request triggers a workflow email to the customer that includes the content of the Resolution fields and tells the customer that the request has been completed. The user can click on the first hyperlink to reopen the request. The request is opened in a new window with I would like to reopen my Service Request automatically set to Yes, and with the Additional Notes field editable. Once the record is saved, the Status is changed to Reopened. If instead the submitter chooses to submit a survey, the following window appears:
Once the survey is saved, it is added to the Surveys table, where it can be included in reports and used to inform service improvement plans.
Customer Updates
If the customer updates the Service Request at any point, an email notifies the assigned person or assigned team, if there is no assigned person, of the update.
When the customer replies to the email or edits a Service Request in a status of Pending Customer, the status changes to Updated by Customer (Rule: all customer update actions, Action: User Update Actions) and an email notifies the assigned person or the assigned team (if assigned person is empty) that the customer has replied. The customer is able to update the Additional Notes field directly and email replies are mapped to that same field.
The closing email to customers includes a hotlink back to the record if they wish to reopen it and instructs them to explain why they are not satisfied with the solution. Clicking the hotlink will automatically change the "I Would Like To Reopen My Service Request" field to Yes, which in turn sets the Status of the Service Request to Reopened and notifies the assigned person (Rule: All customer update actions, Action: User Update Actions).
Workflow

Ownership
Records in this table are "owned" by the individual customer. This means each record is associated with a particular login and no other "end user" employee will be able to edit that record. All technician users are able to edit any service request by default.
Reporting and Statistics
Several fields are included that are used for statistical reporting. The following fields may be of interest:
- Number of Assignees – is auto-incremented each time the assigned person changes (Rule: Assigned team or person changed, Action: Notify team or person of new assignment)
- Number of Teams Assigned – is incremented each time a different team is put in the Assigned Team field (Rule: Assigned team or person changed, Action: Notify team or person of new assignment)
- Number of Reopens – is incremented each time a closed request is reopened by a customer
- Total Hours to Close – elapsed time between Date Created and Date Closed (default value)
- Working Hours to Close – elapsed time between Date Created and Date Closed minus the non-working hours of the team in the Assigned Team field and the time during which the Status was Pending Customer (default value)
- Solved Within SLA – yes/no field with default value of Yes, is set to No when the total hours to close is greater than the relevant SLA Hours to complete field, pulled in with the service and based on priority. Rule: Status Change Actions, Action: All status change actions
There are default reports measuring Total Time Spent by Service Category, Average time to close by service category and by person who closed, as well as averages for number of people assigned, number of teams assigned, number of reopens, and so on. With the field structures already there, it is easy to add reports to slice and dice the information the way you need it. Below are a few examples of some default reports and screenshots:
Service Demand Report
This is a Trend graph that shows a trend analysis of the service demand over time based on the number of Service Requests for each Service.
Billable Service Report
This is a Bar Chart that shows the dollar amount of Billable Services provided for each Department.
Active Service Requests Segmented by Service
This is a Bar Chart that shows the number of active Service Requests for each Service.
Automation
The following rules run in the Service Requests table. Each of them runs when a record is created or edited, or on a scheduled basis.
Create 1: First actions: Set Priority, SLA and Assigned Team and Cost Information
Rule Trigger: This rule runs whenever an incident is created.
Description: Whenever a new service request is created, the appropriate SLA is automatically seteither to the SLA assigned to the CI or, if there is no CI for the incident, an SLA is chosen based on the incident's service the submitter's SLA groups.
If the Assigned Team was not selected manually during creation, it is assigned based on the following logic: if there is a CI for the incident and the service does not specify to give priority to the service's Responsible Team over the CI Team, assign the incident to the CI Team. Otherwise, if there is a Responsible Team for the service, assign it to that team, If not, set the Assigned Team to the 1st Level Support Team. If the service is billable, update the service request's Cost Model, Fixed Cost, and Hourly Rate based on values in the service record.
Set the Priority based on the Impact, Urgency, and service Priority Group.

Edit: All Customer Update Actions
Rule Trigger: This rule runs whenever an incident is edited by the Submitter who is on a customer team.
Description: When the submitter sets I would like to reopen my Service Request to Yes when the current Status of the request is Closed, change the Status to Reopened and increment the Number of Reopens by 1. If the submitter updates the record when the current Status is Pending Customer, change the Status to Updated by Customer. If the Assigned Person field has a value, email that person to notify them that the submitter has updated the request. Otherwise, if the Assigned Person field is empty, email the entire Assigned Team about the submitter update.

Edit: Status Change Actions
Rule Trigger: This rule runs whenever the Status of a service request is changed by a user.
Description: When the Status changes to Closed, the I would like to reopen my Service Request field is set to No. If the Date Closed is also greater than the SLA Due Date, the SLA Resolution Met field is set to No and the user is required to enter notes in the Reason for SLA Breach field. If the Date Closed is not greater than the SLA Due Date, the SLA Resolution Met field is set to Yes. If the Assigned Person field is empty, it is set to whoever closed the record. If the Service is Billable field is Yes, the Total Cost is calculated based on the Cost Model. The SLA calculations within the SLA (Open Incidents - Breached SLA, Open SRs - Breached SLA, Number of Open Incidents, and Number of Open Requests) are also refreshed and the Alert Color is set to the default value.
If the Status changed to Canceled, the Alert Color is set to the default value.

TB: Check for SLA Warning and Due Dates every 15 minutes
Rule Trigger: This rule runs every 15 minutes on service requests that are not Closed or Canceled and for which the SLA Warning Date or SLA Due Date is in the next 15 minutes.
Description: If the SLA Due Date is in the past or in the next 15 minutes, the Alert Color, which sets row coloring in the incident table view, is set to Red. If in addition the service has an Escalation Team, the Assigned Team of the incident is updated to be the Service Escalation Team, and an email is sent to the new Assigned Team and Person. Otherwise, an email goes to the current Assigned Team and Person as well as the Assigned Team Manager notifying of the SLA breach.
If the SLA Due Date is in the future and not within the next 15 minutes, and SLA Warning Date is in the past or within the next 15 minutes the Alert Color is set to Orange and an email is sent to the Assigned Person, Assigned Team, and the Service Escalation Team. If the Alert Color is not already orange, the Assigned Person is notified that the SLA Warning Date or Due Date might have been changed. If neither the SLA Warning Date or SLA Due Date is within the next 15 minutes or in the past, the Alert Color is set to default.
