This The Table wizard is used to act on whole tables, including creating and editing them, and even hiding or deactivating them. You can create tables or edit existing ones. For example, if you navigate to Setup > Tables, select an item in the table tree and click New, the following wizard is shown:

General Tab
This tab lets you set the table's label and provides default values for the name and the plural label.
Graphics tab
This tab lets you choose or upload an icon for the table.

Fields Tab
- This is where the bulk of table work is done. Fields are listed alphabetically by label and may be created, edited, and deleted from this screen.
- Relationships between tables are created and edited here through special field types.
- Creating a field does not make it show up in a form unless you both add it to the Layout and give groups viewing permission.
 e
e
Types of data Fields
Each data type may have options specific to it, but many options are the same for most types:
- General – Provides the name of the field and basic type information
- Options – Defines if field is dependent, required, what type of input is used
- Permissions – Allows an existing field to be copied to set permissions for all groups for new field
- Display – Defines further display characteristics, input and popup instructions and placement
Rules and Workflow Tabs
Create or view rules and workflow specific for this table directly from the Table Wizard.

...
Layout
| Note |
|---|
Fields will not appear until you add them to a layout. |
There are two distinct layouts for every table: one for staff and the other for the EUI: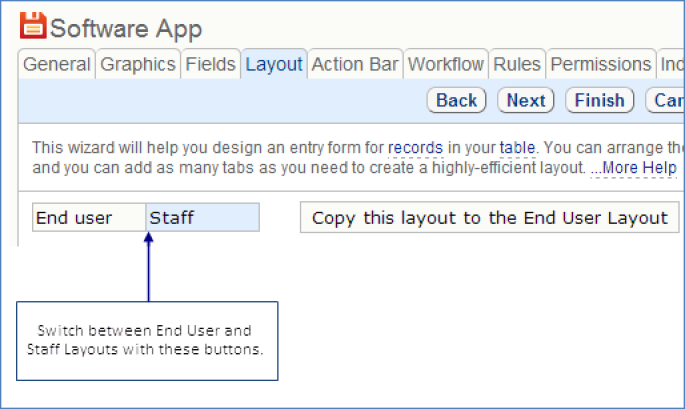
Layout Tab
any number of new tables. When editing a table, you can customize it in a variety of ways, such as its permissions, fields, actions, rules, and more.
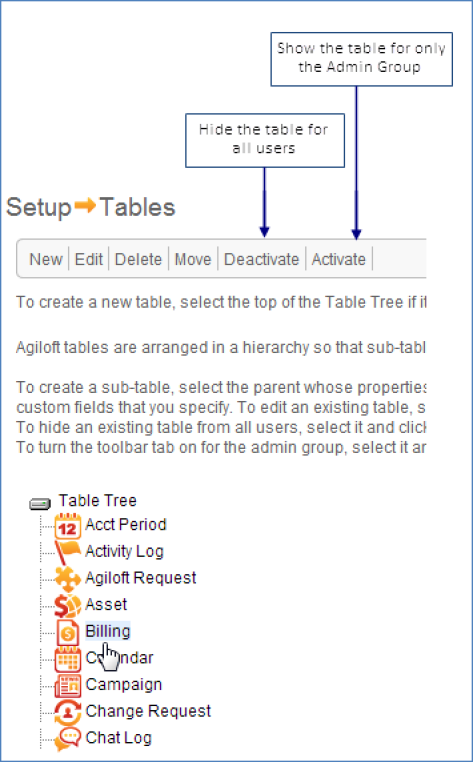
To edit a single table, simply expand it in the navigation menu and click Setup [Table]. To act on the entire table by hiding or deleting it, or to create a new table or edit multiple tables, click the Setup gear in the top-right corner and click Tables to see the full table tree.

From Setup > Tables, you can Hide or Unhide a table from all users, Deactivate existing tables to completely disable them in the system, and Print Fields for all Tables to quickly create an Excel reference sheet of all fields in all tables.
Creating New Tables
To create a new table or subtable:
- Go to Setup > Tables.
- In the table tree, select:
- Table Tree to create a new table
- An existing table to create a new subtable
- Click New. The table wizard opens.
- Before fully configuring the table, it's wise to set only the necessary options and then create the table, to make sure the system creates the table successfully. Begin on the General tab.
- On the General tab, enter a Table Label, which automatically populates the plural label and table name.
- On the Graphics tab, choose an icon for the table. You can also set different icons to use when the table is deselected or when this table is the last one the user opened.
- Go to the Navigation Menu tab.
- Select the "Add this table to the following navigation menus" checkbox and choose the appropriate menus. This makes the new table appear in the navigation menu for easy access and further configuration.
- Click Finish to create the table.
- Click Setup [Table] in the navigation menu and configure the rest of the settings.
| Tip | ||
|---|---|---|
| ||
When creating a new table, save the table before adding too many new fields. This can prevent problems when the system generates the table. |
Editing Default Table Settings
To edit the default table settings for new tables:
- Go to Setup > Tables.
- In the table tree, select Table Tree.
- Click Edit. The Table wizard opens.
Make any desired adjustments to the default table settings. These changes aren't applied to existing tables, with the exception of adding new default fields. Only new tables inherit the other settings chosen here.
Note If you add new default fields, they are added to all existing tables. This process can take a long time in a live system, and the process also locks all the tables, preventing users from working with records. If you need to add new default fields, it's usually best to do it outside of working hours.
Editing Existing Tables
To edit a table or subtable:
- If the table is included in the navigation menu, expand it and click Setup [Table].
- If the table isn't in the navigation menu:
- Go to Setup > Tables and select the table in the tree.
- Click Edit. The Table wizard opens.
Deleting Existing Tables
It's almost always best to deactivate a table rather than delete it. Deleting a table also dismantles its linked fields, actions, and rules, which might be connected to other tables behind the scenes. If you deactivate a table, it is disabled from use and hidden from users, without deleting those elements that other tables might be using.
Deactivating a table also deactivates and hides all of its subtables. You can't deactivate a subtable directly; if you need to remove a subtable, but keep the parent table, select the subtable and click Hide.
To deactivate a table:
- Go to Setup > Tables and select the table in the tree.
- Click Deactivate. This both deactivates the table and hides it from users. You do not need to also click Hide.
Using the Table Wizard
Use the following tabs on the Table Wizard when you create or edit a table or subtable.
General
The General tab allows you to configure several settings:
- Set the table's label and plural label
- Choose a table name
- Choose whether the table is deletable or not
- Apply a saved search automatically when the table is opened from the left pane
- Hide the table label from certain groups
Graphics
The Graphics tab is where you can select the icon used to represent the table and set certain icon properties, such as how the icon displays in the left pane. This tab also shows icons currently used in other tables, provides a selection of icons, and offers a way to upload additional custom icons.
| Tip |
|---|
It usually looks best to choose the Default Unselected Icon for the "Icon When Table is Unselected" and "Last Opened Icon" options. |
Fields
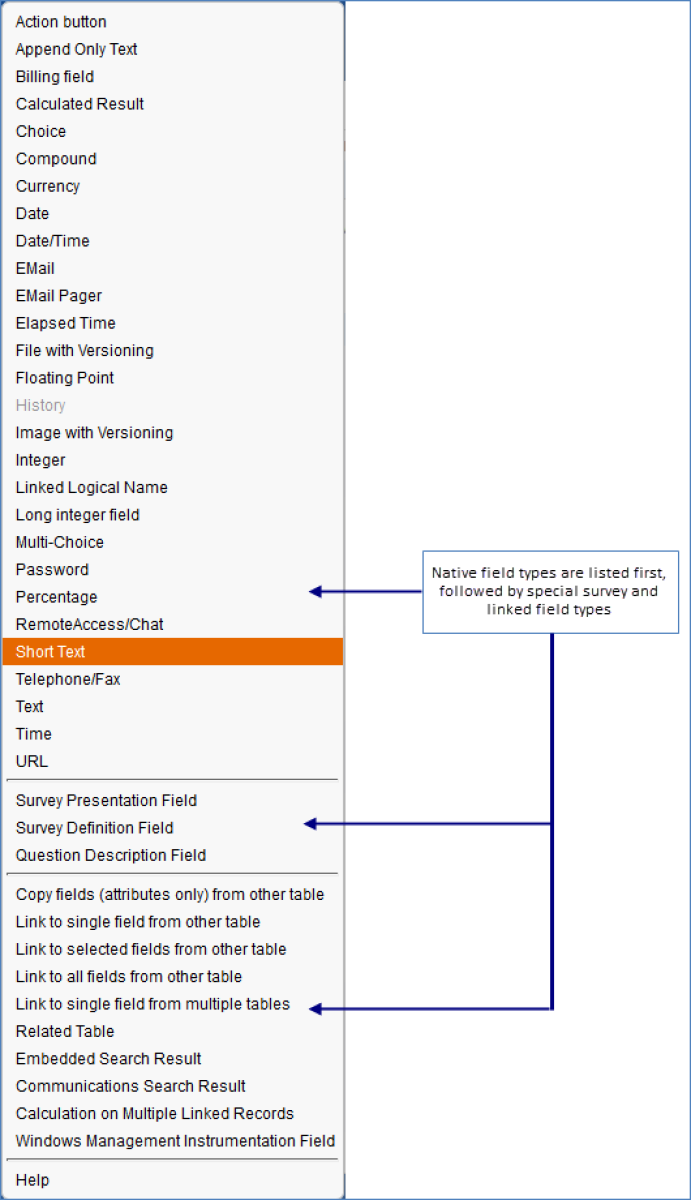
The Fields tab provides a full list of all fields in the table, regardless of whether they appear on the record form. Fields are listed alphabetically by label and may be deleted from this screen. You can also launch the Field wizard from this screen to edit existing fields or create new fields. The Data Type column identifies fields by type, such as linked field, related table, or other data type. You can see a full list of available data types by hovering over New.
You can select multiple fields and click Set Field Properties to configure field visibility, edit dependence, and more. To view information about fields in the table, such as admin notes, date updated, history entries, and other attributes, select the desired field(s) and click Print Field Documentation.
| Tip |
|---|
When you create a new field, it won't appear on any forms until you add the field to the layout and grant permission for groups to view it. |
| Anchor | ||||
|---|---|---|---|---|
|
The Layout tab controls how record forms appear for power and end users. Each available field is listed on the left sidebar, which you can search to find specific field names. Drag and drop the fields into place on the layout. The top toolbar offers Undo, Redo, options to add or remove rows and columns, controls for section headings and tabs, and more. Fields that aren't dragged onto the layout are not shown to users.
For more information, see Layouts.
Action Bar
The Action Bar tab allows you to view existing action bars for the table. You can click New to launch a wizard and create a new action bar, or you can click one of the Edit icons to configure an existing action bar. You can also copy or delete actions bars from this screen. Action bars, which allow you to perform a variety of actions, can be used in the current table and when records from the current table appear in other tables. They appear above the table view and above tables embedded within records.
![]()
For more information, see Action Bars.
Navigation Menu
The Navigation Menu tab lets table admins force an update to a navigation menu configuration, based on the default navigation menu for the team.
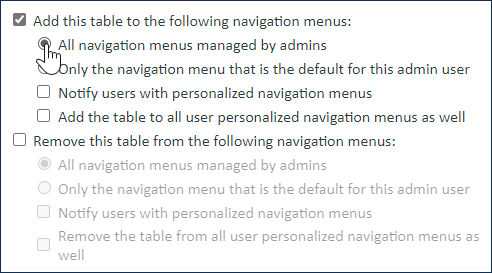
For example, if the default navigation menu for Sheila's team includes the Incidents menu, but Sheila used her personal preferences to remove the Incidents table from her navigation menu, the table admin can use this tab to add the Incidents table back to Sheila's navigation menu. To do so, the admin selects the "Add the table to all user personalized navigation menus as well" checkbox shown above.
If the table admin adds the Approvals table, which isn't included in the default navigation menu for Sheila's team, nothing changes in Sheila's navigation menu. Likewise, if a table admin adds a table that is included on the default navigation menu, and Sheila hasn't removed it, nothing changes for her and she doesn't receive a notification.
Actions
The Actions tab allows you to create, edit, and delete all table actions. You can delete actions directly from this tab, or you can click one of the "Create..." action type buttons to launch a wizard to create a new action. You can also select an existing action and click Edit to launch a wizard to configure the action. This tab functions identically to the action wizards in rules or actions buttons.
For more information, see Actions.
Rules
The Rules tab allows you to create, edit, and delete all table rules. This tab functions identically to the rules wizard accessed elsewhere. For more information, see Rules.
Workflow
The Workflow tab allows you to create or edit the table workflow. For more information, see Workflows.
Permissions
Record Ownership is defined on the Permissions tab, which determines whether a user "owns" the record or not. These settings have a significant impact on record-level permissions, since view and edit permissions are separate for "my own" and "other people's" records.
This tab also contains shortcuts for basic group permission settings which are otherwise set in the Table Permissions Wizard.
Indexes
The Indexes tab allows you to create indexes that work on specific fields to improve saved or advanced ad-hoc search speed. However, the process is resource intensive and should be turned off for tables where it is unnecessary. For more information, see Indexing.
Conversion
The Conversion tab allows you to set up conversion mappings to automatically
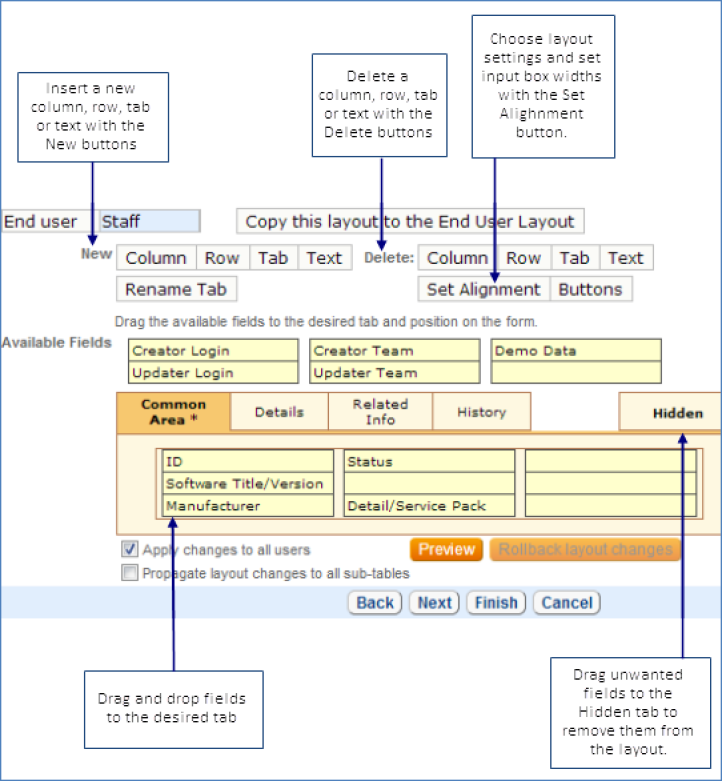
Please note a special Common Area section for dragging-and-dropping fields. This section will appear as the first tab and you can drag and drop fields into it just as you would with tabs normally. When viewing a record using the layout, any fields in the Common Area will be shown above the other tabs, near the title, rather than underneath the tabs where the other fields are shown.
A good use of the Common Area is to put critical fields that are relevant to multiple other tabs there, such as ID, customer name, etc. It is possible to put all types of fields to the Common Area, including Linked Fields, required fields, dependent fields and so on. It is possible to create headers for the Common Area.
Indexes

You can create indexes for specific fields of a table that are important so that speed will be improved when running a saved or advanced search on those fields.
It is also possible to turn off the full text indexing on tables in which it is not relevant or useful, and this will speed performance on those tables (communications tables, for instance).
To set up a field index, go to Setup/Tables/select a table/Edit/Indexes and click the New option. Typically you will want to index only a single field at a time, but it is also possible to create a compound index by choosing multiple fields. When you save the index setting, the system will take the time to index the selected field immediately.
Indexing fields such as Status and/or Assigned to, as an example, can speed the performance of saved searches based on those fields.
Record Ownership
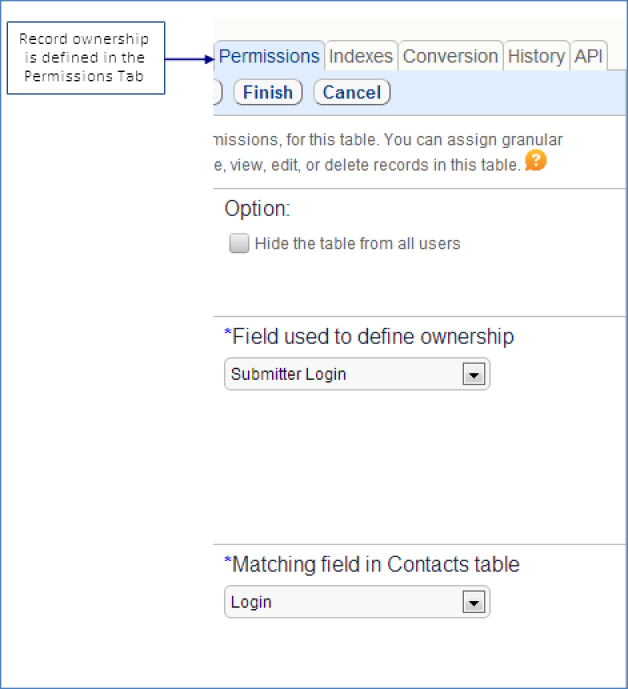
Which records are "My Own" ?
- Generally the owner of a record is defined as a single person - either an end user or account representative.
- However, end users can only edit their own records, so if they need to be able to edit others' records, ownership needs to be defined more broadly – e.g., when the Company field of the record matches the Company field of the user.
- If "my own" is defined more broadly, you may need to add record permission filters to prevent some people from seeing all of their own records.
| Info | ||
|---|---|---|
| ||
Privileged end users at a company can edit others' records, but normal users should only see and edit their own – you can apply a filter in the group permissions for which of their own records a user can view or edit. |
Permissions Tab-Record Permissions
- Permissions control in this tab is not as fine as through the Setup/Access/Manage Groups menu. Do your initial permission setup here, but always refine them from Setup/Access/Manage Groups.
- This tab defines only record level permissions for the table – field level permissions are defined in Manage Groups screens.
Conversion
Conversion is a very useful feature – it allows you to auto- create new records in one or more other tables, mapping values from fields in the current table. The maximum number of possible conversion mappings is 99 per table.
...
| Info | ||
|---|---|---|
| ||
Conversions have many uses:
|
...
|
...
|
...
|
...
|
...
|
...
|
...
|
...
| Note |
|---|
The maximum number of possible conversion mappings is 99 per table. |
Setting up Conversion Rules
...
|
...
...
For more examples, explore some of the existing conversion mappings in the out-of-the-box setup. |
For more information on conversion permissions, actions, and setup, see Data Conversion.
History
The History tab displays a list of history entries for the table, with each entry providing the user, a timestamp, and a description of the history event. The Clear History button removes all the entries on the tab.
API
The API tab allows you manage REST services and SOAP Web Services for the table. For more information, see SOAP and REST API Web Services.
Conversion Permissions
Many customers use action buttons with conversion rules to enable staff to perform record conversion (creation of a record in another table with fields mapped from the current record). They do not want users to see the Conversion button on the menu bar, which brings up a different kind of dialogue, but they want users to be able to interact with the rule conversion action, for instance, by being able to fill out the new record fields as part of the conversion.
We added a new permissions option on the Record permission tab of the Group permission wizard and separated conversion permissions into two options:
[x] Show conversion button on menu action bar
[ ] Allow interaction with conversion rules
If the option 'Allow interaction with conversion rules' is checked, then all four kinds of rule action conversions work no matter what the user's new record create permissions are (if option 3 on the conversion wizard is selected, the new record screen appears with fields based on user's group permissions, just as it did in the previous release).
But if the option to allow interaction with conversion rules is set to No, then when a conversion action is run by a rule, the following logic is applied, depending on the option selected for the behavior of the conversion action:
- silent conversion - runs silently, record is created in background without user' knowledge.
- conversion dialogue - runs silently, creates record in background, brings up confirmation when done.
- new record page - runs silently, creates record in the background, brings up confirmation when done.
- automatically with confirmation - does the conversion and shows the result.
Deactivate/Activate Table
Once you've added the table, you might want to hide it later at some point.
Table may be hidden from all users by using either the Deactivate button on the table tree or the option 'Hide from all users' on the permission tab of the table wizard. This option cannot be simply deselected. If a table has been hidden from all users, it may be unhidden from only the admin group by using the Activate button on the table tree wizard. To make it visible to other groups, Setup > Access > Manage Groups must be used. Admin should edit the appropriate group, select the desired table and scroll down on the Table tab to the option 'Show Table on a Toolbar Tab'.
| Hide If | ||||||||||||||||||||
|---|---|---|---|---|---|---|---|---|---|---|---|---|---|---|---|---|---|---|---|---|
| ||||||||||||||||||||
Related articles
|