The Contracts table holds all contract records. It also Contract records, and controls the associated automation and notifications that are related to contracts. Part of a representative record is shown below.

Required fields, marked with a red asterisk, include: Record Type, Internal Contract Owner, Contract Type, Days in Advance to Notify for Renewal, Contract Title, Contract Description, Contract Start Date, and Contract End Date.
...
them. Contract records are an integral part of the Standard System Demo, and hold information the contracting party, approval information, renewal details, attached contract files, and supporting documents. Contracts can be created manually from the Contracts table or converted from Sourcing Events.

Fields that are required when creating Contract records are marked with an asterisk in the image above. Required fields include:
- Record Type
- Contract Manager
- Contract Type
- Days in advance to notify for renewal
- Contract Title
- Contract Description
Use Case for Power Users
This section covers the use case for power users. Each record in the table holds information about an individual contract including details about the contracting party, approval information, attached contract file and supporting documents, and renewal details.
Create Contracts
Creating Contracts from the Contract Table
Contracts may be created Contract records may be created by members of the Admin, Contract Creator, Contract Manager, and Contract Owner groups. Contracts may be created in one of two ways:
- Click Clicking New in the Contract table action bar.
- Use Using the Create Related Contract button on the Renewal / Related Contracts tab to create a renewal, subcontract, or amendment of an existing Contract record. This can create either a Child Contract or Amendment record directly from the current contractContract record. This button is available only if the contract is in a Status of Signed, Active, Expired, or Canceled. Creating a new contract with the Create Related Contract button will automatically link links it to the current contract Contract record by populating the Parent Contract ID field in the newly created record. For a more detailed explanation of creation by this method, see the Handling Related Contracts and Renewals section.
By default, contracts fall into one of four categoriesthree categories, chosen from the Record Type field:
- ContractsMaster
- AgreementsChild Contracts
- SubcontractsAmendments
- Amendments
Child Contracts and Amendments can both be created from an existing Contract record, whereas Contract records are created manually in the Contract table. The Record Type field in the common area of a Contract record indicates the contract's category. "Contract" is the default Record Type for newly created contracts. It can be used to indicate either a stand-alone contract or a contract that exists under a master agreement. In the latter caseChild Contracts and Amendments are linked to a parent contract automatically if they are created by clicking the Create Related Contract button in the parent Contract record. If created manually from the Contract table, the Parent Contract ID can must be filled in upon creation of the contract. Subcontracts and Amendments will be linked to a parent contract automatically, if they are created by clicking the Create Related Contract button in the parent contract record.


Below the Record Type are fields storing that store the Contract Manager and the Assigned Team and the Internal Contract Owner. . The default Assigned Team is the Contract Manager Management Team. The Internal Contract Owner Contract Manager is the person responsible for overseeing the contract and ensuring timely renewals and approvals. The list of available owners managers is filtered to users who are in the Contract Owner Team or the Contract Manager Contract Manager Team. The default Internal Contract Owner Contract Manager is the user who creates the contract Contract record, provided that user is in the Contract Manager or Contract Owner Team. Users in the Contract Manager or Admin group can manually change the Assigned Team and Internal Contract Owner Contract Manager if needed.Once the appropriate fields are filled in, Information about the contract requester, external company involved, and locations related to the contract may be saved in a Status of Draft.The contract's Status field is changed automatically by the system at appropriate points in the workflow, generally when an action button is pressed or when some condition is met; however, users in the Admin group can manually override the Status if necessary.
Information about the contract requester, external company involved, and locations related to the contract may be added by clicking the lookup icon next added by clicking the lookup icon next to those fields. If a desired Requester, Company, or Location does not exist, a record must first be created in order to link it to the Contract.
Creating companies and contacts during contract creation
In the Contract Party Information section, users can find and link to an existing company, or create new ones as needed. To find an existing company record, use the lookup icon to search for the company. If the contract party isn't found, power users can add a new company by selecting New Company. Enter the name and address information, then click Create Company.

...

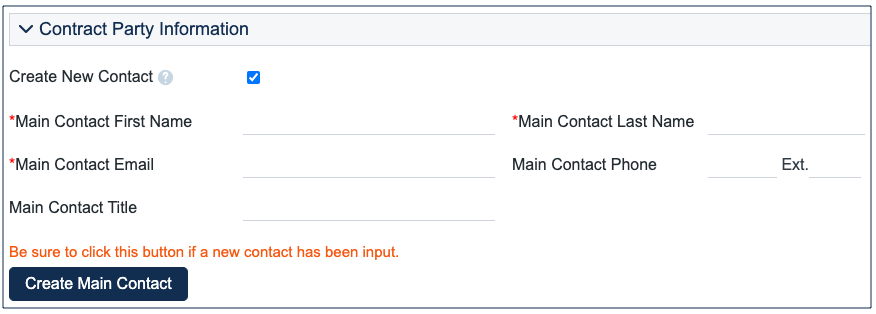
Similarly, you can create new entries in the people table if the main contact for the contract party is not an existing contact. Select New Contact, enter the information, and click Create Main Contact. Multiple contacts can be created in this way, and then the primary contact can be selected from the Main Contact drop-down.

When contract requesters submit a new contract through the end user interface, they can enter new company and contact information, but they don't see the buttons to create new records. When a contract is submitted for review, Contract Managers can edit the contract party information, or click the button to confirm the new company or contact and finish adding records.
This setup is intended to prevent end users from creating duplicate companies with slightly different spellings and to ensure that contract managers have ownership and control of this data. Permissions can be changed easily to allow end users to use the buttons to create companies and contacts directly. Note that it is important for the contract managers to evaluate the new additions and either replace with existing data or click the buttons to create the appropriate background data. Otherwise, the linked data can't be used in print templates and emails.
You can specify in this section whether the contract was the result of a Sourcing Event by selecting Yes. This makes the Sourcing Info tab visible, where you can link the contract to an event and select the appropriate supplier. Once the appropriate fields are filled in, the contract may be saved in a Status of Draft.
The contract's Status field is changed automatically by the system at appropriate points in the workflow, generally when an action button is pressed or when some condition is met. However, users in the Admin group can manually override the Status if necessary.
Creating Companies and Contacts during Contract record creation
In the Contract Party Information section, users can find and link to an existing company, or create new ones as needed. To find an existing Company record, select the Existing Company option and use the lookup icon next to Company Name to search for the company. If the contract party isn't found, power users can add a new company by selecting the Create New Company checkbox. Enter the name and address information, then click Create Company. Before adding new information, ensure that you check for all possible alternate spellings or stylizations of the desired Company.
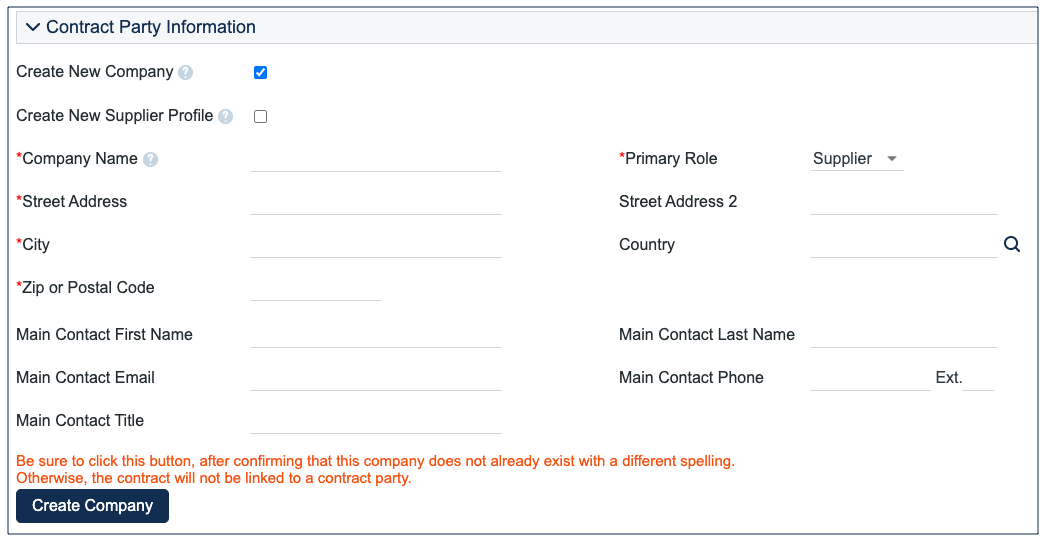
Both Company and Location records are created in the background, and linked to the new contract when the record refreshes.

Similarly, you can create new entries in the People table if the main contact for the contract party is not an existing contact. Select the Create New Contact checkbox, enter the information, and click Create Main Contact. Multiple contacts can be created in this way, and then the primary contact can be selected from the Main Contact drop-down.
Creating Contract Attachments from Default Document Templates
...
The Attachments tab shows all attached files related to the contract and provides the user with options to create and edit related attachments. For certain contract types, when the Document Source is set to Standard Template or Modified Template, the Print 'Document Template to Generate' field appears. The Document Source can be set to:
- Standard Template, for a file : used when a file is generated from an internal template. This option appears only for contract types where Has Print Templatedocument template(s) is set to Yes.
- Modified Template, for : used when a file originally generated from a template, but is then modified. This option appears only for contract types where Has Print Templatedocument template(s) is set to Yes.
- 3rd Party, : used to indicate a document provided by the external contract party.
- Internal – Other, for : used when a document that has been internally generated, but not from a template.
The Print Document Template to Generate has a default value set of values that are based on the contract typeContract Type, and there may be some visibility dependent fields that appear based on whether the print document template uses any user-selected or optional clauses. For For instance, the Customer Service Contract default template has some additional fields such as 'Select Governing Law Clause' and some 'Select Optional Clauses that are selectable by the user:'

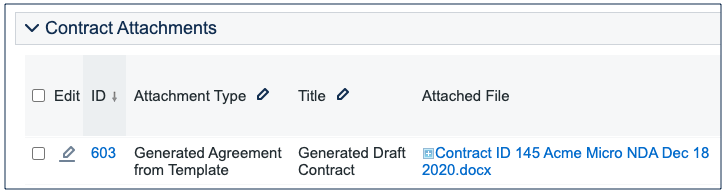
The Create and Attach action button is used to auto-generate a contract document from the MS Word print document template specified in the Print Document Template to Generate field and , which is then stored in the Print Template document template File field. Clicking Create and Attach generates the document and creates an attachment Attachment record to hold the attached file. It also increments the Version Number fieldIf there are clauses associated with the selected document template, the Contract Clauses will populate with the clause text used in this Contract. As updates are made to the clauses, the Contract Clause text will be updated.
If the Contract Party Information section is not properly filled out and linked to records, a validation action warns the user to finish creating new records before generating the attachment.
Creating contracts and attachments from inbound emails
Attachments can be automatically generated from inbound emails containing attached files. Files from inbound emails are mapped to the Transitional Contract Files field in the contract, assigned a predetermined Attachment Title and Attachment Type value of Document Provided by Outside Party, and then converted into a new attachment record. The file is mapped into the Attached File field in the attachment record. If multiple files are attached to an inbound email, each one is converted into a separate attachment record for that contract.

Working with Attachments
The All Contract Attachments related table is also used to manually create and attach files to the contract, such as supporting documents, signed agreements, or other documents from the contract parties. Create attachments from within the contract record by clicking New on the related table's action bar.
The Select Files drop-down on the action bar is used to operate on multiple selected attachments to update the fields to the far right in the table view. Add or Remove for the Approval Packet sets the Include in Approval Packet field to Yes or No. Add or Remove for the E-sign Packet changes the To Be eSigned field to yes or no. And Set Status to Superseded sets the status for the selected attachment(s) to Superseded.

Tracking company documents and insurance certificates
The Attachments tab also holds related tables of company documents and insurance certificates. The Create New Company Document button opens a new company document record linked to this contract.

For more information on company documents, see the Company Documents Table section.
Insurance certificates can be found directly in the Insurance Certificates table, and in related tables in the Company, Contracts, and Company Documents tables.

...
However, many other fields in a contract may also be referenced in the template, such as Clauses and Signing Parties. For this reason, it's usually best to check that as many fields as possible are finalized before generating attachments from templates.
Creating Contracts from the Sourcing Events
Once a sourcing event proposal has been approved and the supplier has been notified, the Status will be Selection Approved. In this status, the Sourcing Event Manager Team can create Contract records directly from the Sourcing Event record. To create Contract records from the Sourcing Event record, navigate to the bottom of the Selection Process tab. Under Selected Proposal Information, select values for the Selected Supplier Summary and Contract Type and then click the Create Contract button. This step can be repeated multiple times if the award should result in multiple contracts or involves multiple parties. Clicking Create Contract creates a new Contract record with a default Status of Draft, which inherits relevant information from the Sourcing Event record, such as Contract Type, Contract Title, Company Name, and Party Name Contact. The information in the Selected Supplier Summary field is distributed to the relevant fields in the Contract record.
Creating Contracts and Attachments from Inbound Emails
Attachments can be automatically generated from inbound emails that contain attached files. Files from inbound emails are mapped to the Transitional Contract Files field in the Contract record, assigned a predetermined Attachment Title and Attachment Type value of 'Document Provided by Outside Party,' and then converted into a new Attachment record. The file is mapped into the Attached File field in the Attachment record. If multiple files are attached to an inbound email, each one is converted into a separate Attachment record for that contract.
Contract Confidentiality Management
Contracts can be made confidential and made available only to certain people or roles. Confidentiality can be managed by Contract Managers and members of the Legal group. In addition to the people/roles selected, the Requester of the Contract and any Approvers assigned the Contract for approval will also be able to view the Contract.

Attachments Tab
The Attachments tab shows all attached files related to the Contract record, and provides the user with options to create and edit related attachments.
File Upload
To add files from a local source, drag and drop the file(s) from your computer onto the "Drag&Drop files" square. Alternatively, click the "Attach/Manage" text and choose "Local Source" to navigate to the file(s) to upload.
If an Attachment Type is defined, the default settings for the selected Attachment Type will be applied regarding permission level, approvals, and e-signature.
To replace a file that has already been added to the Contract, choose the appropriate file from the "Files to Replace" drop-down list, add your file, and the new attachment replaces the existing attachment.
Reviewing Attachments
The All Contract Attachments related table is also used to manually create and attach files to the contract, such as supporting documents or signed agreements. Create attachments from within the Contract record by clicking New on the related table's action bar.
The Select Files drop-down on the action bar can be used to add or remove a selected file in the Approval Packet, add or remove a selected file from the e-signature envelope, set status fields, convert from PDF to Word or Word to PDF, and compare a revised document to its baseline.
- Add or Remove for the Approval Packet: sets the Include in Approval Packet field to Yes or No.
- Add or Remove for the E-sign Packet: changes the To Be eSigned field to Yes or No.
- Set Status to Superseded: sets the Status for the selected attachments to Superseded.
- Convert to Word/PDF: converts a Word document to a PDF or a PDF to a Word document and saves the conversion as a separate document, but does not supersede the original.
When an attached .docx file is edited using Edit and Checkout, the revised file automatically creates a revision record. The revision is then immediately compared to its baseline, which is the template attachment that was originally generated. A markup document can be located within the attachment record. Markup on Contract Clauses appears automatically.
Contract Clauses
This table stores all the Clauses used in a Contract. Contract Clauses are populated automatically when the document template is created. When revisions are compared against the baseline, the Contract Clauses update to show the markup against the source text. The Contract Clauses are sorted in the order they appear in the document template when the source is document template. If the Contract Clause is changed from the source, Modified from Default changes to Yes. For more information on Contract Clauses, see the Contract Clause Table.

Tracking Company Documents and Insurance Certificates
The Attachments tab also holds tables of Company Document and Insurance Certificate records. The Create New Company Document button opens a new Company Document record that is linked to this Contract record.

For more information on company documents, see the Company Documents Table section.
Insurance certificates can be found directly in the Insurance Coverages table, and in related tables in the Company, Contracts, and Company Documents tables.
When you add an insurance certificate to a Company record, it can be automatically linked to all pending or active contracts with that supplier by a time-based rule that runs daily. However, this time-based rule is disabled by default in the Standard System Demo.
The Insurance Certificate Owner, which defined in the related Company record, is notified fourteen days before an insurance certificate's Expiration Date. When an insurance certificate expires without being renewed, the Contract Managers of any related active contracts are notified on the date of the expiration.
For more information about insurance certificates and related automation, see the Insurance Certificates Table section.
Another Method for Managing Insurance Certificates
You may prefer to manage insurance certificates as contract attachments, instead of using the Insurance Certificates table. For example, if Contract Managers are responsible for renewing and maintaining insurance certificates, it may be best to use the Attachments table to hold the certificates, along with all other types of attached documents for contracts. Managing insurance certificates as contract attachments means the Contract Manager will receive email notifications instead of the Internal Certificate Owner.
If this method makes the most sense for your particular business, you can remove the default Insurance Certificates field from the Contract record's layout. Then, go to the Attachment Type table and edit the record called Insurance Certificate. By default, this record's Status is Inactive; change the Status to Active to make it visible in the Attachments table.
Tracking Changes
When an attachment record is edited using 'Edit and Checkout', a new attachment is created, and the prior attachment is set to Superseded. The Attachment record can be compared against the previous version, or against a baseline, within the attachment.
By editing the attachment and navigating to the 'Comparison Against Previous Version' heading, the user can select the Previous Attachment Type they want to evaluate the current attachment against, as well as the Previous Attached File. Clicking the Compare Documents button generates a markup file that can be opened in word for comparison.
The Comparison Against Baseline button also runs a document comparison action, but against the original standard system template. When this button is used, Contract Clause Modification records are created if the source template used clauses. See document template Clauses for more information.
Approvals Tab
Approvals for a contract are handled on the Approval tab of the Contract record. The order and nature of approvals depends on the Workflow selected on the Approvals tab. Selecting a Contract Type in the common area filters the available Workflow Title choices. For information on setting up the individual Workflows, refer to the Approval Workflows section.
The order and nature of approvals depends on the Workflow Title selected on the Approvals tab. Selecting a Contract Type in the common area filters the available Workflow Title choices. For information on setting up the individual Workflows, refer to the Approvals Table section.
To submit a contract for approval:
- Select the correct Workflow Title from the drop-down list.
- Click Create Approvals. This generates a set of related Approval records in a Status of Queued.
- Click Launch Approval Process to update the Status of the contract to Pending Approval, as well as update the Status of the approvals with the lowest step number to Pending Approval. There can be more than one approval at the lowest step number for parallel approvals.

The system automatically notifies the first approver in the sequence. To advance the contract workflow, an approver will use one of three action buttons to change the Status of the approval record:
- Approve: sends the contract to the next approver in the sequence.
- Require Changes: sends the contract back to the contract manager to make changes.
- Permanently Reject: used only if the contract requires significant changes.
Both Require Changes and Permanently Reject require the user to enter notes in the Approval Notes field. These notes are appended to the Approval Notes field in the Contract record, and are also viewable from any other Approval record linked to that contract.
As each Approval record is approved, the system notifies the next approver in the sequence that a Contract record is pending their approval. A list of all Approval records is displayed under the Approvals Needed section, and automatically updates as Approval records are modified.
If a user who is not on the current approval team attempts to approve a contract, the system recognizes the error and prevents the user from completing the approval action. When all the required approvals are received by the system, the Contract record's Status is automatically changed to Approved.
Adding Notes and Sending Emails
Notes that are relevant to the general contract process are entered into the General Notes field on the Details tab, and notes pertaining to the approval process are entered into the Approval Notes field on the Approvals tab.

Emails can be sent to Internal Contacts and External Party Contacts from the Emails tab.
- Choose the type of Recipient(s), which can be Internal Contacts, External Party Contacts, or External Party and Internal Contacts.
- Select the Email Title, which can be used as a template. For more information see Email Texts.
- Click the lookup icon to select the contacts to email. Fill out the Email Subject and Email Text fields as needed.
- Select necessary files to send with the email, then click Send Email.

Turning Off Approvals
Contract Management tables have Approval handling set up by default. The associated processes may be turned off in order to use
| Companyname |
|---|
- Edit field permissions to allow the Contract Manager Group to edit the contract Status field in their own contracts and in others' contracts.
- Remove two status changing buttons from the layout: Submit for Approval and Mark as Signed.
- Remove the Approval tab and related fields from the layout.
Renewal / Related Contracts Tab
Information about the renewal process is stored on the Renewal / Related Contracts tab. Fields for capturing the Renewal Notification Date and Days in Advance to Notify for Renewal are provided as a default. If relevant, information about the renewal contract or previous contract are automatically updated by the system. The Create Renewal Contract button is used to create a renewal Contract record that is linked to the previous Contract record. This button is only visible when the contract's Status is Active, Canceled, Expired, or Signed. A new contract generated in this way can be edited before saving.
If applicable, the system automatically links renewal contracts to any preceding contracts, creating an audit chain. Typically, users do not manually enter information into the Renewal Contract and Previous Contract Information fields.
This tab is also used to create an amendment or SOW of an existing contract. Select the type of record you wish to create, then click the Create Related Contract button. The new record gets linked to the current contract in a child relationship.
The Diagram icon is used to generate a diagram of Contract records that are related to this Contract record.
For example, the diagram for a subcontract of a master agreement, with its own amendment, is shown here:

Any direct children of the current Contract record are shown in the table in the Related Contracts and Amendments section.
Signature Tab
The Signature tab contains fields for contract document signers, and contains all fields related to DocuSign and Adobe Sign. If you are not using either system, these fields can simply be removed from the layout.
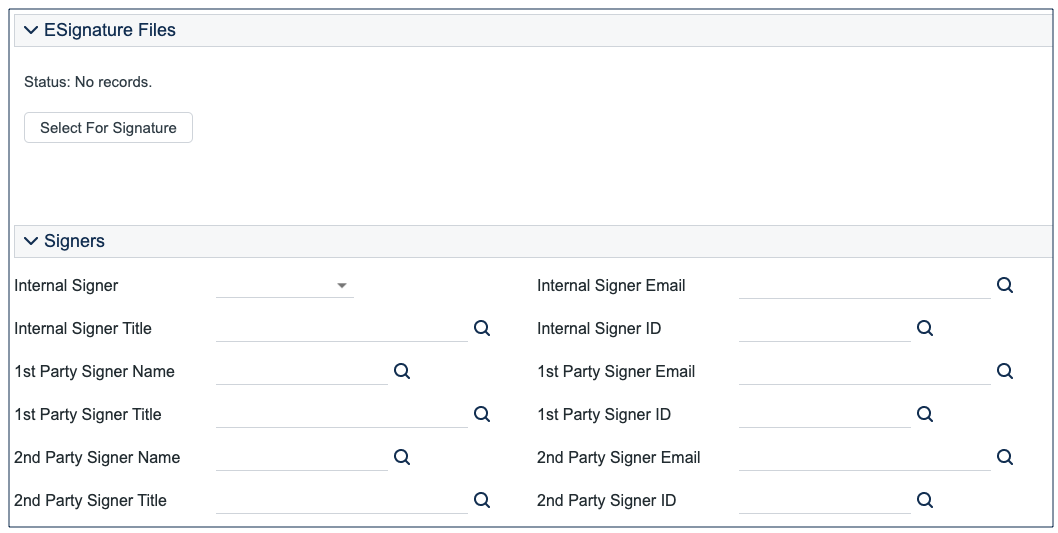
Fields under the Signers heading are used to populate the signature page of the contract's document templates and to identify the signers for either program. For this reason, these fields must be filled before generating an attachment from a template, which in turn must be generated and set as To Be eSigned before returning to the Signature tab in order to create envelopes.
Before using either DocuSign or Adobe Sign, you will need to configure the integration by going to Setup > Integration and choosing the appropriate platform. For DocuSign, you must sign up for a DocuSign account directly with DocuSign. For Adobe Sign, Agiloft can set up the account and allow you to purchase envelopes directly without any long term contract. See the sections on DocuSign and Adobe Sign below for more details.
Using DocuSign
Once the contract is ready to sign, use the Create DocuSign Envelope action button to create a DocuSign Envelope record and attach the files held in the Files to Sign field.

This also create a DocuSign Recipient record for each signer. These records are then shown in the related tables for DocuSign Envelopes and DocuSign Recipients on the Signature tab. Only users in the Admin and DocuSign Users groups can access the DocuSign fields on the Signature tab. For more information on DocuSign, refer to the DocuSign User Manual.
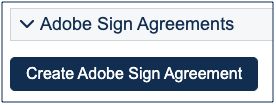
Using Adobe Sign
Once the contract is ready to sign, click the Create Adobe Sign Envelope button. This creates an Adobe Sign Envelope, and convert the signers into recipients.
Contract Processing
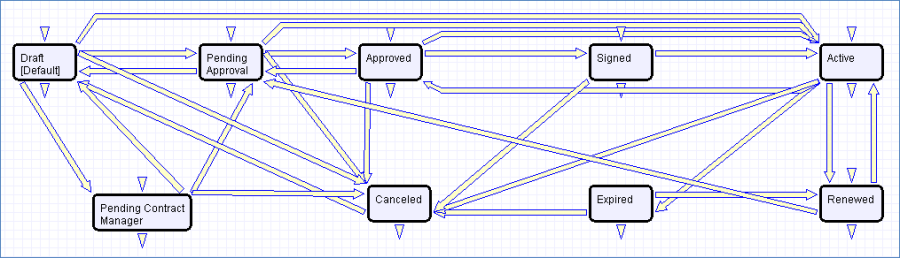
This section covers the remaining Status changes that have not been mentioned in the explanations above. Once a contract changes to a Status of Signed, the system automatically updates the contract to a Status of Active when the Contract Start Date occurs.
Similarly, the Status is changed when the Contract End Date arrives. If the contract does not have an associated renewal contract, the Status is automatically set to Expired; if the contract does have a renewal, the Status is set to Renewed. If the contract is auto-renewing, the Contract End Date is increased by the Renewal Term in Months and the contract remains Active.
To cancel a contract, click the Cancel Contract button in the common area. Users of the Admin group can also manually change the contract Status to Canceled.
If the contract has a Status of Approved, the Mark as Pending Signature button is visible in the common area. This button sets the contract Status to Pending Signature.
Once the Status of the contract is Pending Signature, a Mark as Signed button appears. This button sets the contract Status to Signed.
Tasks and Obligations Tab
This tab is used to manage various tasks and obligations related to to the Contract. The three sections, described in more detail below, help provide an overview of and track all activities that must be performed in the course of executing and managing a contract.
All Contract Tasks
This section becomes visible when the Contract Type selected is marked as Uses Tasks on the Contract Type table.
The Task Generation Method is established in the Contract Type record. In the Standard System Demo, all contract types are set to show the Tasks tab and to allow the creation of ad hoc tasks. Depending on the Task Generation Method set on the Contract Type, the user will be able to choose from a task workflow, select from possible tasks, or create ad hoc tasks as needed. Refer to the Contract Types section for more information on setting the Task Generation Method.
Predefined Workflow
To create tasks from a predefined workflow:
- Select the workflow from the choices available in the Task Workflow field drop-down list
- Click the Generate Tasks button.
User Selected Tasks
To create tasks using a generation method of User Selected Tasks:
- Select the relevant tasks from the multichoice list
- Click the Generate Tasks button

User Generated Ad Hoc Tasks
When this is the task generation method, the user creates tasks using the Add Ad Hoc Tasks button as needed. Refer to the Tasks Table section for details on creating tasks.
All Contract Obligations
This section allows the user to add ad hoc obligations and/or generate default ones. Clicking the 'Generate Default Obligations' button finds and creates all default obligations for the Contract's selected Contract Type, as well as for all the Clause Types used in the Contract (as seen in the Attachment tab). The 'Add Obligation' button allows the user to add a new Obligation in the same way they add an ad hoc Task.

Obligations are tasks of Type 'Obligation'. They provide all the assignment and recurrence options found while creating a standard Task, but also some additional Obligation-related options.
- Obligation Clause Text: Obligations created from Clause Type defaults display the Clause Text for reference.
- Obligation Type: The primary party responsible for the obligation - Customer, Internal, Customer and Internal, Partner, or External.
- Obligation Output: The output of the Obligation, such as Payment, Report, Document, etc.
Manage Task/Obligation Recurrence (via Parents)
This section displays the parents of all recurring Tasks and allows you to manage their recurrence settings or even cancel further recurrences.
Working with Tasks and Obligations
All Tasks and Obligations are created regardless of their Task Usage (Default/Conditional), and are set to Assigned based on their Assignment Trigger (Date/Status/Creation). Tasks and Obligations that are Queued do not yet require action, as their Assignment Trigger has not been met. Tasks and Obligations that are conditional remain conditional until their Assignment Trigger is met, at which point the condition will be evaluated, and they either become Assigned if the condition is met or Not Needed if the condition is not met.
As individual Tasks and Obligations are completed, the Contract Manager is notified if the individual task is configured to notify the Contract Manager. Once all individual Tasks and Obligations on the Contract are completed, the Contract Manager is notified regardless of how individual task notifications are configured.
Finance Tab
This tab contains Budget details as well as information regarding Payments.
Add Budget Details
This section allows the user to add new Budget Items for the Contract. The following fields are available:
- Cost Center: Choose from a list of Cost Centers.
- Filter by Department / Show All: Field that determines if the list of Cost Centers to pick from is limited to the Contract's Department's Cost Centers.
- Fiscal Year: The Fiscal Year for which the Budget Item is being added.
- Budget Amount: A currency field for the budget amount.
- Add Budget Item: Button to convert the above details into a Contract Budget Item record.
Budget Details For This Contract
Shows the Budget Items added directly to this Contract from the above section in a related table. The related table allows you to quick-edit all of the fields from above in order to allow for easy corrections.
The section additionally displays:
- Total Budget for This Contract: The sum of all Active Budget Items linked to this Contract.
- % of Contract Amount Budgeted: The Total Budget for This Contract as a percentage of the Contract Amount.
- Budget Remaining for This Contract: The difference between the Total Budget for This Contract and the Total Payments for This Contract.
- % of Budget Spent for This Contract: The remaining budget for the contract as a percentage of the Total Budget for This Contract.
All Related Budget Items
This section is only displayed for Master Agreements or Contracts that have no parents. It displays all budget items for the current Master Agreement / Contract as well as all their children, providing the user a complete view of the budget for the entire hierarchy.
It additionally displays a calculated result for the Total Budget for All Contracts (in the hierarchy).
Related Payments
This section displays all Payment records linked to the current Contract record. Its visibility is based on the current Contract Type. The fields in this section include:
- Related Payments: Related table that shows all the payment records associated with the contract.
- Total Budget: Same as Contract Amount.
- Total Payments for This Contract: Sum of Completed payments within the Related payments table.
- Budget Remaining: Amount obtained by subtracting Total Completed Payments from Total Budget.
- Budget Used: Percentage of Total Budget used.
The visibility of the Budgeting sections is dependent upon the Cost Type being Payable.
Risk Analysis Tab
A Contract Manager can perform Risk Analysis on Contract records. Risk Conditions are pre-defined on the Risk Conditions table based on criteria within the contract or modifications made to standard clauses. To run a Risk Analysis:
- Navigate to the Risk Analysis tab.
- Click Trigger Risk Conditions. The current contract is evaluated and assigned a Total of Weighted Risk Condition Assessment and Overall Risk Percentage based on the highest potential risk for the current contract.
See the Risk Conditions Table and Contract Risk Conditions Table articles for more detail.
Performance Management Tab
This tab appears only when the primary role of the contract party is Supplier.
Performance Evaluation Setup
Performance evaluation is off by default, but can be changed by the Contract Manager or Contract Requester to one of the three options:
- Launch Manually (One Time): On the Date of Next Evaluation a reminder to manually launch the evaluation is sent to the Performance Manager.
- Launch Manually (Scheduled): On the Date of Next Evaluation a reminder to manually launch the evaluation is sent to the Performance Manager. Then the Date of Next Evaluation is set to a selected amount of time in the future.
- Launch Automatically: On the Date of Next Evaluation the evaluation process is launched automatically if at least one evaluator has been selected. Otherwise the Performance Manager is notified of a failed launched and reminded to select at least one evaluator. After the evaluation is successfully launched, the Date of Next Evaluation is set to a selected amount of time in the future.
Other setup fields include:
- Performance Manager: By default, this field is set as the same person as the Contract Manager, but can be manually changed to any other Contract Manager or this contract's Requester.
- Evaluation Frequency (months): Only visible if Launch Manually (Scheduled) or Launch Automatically are selected in Performance Evaluations. Determines when the Date of Next Evaluation will be set to after the evaluation is launched.
- Date of Next Evaluation: When the contract enters Active or Signed status, it is automatically set to Contract End Date (for Manual (One Time) Evaluations) or Contract Start Date plus Evaluation Frequency (months) unless it was already filled in manually. For evaluations launched automatically, or manually on schedule, the Date of Next Evaluation is set to a future date after each successful launch until it is past the Contract End Date.
Add Evaluators
In this section, the Evaluator and Question Set are selected and added to the list of evaluators. Each record in the list becomes an evaluation when it is launched. For example, a person from the Finance Department can be set to evaluate the financial qualities of the supplier using a question set with price-related questions, while a person from Procurement Department evaluates the delivery timeliness and product quality of the supplier.
If no evaluators are selected, the Evaluation cannot be launched.
Evaluations
This section contains the list of Evaluations created for this contract, the Launch Evaluations button, and information about the latest evaluation (Date Launched and Performance Score).
Launch Evaluation button creates new evaluations (one per selected Evaluator), notifies the Evaluators, and resets the Date of Next Evaluation to the next scheduled date (if applicable).
Use Case for Portal Users
This section covers the use case for portal users in a Contract Management context.
Members of the Contract Creator group are internal employees who access the system by way of the End User Interface (EUI). Contract creators, also called contract requesters, are users who submit requests for contracts, but do not work on or manage the contract once it is requested and submitted.
Creating Contracts
Users in the Contract Creator group can create contracts by:
- Clicking the Create a Contract Request link on the home page of the EUI.
- Selecting New > Contract from the menu.
A simplified contract form is presented to the contract creator. Many of the fields are hidden from the layout or restricted by field-level permissions.
In the Contract Party Information section, users can find and link to an existing company and contact, or create new ones as needed. Before adding new information, ensure that you check for all possible alternate spellings or stylizations of the desired value. To create a new company, elect New Company and then enter the name and address information. After the contract is submitted for review, Contract Managers need to confirm the new company before the new Contract record can be finished. Similarly, contract creators can suggest a new company contact by filling out the fields in the Party Main Contact section of the form.
Once the required information is filled in, the Contract record can be saved for later revisions.
Working with Contracts
At any time, the contract requester can view contracts they previously submitted by:
- Choosing View > My Contracts from the menu
- Clicking on the View My Contracts link.
Contract Creator group members can edit certain fields in contracts they own. Other fields such as Contract Amount, Contract Start Date, and Contract End Date, among others, are not editable by the contract requester if the contract's Status is Pending Approval, Approved, Signed, Active, Renewed, or Expired. This is to prevent changes to currently active or in process contracts.
The contract requester can view all contracts they have permission to see by clicking on the All Contracts home page link or tab.
Automation
Some of these rules have been mentioned or quickly described in the use cases above. In the Standard System Demo, the Contracts table contains twelve active rules. Most time-based rules, marked with a "TB," are disabled by default in the Standard System Demo. These rules are accessed by expanding the Contracts table in the left pane, selecting Setup Attachments, and then selecting the Contracts tab:
- Create: Creation Via Email Actions: This rule sets the Attachment Type and Title for contracts created via email.
- Edit: Validate that end date is after start date (web): This rule ensures that when a Contract record is edited, the start date is before the end date. If this is not the case, a Validation action warning the user about this conflict is triggered.
- Edit: Update Renewal Notification Date if underlying fields change (web,api): This rule ensures that when a Contract record is edited, the Renewal Notification Date gets updated. This rule can update auto-renewing contracts or set a renewal notification date for non auto-renewing contracts. It also can set the Alert Color to red for Contract records that have a past Renewal Notification Date.
- TB: (DISABLED) Daily check for start date: This rule uses a saved search to check for Contract records that start on the present day, or earlier, with a Status of Signed, and changes their Status to Active. It also sets the Status of any previous contracts to Renewed.
- Edit: Handle Status Changes (rule should always be lowest priority): This rule runs any time a record's Status changes. It creates a new Status Time record and also updates the Previous Status field to reflect what the record's Status was before the change was made. This rule runs from edits made by users, rules, or emails.
- TB: (DISABLED) Notify of upcoming expirations: This rule sends emails to contract managers of records that have a renewal date of one day in the future, as long as those records can be renewed more than once. It runs every two days, early in the morning.
- Edit: Update Alert Color if Renewal Notification Date Changed (web, api): This rule ensures that a record's Alert Color is still accurate whenever a record's Renewal Notification Date is changed by either a user or another rule.
- Edit: Updates via Email: This rule ensures that if an outside party makes an update to a Contract record, the manager of the contract and the Contract Manager team are notified. It also creates an Attachment Type and a Title for any files that may have been added.
- Create/Edit: If Transitional Contract Files field has value, convert to Attachment: This rule runs on new Contract records, or records that have had their Transitional Contract Files field changed. It converts the newly added file to an Attachment record, and then clears the Transitional Contract Files field for future uploads.
- TB Demo Data Update: Update date fields by one month each month so reports have data: This time-based rule runs once every month, updates Demo Date fields, and deletes the History associated with the Demo Date fields being updated.
- Edit: Most edit actions by web or api: This rule runs whenever a Contract record is edited by a user or another rule, and ensures that all the data in the record remains unified and consistent with the current stage of the contract lifecycle.
- Create: All New Contract Actions: This rule runs whenever a Contract record is created by a user or another rule, and ensures that all the data in the record is unified and consistent with the beginning of the contract lifecycle. For example, some of the things this rule ensures are that the contract end date isn't before the contract start date, and that if the new Contract record is a renewed version of a previous Contract record, the records are linked.
- TB: (DISABLED) Daily check for expiration date: This rule runs daily on Active records with an End Date on the present day or before. It ensures that the renewable contracts get renewed and resets their end date. If contracts cannot be renewed, it sets their Status to Expired. Either way, the rule also notifies the contract manager of the End Date.
Workflow
The Contracts table has the following default workflow:
Default: All contracts are created in this status.
Pending Review: Change to this status with the "Submit" button. Also, set by the "Edit: Updates by Party" rule that handles inbound email updates. If the status is "With Counterparty" and the external party replies, the status will be set back to "Pending Review." The status will also be moved back to this status from "Pending Approvals" if Approvers require changes.
With Counterparty: Change to this status with the "Set Status to With Counterparty" button. Additionally, the "Send Email" button sets the status to "With Counterparty" when an email is sent to an external party and the status is "Pending Review."
Pending Approval: When there are Contract approvals in a Pending status, the "Edit: Most edit actions by web or api" rule on Contracts and "Edit: All Contract Approval Edit Actions (web, API)" rule on Approvals sets the status to "Pending Approval."
Approved: When all Pending approvals are completed (Approved/Not Needed), the status is moved to Approved by the Edit: All Contract Approval Edit Actions (web, API)" rule on Contracts.
Pending Signature: Change to this status with the "Mark as Pending Signature" button or by setting the DocuSign or AdobeSign envelope status to "Sent."
Signed: Change to this status with the "Mark as Signed" button or by setting the DocuSign or AdobeSign envelope status to "Signed."
Active: A time-based rule is used to evaluate the contract start date, and assigns the appropriate status. If the status is "Signed" at the start date, the status is changed to "Active." If the contract becomes signed and the start date was in the past, the Contract status immediately changes to "Active."
Renewed: Set by the rule that checks for the contract end date. If a renewal contract exists, the status is set to "Renewed."
Canceled: Set with the "Cancel Contract" button, or by Approvals being permanently rejected.
Terminated: Set by the "TB: Terminate Contracts on Termination Date" rule that evaluates the Terminate Early field. If the the Termination Date is today or in the past, the status is set to "Terminated."
Expired: Set by the "TB: (DISABLED) Daily check for expiration date" rule on Contracts. This rule should be enabled only when the system is ready to go live.
Ownership
Records in this table are owned by the Contract
The Insurance Certificate Owner (defined in the company record) is notified fourteen days before an insurance certificate's Expiration Date. When a certificate expires without being renewed, the Contract Managers of any related active contracts are notified on the date of the expiration.
For more information about insurance certificates and related automation, see the Insurance Certificates Table section.
Another method for managing insurance certificates
You may prefer to manage insurance certificates as contract attachments, instead of using the Insurance Certificates table. For example, if Contract Managers are responsible for renewing and maintaining insurance certificates, it may be best to use the Attachments table to hold the certificates, along with all other types of attached documents for contracts. Managing insurance certificates as contract attachments means the Contract Manager will receive email notifications instead of the Internal Certificate Owner.
If this method makes the most sense for your particular business, you can remove the default Insurance Certificates field from the contract layout. Then go to the Attachment Type table and edit the record called Insurance Certificate. By default, this record's Status is Inactive; change the Status to Active to make it visible in the Attachments table.
Handling Approvals
Approvals for a contract are handled on the Approval tab. The order and nature of approvals depends on the Workflow selected on the Approvals tab. Selecting a Contract Type in the common area filters the available Workflow Title choices. For information on setting up the individual Workflows, refer to the Approval Workflows section.
The order and nature of approvals depends on the Workflow Title selected on the Approvals tab. Selecting a Contract Type in the common area filters the available Workflow Title choices. For information on setting up the individual Workflows, refer to the Approvals Table section.
To submit a contract for approval, first select the correct Workflow Title from the drop-down provided. Click Create Approvals to generate a set of Approval records in a Status of Queued. Once the records have been created, click Launch Approval Process to update the Status of the contract to Pending Approval and update the Status of the approval(s) with the lowest step number to Pending Approval. There may be more than one approval in the lowest step number for parallel approvals.
...
- Approve to send the contract to the next approver in the sequence.
- Require Changes to send the contract back to the contract manager to make changes.
- Permanently Reject if the contract requires significant changes.
...
Both Require Changes and Permanently Reject require the user to enter notes in the Approval Notes field. These notes are appended to the Approval Notes field in the contract record and are also viewable from any other approval record linked to that contract.
As each approval is approved, the system notifies the next approver in the sequence that a contract is pending their approval. A list of all approval records is displayed under the Approvals Needed section and automatically updated as approval records are modified.
If a user who is not on the current approval team attempts to approve a contract, the system recognizes the error and prevents the user from completing the approval action.
When all the required approvals are received by the system, the contract Status is automatically changed to Approved.
Adding notes and sending emails
Notes relevant to the general contract process are entered into the General Notes field on the Details tab, and notes pertaining to the approval process are entered into the Approval Notes field on the Approvals tab.

Emails can be sent to Internal Contacts and External Party Contacts from the Emails tab. First choose the type of Recipient(s) (Internal Contacts, External Party Contacts, or External Party and Internal Contacts), then click the lookup icon to select the contacts to email. Fill out the Email Subject and Email Text fields as needed, select any files to send with the email, then click Send Email. The emails sent from the contract will be shown below in the Email Communication History.

Related Contracts and Renewals
Information about the renewal process is stored on the Renewal / Related Contracts tab. Fields for capturing the Renewal Notification Date and Days in Advance to Notify for Renewal are provided as a default. If relevant, information about the renewal contract or previous contract are automatically updated by the system. The Create Renewal Contract button is used to create a renewal contract. This will link the new contract to the previous one.
This button is only visible when the contract's Status is Active, Canceled, Expired, or Signed. A new contract generated in this way can be edited before saving.
If applicable, the system automatically links renewal contracts to any preceding contracts, creating a chain for auditability. Users typically do not enter information into the Renewal Contract and Previous Contract Information fields manually.
This tab is also used to create an amendment or subcontract of an existing contract. Select the type of record you wish to create, then click the Create Related Contract button. The new record will be linked to the current contract in a child relationship.

The Diagram icon is used to generate a diagram of any contracts related to this contract.
For example, the diagram for a subcontract of a master agreement, with its own amendment, is shown here:

Any direct children of the current contract are shown in the table in the Related Contracts and Amendments section.
Signing contracts with DocuSign or Adobe Sign
A Signature tab appears to the right of the Renewal / Related Contracts tab. This tab contains fields for contract document signers, and contains all fields related to DocuSign and Adobe Sign. If you are not using either system, these fields can simply be removed from the layout. The Files to Sign field holds attached files from the Attachments table that have a To Be eSigned value of Yes. The Refresh Files action button refreshes this field in case changes to the attachments were made in the same session under the contract's Attachments tab.

Fields under the Signers heading are used to populate the signature page of the contract's print templates and to identify the signers for either esignature program.
Before using either DocuSign or Adobe Sign, you will need to configure the integration by going to Setup > Integration and choosing the appropriate platform. For DocuSign, you must sign up for a Docusign account directly with DocuSign. For Adobe Sign, Agiloft can set up the account and allow you to purchase envelopes directly without any long term contract. See the sections on DocuSign and Adobe Sign below for more details.
Using Docusign
Once the contract is ready to sign, use the Create DocuSign Envelope action button to create a DocuSign Envelope record and attach the files held in the Files to Sign field.

This will also create a DocuSign Recipient record for each signer. These records are then shown in the related tables for DocuSign Envelopes and DocuSign Recipients on the Signature tab. Only users in the Admin and DocuSign Users groups can access the DocuSign fields on the Signature tab. For more information on DocuSign, refer to the detailed DocuSign User Manual at http://www.agiloft.com/documentation/docusign-users-manual.pdf.
Using Adobe Sign
Once ready to send for signature, click the Create Adobe Sign Envelope button.

This will create an Adobe Sign Envelope and convert the signers into recipients.
Contract Processing
This section covers the remaining Status changes not mentioned in the explanations above. Once a contract changes to a Status of Signed, the system automatically updates the contract to a Status of Active when the Contract Start Date occurs.
Similarly, the Status is changed when the Contract End Date arrives. If the contract does not have an associated renewal contract, the Status is automatically set to Expired; if the contract does have a renewal, the Status is set to Renewed. If the contract is auto-renewing, the Contract End Date is increased by the Renewal Term in Months and the contract remains Active.
To cancel a contract, click the Cancel Contract button in the common area. Users of the Admin group can also manually change the contract Status to Canceled.

If the contract has a Status of Approved, the Mark as Pending Signature button is visible in the common area. This button sets the contract Status to Pending Signature.

Once the Status of the contract is Pending Signature, a Mark as Signed button appears.

Turning Off Approvals
Contract Management tables have Approval handling set up by default. The associated processes may be turned off in order to use Agiloft as a contract repository. To turn off Approvals, do the following:
- Edit field permissions to allow the Contract Manager Group to edit the contract Status field in their own contracts and in others' contracts.
- Remove status-changing buttons from the layout: Submit for Approval and Mark as Signed.
- Remove the Approval tab and related fields from the layout.
For help on configuring table layouts, please refer to the Administrator Reference Manual or online help.
End User Use Case
This section covers the use case for end users in a Contract Management context.
Members of the Contract Creator group are internal employees accessing the system via the end user interface. Contract creators, also called contract requesters, are users who submit requests for contracts but do not work on or manage the contract once it is requested and submitted. Below is a representative home page for an end user in the Contract Creator group.

Creating Contracts
Users in the Contract Creator group may create contracts by clicking the Create a Contract Request link on the home page or by selecting New > Contract from the menu. A simplified contract form is presented to the end user. Many of the fields are hidden from the layout or restricted by field-level permissions.

In the Contract Party Information section, users can find and link to an existing company and contact, or create new ones as needed. Select New Company and then enter the name and address information. After the contract is submitted for review, Contract Managers can confirm the new company to finish adding a record. Similarly, end users can suggest a new company contact by filling out the fields in the Party Main Contact section of the form.

Once the required information is filled in, the contract can be saved for later revisions. The contract requester can also press the Submit for Review button to request approval from a Contract Manager. Contract requesters can be contacted to update the submitted contract, but they are typically no longer involved in the approval process from this point forward. After the contract requester submits the contract for review, a contract manager decides whether to continue with the approval process or reject the contract request.

Working with Contracts
At any time, the contract requester can view contracts they previously submitted by choosing View > My Contracts from the menu or by clicking on the View My Contracts link. Contract Creator group members can edit select fields in contracts they own. Certain fields such as Contract Amount, Contract Start Date, and Contract End Date (among others) are not editable by the contract requester if the contract's Status is Pending Approval, Approved, Signed, Active, Renewed, or Expired. This is to prevent changes to currently active or in process contracts.
The contract requester can view all contracts they have permission to see by clicking on the All Contracts home page link or tab.
Ownership of Contracts
Records in this table are owned by the contract Requester. Specifically, a record is owned by the user whose ID matches the number in the Requester ID field. By default, the Contract Requester is the user who created the contract record.
Automation
The Contracts table has several rules set up. Their actions have been described in the use cases above. Rules which are run based on a schedule (rather than those which are event-triggered) are identified by the prefix "TB", for time-based and are disabled by default.
Workflow
The Contracts table has the following default workflow:
the Contract record. For this reason, the owner of a Contract record is often the requester, rather than a power user Contract Manager.
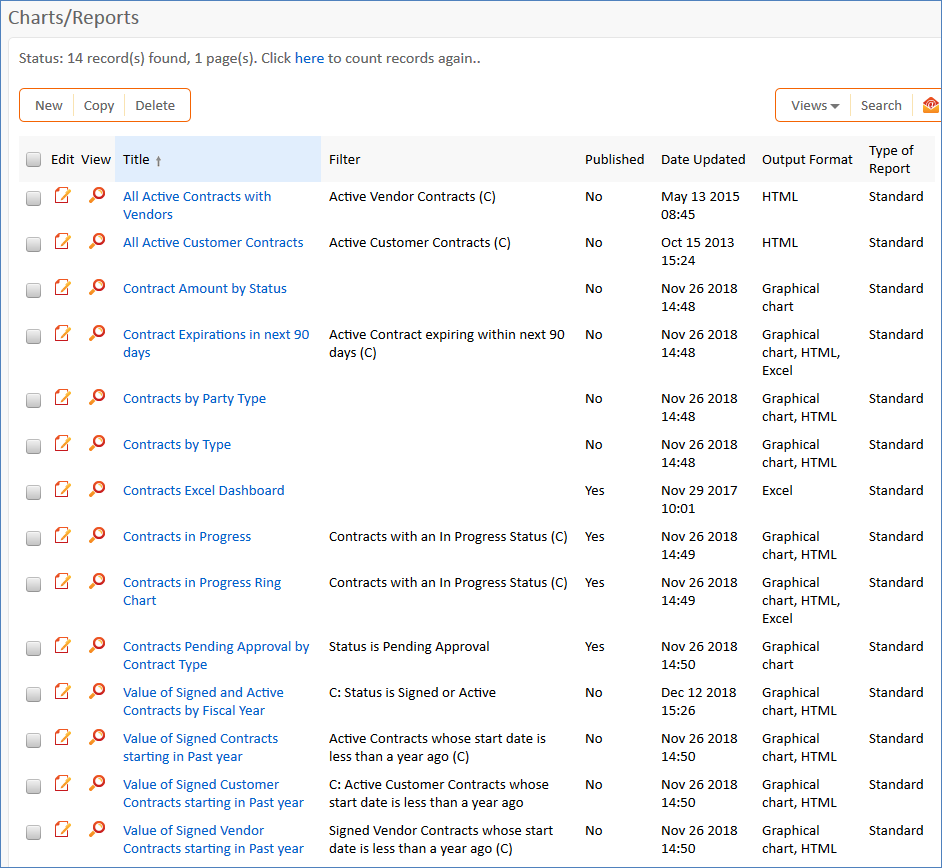
Reports
The Contracts table contains the following default Charts /and Reports: