...
In general, the update process has the following steps:
- Backup Back up everything that should be backed up. This may might include KBs, software code, database files, etc., depending on what is to be updated. See Set Up Knowledgebase Backups.
- Obtain new licenses for the new release, if it is a major upgrade with a new main version number. See Licensing.
- Run the Setup Assistant to replace installed software and/or data that should be updated. See Setup Assistant. Roll back to pre-update state if something goes wrong. See Rolling Back
- Perform the upgrade.
For moderately sized KBs, the process is simple because the installer includes an option to create a full backup, and it automatically executes a set of integrity checks after the upgrade. In the rare case that something goes wrong and the system can't repair itself, it automatically rolls back to the pre-update state using the backup.
Regardless of KB size, the upgrade itself is typically quick. In larger KBs, the overall process can take a long time due to the time required to create a backup.
| Tip |
|---|
For in-house systems, and for more information about creating backups more easily for large KBs, see Upgrading In-House Systems. |
Update Methods
There are three ways to run the update process:
...
Download the 2019_01 installer package from https://wwwdownload.agiloft.com/ewdownload/upgrade/ and upgrade your system to 2019_01.
Note You cannot upgrade to version 2019_01 using the in-system Software Update option. You must download and run the installer package to upgrade to 2019_01.
Stop and disable the DHCP Client and Windows Event Log services, using the Services program or the Services tab of Task Manager. Make sure to disable them, not just stop them, so that they don't start running again during the upgrade.
Upgrade your system to 2019_01.
After the successful upgrade, upgrade to the current version of
, releases 2019_02 and later. You can enable the DHCP Client and Windows Event Log services at this point.Companyname
Version 2017_01
If you're running a version of
| Companyname |
|---|
- Download the 2017_01 installer package from https://wwwdownload.agiloft.com/ewdownload/archive/2017_01/ and upgrade .
Stop and disable the DHCP Client and Windows Event Log services, using the Services program or the Services tab of Task Manager. Make sure to disable them, not just stop them, so that they don't start running again during the upgrade.
- Upgrade your system to 2017_01.
- After the successful upgrade, upgrade to the next minimum version of
, version 2019_01. You can enable the DHCP Client and Windows Event Log services at this point.Companyname
Online Update
The online update option is the simplest method.
Stop and disable the DHCP Client and Windows Event Log services, using the Services program or the Services tab of Task Manager. Make sure to disable them, not just stop them, so that they don't start running again during the upgrade.
- Run the Setup Assistant in your installation directory and select Software Update from the main menu, then click Check for updates online.
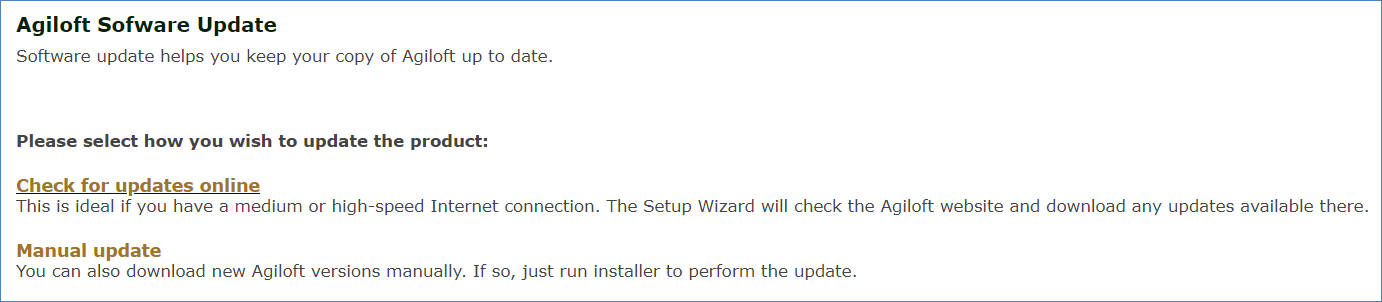
- Setup automatically checks for a new version of
. If a new version is available, the Setup Assistant downloads it and starts the update.Companyname 
- The user can monitor and set update options using the web interface.
...
If you aren't installing
| Companyname |
|---|
| Companyname |
|---|
Stop and disable the DHCP Client and Windows Event Log services, using the Services program or the Services tab of Task Manager. Make sure to disable them, not just stop them, so that they don't start running again during the upgrade.
- Run the downloaded installer. The installer detects an existing
instance and prompts the user about a possible update.Companyname 
- Confirm the selections on the Update Options screen. These options include whether to run a backup; whether to delete backup files after the update; and whether to preserve modified MySQL parameters. The update options are explained in more detail in Command Line Options. If you aren't familiar with the commands, be cautious in changing the default selections, particularly if you are working with a live system.
- Follow the steps in the installer to complete the upgrade.
...
Update option | Corresponding ewupdate EWUpdate command-line option | Description |
|---|---|---|
Backup database data using OS-level backup | -k,--skiposlevel | This command only applies if the built-in MySQL server is used. Under normal circumstances a full OS-level backup is made. Use this option to skip the default OS-level backup of the MySQL directory. No database restoration is possible if the upgrade fails. |
Skip checkers unless any patchers were run | -p,--scup | When the application server starts, it performs data checks for consistency, which might take a long time. Use this option to skip data checking if no data was changed on update. This can speed the time taken to start the application server. |
Skip project backup if possible | -K,--skipprjbckp | At the very beginning of the update process all existing projects are saved to the backup directory. If this option is set then no project backup is performed, if allowed. Some update modes require a project backup, in which case it isn't skipped. |
Don't delete temporary files after update | -t,--keeptemp | During the update, temporary files are normally stored on the hard drive. These may include data backups, unpacked new code, etc. By default, temporary files are removed after an update. If this option is set, temporary files are left on the device. The temporary files are automatically deleted before the next update. |
Don't backup temporary files - logs etc | -i,--backuptemp | If this option is set then no temporary files such as log files are backed up before the update. This saves used disk space and shortens the update time. |
...
| Code Block |
|---|
Example: ewupdate --stable
 -s,--stable             Download stable release version (Offical Release)
 -l,--latest             Download latest release version (Beta)
 -d,--devel              Download development version (Alpha)
 -C,--custom <host>      Download from custom server
 -F,--file <file>        Upgrade from a distribution that has already been downloaded to the local hard drive
 -f,--force              Unattended update, all prompts are answered 'yes'
 -c,--caution            Unattended update, all prompts are answered 'no'
 -k,--skiposlevel        Skip OS level backup (avoid using this when skipping project backup)
 -K,--skipprjbckp        Skip project backups (avoid using this when skipping OS level backup)
 -t,--keeptemp           Keep temp files
 -p,--scup               Skip checkers unless patchers were run
 -i,--backuptemp         Backup temporary files such as logs (when unattended mode)
 -r,--requiredspace <Gb>   Disk space (Gb) required for update (use with care)
 -w,--warn <MMM or MMM:NNN>  Displays a warning message to customers about an impending update. Argument syntax is MMM or MMM:NNN, where MMM is the number of minutes before update and NNN is the estimated update duration in minutes
 -A,--allowsameversion   Do update even if new version is same as old one
 -X,--forceincompat      Forces an upgrade between releases that should not be compatible. Do not use this option.
 -v,--verbose            Print error details
-h,--help Prints this help |
Rolling Back
If the upgrade fails, the setup stops, shows an error message, and then rolls the system automatically troubleshoots problems and applies the proper fixes. If the upgrade still fails, the system prompts the user for input before rolling back to the pre-update version. It retains all All your settings . The error message provides the installer logs, which are retained, and the logs are copied to <Agiloft-Home>\logs\ so you can use them to trace the cause of the upgrade failure and resolve it before trying the upgrade again.
| Hide If | ||||||||||||||||||||
|---|---|---|---|---|---|---|---|---|---|---|---|---|---|---|---|---|---|---|---|---|
| ||||||||||||||||||||
Related articles
|