Working with the Default EUI Templates
This topic provides instructions on how to control which tables are displayed on the home page of the End User Interface (EUI), as well as which tables and tabs appear in the navigation menu. The tables and tabs that the EUI displays are controlled by records in the EUI Templates table, which also control the functionality and appearance of the EUI. For information on changing any text that appears on the EUI, see Text and Localization in the EUI.
In addition to working with specific EUI templates, use these pages to learn more about other aspects of the EUI that involve working with templates:
- Creating a New Page Tutorial: Learn how to manually add a new record submission form for a table.
- EUI Portal Tutorial: Learn to create a very basic EUI portal from scratch.
- Using Quick Links to Prepopulate Records in the EUI: Learn how to use parameters and macros in the EUI to create records that are populated with content. This page requires knowledge of web development and JavaScript.
- EUI Setup Tips: Learn about some additional setup tips regarding single sign-on, drop-down menus, language selection, and browser pop-ups.
For more information on getting started with the EUI, and to complete interactive practice exercises, we highly recommend signing up for the online training and completing the EUI chapter in Unit 2.
Prerequisites
Before making changes to the EUI, we recommend that you have a basic understanding of the following topics:
- HTML
- CSS
- Macros, methods, and conditionals, as they're used in the EUI
For more information on HTML and CSS, visit W3 Schools.
Working with Home Pages
The EUI has three predefined home page template files that determine the layout of the home page. Two of the template files are mutually exclusive and display multiple tables to the user, whereas the third file is used when the user only has permission to view a single table. This third file is used because the other two template files are not optimized for viewing a single table. The system automatically calculates the tables available to the user and displays the appropriate home page.
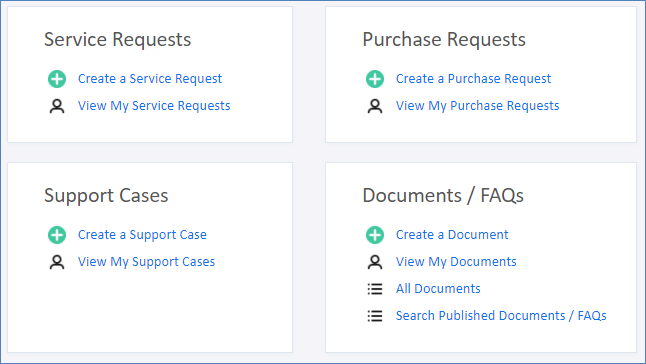
home.htm—Default Layout
The default home.htm template file provides a dynamic two-column display. The system dynamically calculates the layout to list the available tables in order from left to right and top to down. Available links to create or view items appear under each table heading.
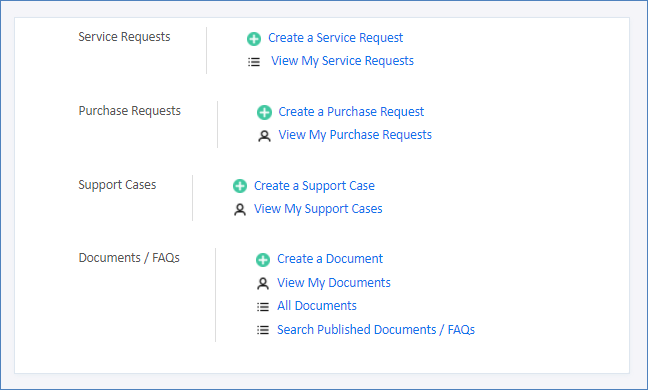
home-1column.htm—Alternate Layout
The alternate home-1column.htm template file arranges each table on its own row with the links in a second column to the right.
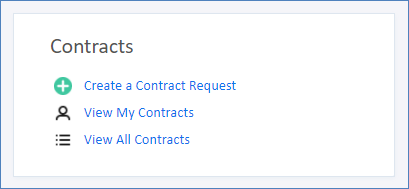
home-1table.htm—Default Single-Table Layout
The home-1table.htm template uses a similar layout to the home-1column.htm template. The primary differences are larger icons and text in home-1table.htm, as well as an additional block of text to fill space on the page.

Change the Home Page
The home page template file that the system uses is configured in the translation.properties file, which is located in the EUI Templates table. By changing one or more variables in translation.properties, you can choose the home page that the EUI uses. The translation.properties file has three variables near the top that define the home page template files:
global.home.file: Defines the main home page file. The default value ishome.htm. If you prefer the alternate layout, change the variable tohome-1column.htm. If neither of the predefined home pages suit your needs, you can also create your own home page and enter the template name here.global.home.one.table.file: Defines a third home page file that's displayed if the user who logs in only has access to a single table. The default value ishome-1table.htm.global.search.file: Defines the file that controls the tables displayed in the global search area. The default value ishome-multiple-search.htm.
Taken together, the template files defined by these variables determine which tables are shown to users, the ordering of the tables, and other formatting. Although some page components are static, such as the Logout link, other links and headings are controlled by a combination of user permissions, variables defined in translations.properties, and code in the template files.
To change the default home page:
- If you want to use an entirely new home page, copy and edit one of the default home page files in the EUI Templates table, or create a new template record. Skip this step if you want to change the home page to one of the predefined template files.
- Make any changes to the code as desired.
- Save the file.
- Open
translation.properties. - Update one or both of the
global.homeandglobal.home.one.tablevariables to point to the new home page file. - Click Save.
The system counts the number of tables available to a user by using code in the menu.htm template file. If the table count results in a total value of 1, the main.php template file displays the single-table home page. Otherwise, the main home page file is displayed.

Change the Order of Tables
Each table included in the home page has its own block of code. In the default home page, each block of table code looks like the following:
			#if ($ewText.get("show.incidents")=="yes" && ($ewPermission.table("incident","view_own") || $ewPermission.table("incident","v_own_with_ssearch") || $ewPermission.table("incident","view_others") || $ewPermission.table("incident","v_oth_with_ssearch")))
			#set($rowcount=$rowcount+1)
			...
			#end
Notice that the code begins with an #if directive and ends with an #end directive. The order of these code sections determines the order in which tables are displayed to users. The alternate home page follows a similar logic, but the code looks slightly different.
To change the order of the tables on the home page:
Open the desired home page file.
Before making changes to any code, create a copy of the existing text so that you can revert the code back to its original state if necessary.
- Cut and paste one table’s section above or below another section. Be careful to include all of the section related to the table. Pay special attention to nested
#ifand#enddirectives so that you cut and paste in the correct location. - Click Save.
For more information on how permissions are used in the home page to display tables to users, see Permissions and Visibility in the EUI.
Review the Home Page Code
The following section is a snippet of code for a single table in the default home.htm template. It contains added comments that explain the purpose of the code, so if you want to make manual adjustments to your home page, use the comments to help you know how each block of code affects the page.
Working with the Navigation Menu
The navigation menu refers to series of tabs and drop-downs in the top-right of the default home page. Its contents are defined in the menu.htm template and translation.properties files.
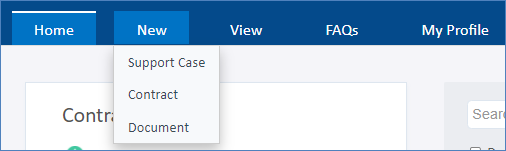
Change the Navigation Menu Tabs
The tabs on the navigation menu are controlled by menu.htm and variables in translation.properties. You can control whether the New, View, FAQs, and My Profile tabs appear at all or only to certain users.
To control which tabs can appear at all:
- In the EUI Templates table, open
translation.properties. - Find the note beginning with "#These determine whether the menu bar shows..." and notice the variables immediately below the note.
If you do or do not want to display a tab, change the corresponding variable to Yes or No, respectively. For example, if you don't want to display the View tab, the variable would look like the following:
show.menu.view=no
Click Save.
If the variable for a tab is set to Yes, users might not see the tab if you've applied conditional visibility to it in
menu.htm. See the steps below for more information.
To control which tabs are visible depending on a user's group, team, or permissions:
- In the EUI Templates table, open
translation.properties. - Find the note beginning with "#These determine whether the menu bar shows..." and notice the variables immediately below the note.
For tabs you want to display to at least some users, make sure the corresponding variable is set to Yes. If the variable is set to No, users will not be able to see the tab, regardless of any conditions you create. For example, if you want to display the New, View, and My Profile tabs to some users, but you don't want to display the FAQs tab to any users, the variables would look like this:
show.menu.new=yes
show.menu.view=yes
show.document.faqs=no
show.myprofile=yes
- Click Save.
- Open
menu.htm. Find the beginning line that corresponds to the tab you want to make conditionally visible. For example, the New tab begins with the following line:
#if ($ewText.get("show.menu.new")=="yes")On the same line, add a logical operator and an appropriate method to define the type of conditional visibility you want to use. For example, if you only want users in the Contract Creator group to see the New tab, your code would look like this:
#if ($ewText.get("show.menu.new")=="yes" && $ewUser.isInGroup("Contract Creator"))For more information on using conditionals and methods, see Macros, Methods, and Conditionals and EUI Method Reference.
- Click Save.
Change the Links under the Navigation Menu Tabs
Like the navigation menu tabs themselves, the links they contain are controlled by menu.htm and variables in translation.properties.

You can control whether a link appears at all or only to certain users. In most cases, it's better to make the links appear to only certain users by creating conditions that check a user's team, group, or table permissions. This is because the method to control whether a link can appear at all also controls whether a table may appear at all in the EUI. For example, if you prevent the Support Case link from appearing at all by setting the show.support.cases variable to No, you also prevent the Support Cases table from appearing on the EUI. However, if a table is no longer in use or end users shouldn't have access to it, it can sometimes be useful to completely remove the table and its associated links from the EUI.
To control which links can appear at all:
- In the EUI Templates table, open
translation.properties. - Find the note beginning with "#These values determine whether a table..." and notice the variables immediately below the note.
If you do or do not want to display a link, change the corresponding variable to Yes or No, respectively. Each variable may control multiple links. For example, if you set the
show.support.casesvariable to No, both the Support Case and My Support Cases links are removed.Click Save.
If the variable for a table is set to Yes, users might still not see any related links if you've applied conditional visibility in
menu.htm. See the steps below for more information.
To control which links are visible depending on a user's group, team, or permissions:
- In the EUI Templates table, open
translation.properties. - Find the note beginning with "#These values determine whether a table..." and notice the variables immediately below the note.
- For links you want to display to any users, make sure the corresponding variable is set to Yes. If the variable is set to No, users will not be able to view the link, regardless of the condition.
- Click Save.
- Open
menu.htm. Find the link that you want to make conditionally visible. Each link uses a few lines of code, and it's placed within a section of code for the corresponding tab. For example, lines 4 - 6 of the code below refer to the Service Request link, and the rest of the code indicates that it's within the New tab on the navigation menu:
#if ($ewText.get("show.menu.new")=="yes")
            <li id="new" class="submenu"><a>$ewText.get('menu.new')</a>
              <ul>
#if ($ewText.get("show.service.requests")=="yes" && $ewPermission.table("helpdesk_case","create"))
                <li><a href='#ew_forward("new_servicerequest.html")'>$ewText.get('menu.new.sr')</a></li>
#end
...
              </ul>
            </li>
#end
Edit the existing conditional to define the type of conditional visibility you want to use. For example, the above example requires that the
show.service.requestsvariable intranslation.propertiesis set to Yes and that the user has permission in the Service Requests table to create records. If you also want to require that the user is in the Service Manager group, your code would look like this:#if ($ewText.get("show.menu.new")=="yes") <li id="new" class="submenu"><a>$ewText.get('menu.new')</a> <ul> #if ($ewText.get("show.service.requests")=="yes" && $ewPermission.table("helpdesk_case","create") && $ewUser.isInGroup("Service Manager")) <li><a href='#ew_forward("new_servicerequest.html")'>$ewText.get('menu.new.sr')</a></li> #end ... </ul> </li> #endFor more information on creating conditionals, see Macros, Methods, and Conditionals.
- Click Save.
Working with the Header
The header refers to the top area of the EUI that includes the company logo, language drop-down, user information, and logout link. It's controlled by header.htm and variables in translation.properties. The navigation menu is not considered part of the header and is controlled separately with menu.htm.

Customize the Logo
One of the first changes you may want to make is to replace the existing logo in the EUI with your company logo. You can do this by editing the #ew_image macro and changing its file path.
- You first need to add the image to the server, so go to Setup > Look and Feel > End User Schemes and edit any existing scheme.
- Go to the content tab and click Select / Manage Images.
- At the top, click Choose File and select the logo file, then click Upload. Then, close the dialog. This makes the image available in the image directory so that it can be referenced by the
#ew_imagemacro. - Click Cancel to leave the Look and Feel editor.
- Go to the EUI Templates table and edit
header.htm. In the Body field, locate the following line:
<a href='#ew_forward("main.php")'><img src="#ew_image('/gif/logo/agiloft-white2.png')" style="max-width:100%;max-height:70px" alt="Agiloft" style="vertical-align: middle" /></a>To change the logo, replace the reference to
agiloft-white2.pngin the#ew_imagemacro with the new file name.- Change the alt attribute value from "Agiloft" to the new logo name. This is the text that screen readers use and that appears when you hover over the image.
Change the max-width and max-height properties to appropriate values, or leave out the dimensions to display it at its full size. You can define the values in percentages, pixels, or a combination of the two. For example, your new code may look like the following:
<a href='#ew_forward("main.php")'><img src="#ew_image('/gif/sample-logo.png')" style="max-width:80%;max-height:80%" alt="Company logo" style="vertical-align: middle" /></a>
Click Save. The new logo will be visible when you log into the EUI.
Customize the Logo with Conditional Branding
Suppose you want to display a different logo to users in a particular group or team. You can achieve this by adjusting the code in the previous section.
- Follow the steps in the previous section to upload a second image.
- Go to the EUI Templates table and edit
header.htm. In the Body field, locate the line you edited earlier. From the previous example, it looks like this:
<a href='#ew_forward("main.php")'><img src="#ew_image('/gif/sample-logo.png')" style="max-width:80%;max-height:80%" alt="Company logo" style="vertical-align: middle" /></a>- Create a conditional that displays each logo to the appropriate users:
If you want to display one logo to users in a certain group and the other logo to everyone else, your code might look like this:
#if ($ewUser.isInGroup("Contract Creator"))
<a href='#ew_forward("main.php")'><img src="#ew_image('/gif/sample-logo.png')" style="max-width:80%;max-height:80%" alt="Company logo" style="vertical-align: middle" /></a>
#else
<a href='#ew_forward("main.php")'><img src="#ew_image('/gif/new-logo.png')" style="max-width:150px;max-height:60px" alt="New logo" style="vertical-align: middle" /></a>
#end
If you want to display one logo to users in a certain team and the other logo to everyone else, your code might look like this:
#if ($ewUser.isInTeam("Contract Creator Team"))
<a href='#ew_forward("main.php")'><img src="#ew_image('/gif/sample-logo.png')" style="max-width:80%;max-height:80%" alt="Company logo" style="vertical-align: middle" /></a>
#else
<a href='#ew_forward("main.php")'><img src="#ew_image('/gif/new-logo.png')" style="max-width:150px;max-height:60px" alt="New logo" style="vertical-align: middle" /></a>
#end
For more information on creating conditionals, see Macros, Methods, and Conditionals.
- Click Save.
Working with Tables
The EUI comes with several default tables already included. Each table has individual template files for each of its pages in the EUI, as well as variables in the translation.properties template file that these and other pages use. For example, the Support Cases table has template files that allow users to create new support cases, view support cases, and search support cases. The text that these pages use, such as the header or search label, is defined with variables in translation.properties.
You can edit the template files to change the formatting and content of individual EUI pages. For example, you can move or resize a page's header, or you can apply a different saved search. Some changes, like resizing the header, require only a basic knowledge of HTML. Other changes, like applying a different saved search, require an understanding of the macros used in the EUI. For more information on applying a new saved search to a page, see Using Default Searches. For more information on macros in general, see Macros, Methods, and Conditionals.
Add a New Table
If you want to add a table to the EUI that is not included in the default setup, you must update the EUI templates to provide this access. To do so, you can either add the code manually or generate the code using the New EUI table.xlsx Excel template. We strongly recommend that you use the Excel template, which you can download here. Using the template is much easier and much less likely to result in errors than entering the code manually. The steps below describe how to use the Excel template.
Before you start, go to Setup [Table Name] for the table you're adding and note the following information on the General tab:
- The plural table label
- The logical table name
Update translation.properties
The first step to adding a new table is to create the variables used in the translation.properties file. If you have a multilingual knowledgebase, you need to update the translation.properties file for each language, using the same variables created below but with appropriately translated values.
- Download the New EUI Table Excel template.
- Click the Table Name sheet, located on the bottom of the Excel window.
- Enter the table information, including the name; plural label; a unique, three-letter abbreviation; and the logical table name. You can use any three-letter abbreviation you want, but it must be unique and not match any existing table abbreviations in
translation.properties.
- Click the translation.properties sheet and copy the code from Column N. Don't close the spreadsheet until this entire process is complete because you still need code from the other Excel sheets.
- In your knowledgebase, go to the EUI Templates table and open
translation.properties. Paste the code from Column N into the bottom of the Body field.
The code in
translation.propertiesis separated into sections and listed in alphabetical order, but this is only for readability. The code works anywhere you place it, but it's typically good practice to keep code organized.- Click Save.
Create the New Template Files
Next, create the template files for the pages that the new table will use.
- Create the first template file:
- Go to the EUI Templates table and click New. This template will be for displaying all records in the table.
- In the Name field, enter a name like all_records.html or all_widgets.html.
- Provide a Description, but leave the Body field blank for now.
- Click Save.
Repeat the previous steps to create pages for creating new records, viewing the user's own records, and using searches on the table. For example, you might create pages titled new_record.html, my_records.html, and my_records-search.htm. The search page must end in ".htm" and the other three pages must end in ".html" for the table to be correctly added.
Although the tables can be titled anything you like, we recommend that you follow a consistent naming convention throughout the EUI.
- Go to the table in your knowledgebase and create a search called "My [Plural Table Label]" that finds all records assigned to the currently logged in user. For example, you might name it My Records or My Widgets.
- Retrieve the code for the first template file:
- In the Excel spreadsheet, click the EUI Templates_import sheet.
- Copy the code from cell D2 and paste it into a Word document or other word processor. You must paste it into a word processor before pasting it into the template file. Otherwise, Excel automatically includes quotation marks that prevent the HTML from working properly.
- Copy the code from the Word document, go the the EUI Templates table, and open the
all_records.htmlpage you created. - Paste the code into the Body field and click Save.
- Repeat the previous steps and use cells D3, D4, and D5 to retrieve and insert the correct code for the respective pages.
Tip
To define the view for a specific template file, add the View Name (not View Label) to the #ew_table line, in the blank expression after the table name.
Add the Table to the Home Page
After you've created the new template files, edit the home page template file so that the new table appears on the home page.
If you are using the alternate home page or a custom home page, you need to manually enter the code in the template file. To help prevent errors, use the the code for existing tables as a model when you add the new table.
- In the Excel spreadsheet, click the home.htm sheet.
- Copy the code from cell B1 and paste it into a Word document or other word processor. As before, you must paste it into a word processor before pasting it into the template file.
- Copy the code from the Word document, go the the EUI Templates table, and open
home.htm. - Scroll down to find the the last two
#enddirectives that are directly after one another, and place your cursor after the second#enddirective.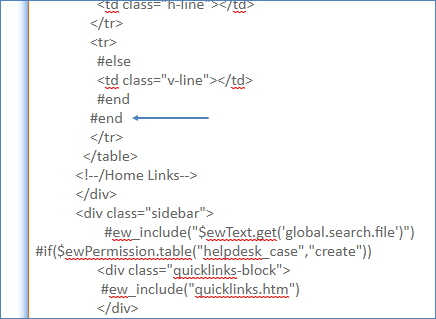
- Press Enter and paste the code from the Word document. Make sure the code is placed after the second
#enddirective but before the</tr>tag. - Click Save.
Create Links from the Navigation Menu
Now that users can view the table on the home page, add some links to the navigation menu. This lets users create new records in the table and view records that they own, assuming they have the appropriate permissions.
- In the Excel spreadsheet, click the menu.htm sheet.
- Paste the code from the Word document. Make sure the code is placed after the
#enddirective and before the</ul>tag. Don't close the record yet.
- Paste the code from the Word document. Make sure the code is placed after the
- Go back to the Excel spreadsheet, copy the code in cell B2, and paste it into a Word document.
- Copy the code from the Word document and go back to
menu.htm. - Find the last
#enddirective in the second unordered list, which is near the bottom of the field.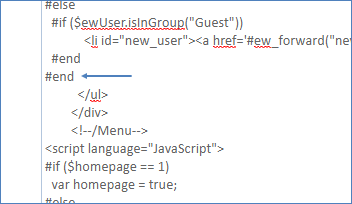
- Place your cursor directly after the
#enddirective, press Enter, and paste the code. Make sure the code is placed after the#enddirective and before the</ul>tag. - Click Save.
- Copy the code from the Word document and go back to
Add the Table to the Single-Table Home Page
The next step is to add the table to the single-table home page, which is displayed in cases where the user only has access to this table.
- In the Excel spreadsheet, click the home-1table.htm sheet.
- Find the last
#enddirective in the table element. It's near the bottom of the page and preceded by two</div>tags.
- Paste the code from the Word document. Make sure the code is placed after the
#enddirective and before the</td>tag. - Click Save.
Make the Table Searchable from the Global Search Block
The final step is to add the table to the global search block so that users can search it. This step involves editing three template files.
Edit home-multiple-search.htm
- In the Excel spreadsheet, click the home-multiple-search.htm sheet.
- Copy the code in cell B1 and paste it into a Word document.
- Find the last
#enddirective in the div element. It's near the bottom of the page and preceded by a<br>tag.
- Paste the code from the Word document. Make sure the code is placed after the
#enddirective and before the</div>tag. - Click Save.
Edit multiple-search.htm
- Find the last
#ifdirective and make note of the number that follows itsmy_tableparameter. For example, it might bemy_table7.
- In the Excel spreadsheet, click the multiple-search.htm sheet.
- In cell B3, edit the
my_tableparameter so that it uses the next table number in sequence. For example, if the last#enddirective in - Copy the updated code in cell B1 and paste it into a Word document.
- Go back to
- Find the last
#enddirective in the div element. It's near the bottom of the page and preceded by several visualization parameters.
- Paste the code from the Word document. Make sure the code is placed after the
#enddirective and before the">characters. - Click Save.
Edit multiple-search-result.html
- In the Excel spreadsheet, click the multiple-search-result.html sheet.
- Copy the code in cell B1 and paste it into a Word document.
- Find the last
#enddirective in the first part of the body element. It's preceded by a</div>tag and immediately followed by a<script>element.
- Paste the code from the Word document. Make sure the code is placed after the
#enddirective and before the<script>element. Don't close the record yet.
- Find the last
- Go back to the Excel spreadsheet, copy the code from cell B2 on the multiple-search-result.html sheet, and paste it into a Word document.
- Go back to
multiple-search-result.htmlin the EUI Templates table, and find the last#enddirective in the second part of the body element. It's near the bottom of the page and preceded by several visualization parameters.
- Paste the code from the Word document. Make sure the code is placed after the
#enddirective and before the}character. - Click Save.
- Go back to
The new table is now added to the EUI and searchable from the global search block. If you want to adjust how the table appears on the home page or edit the links on the navigation menu, see Working with Home Pages and Working with the Navigation Menu, respectively.