Visibility Dependent Fields
Conditional field visibility improves the user experience by hiding irrelevant fields dynamically in the record form, depending on the options the user selects. Visibility dependence can be based on one or more conditions that combine to determine whether the field is visible. Each condition is based on a Choice or Multi-choice field having certain values. You can choose whether to show the field if all conditions are met or if any of the conditions is true.
Terminology
- Dependent field: A field whose visibility is controlled by the values held in one or more parent fields in the table.
- Parent field: A field whose values control the visibility of a dependent field. Parent fields are Choice fields, Multi-choice fields, or links to Choice or Multi-choice fields in other tables without multiple values enabled.
- Condition: Conditions are the set of allowed values in the parent field that cause the dependent field to appear. The condition editor is a pop-up window where you select fields and values.
Setting Visibility Dependence Conditions
You can set visibility dependence for a field:
- Go to Setup [Table] or click the Setup gear in the top-right corner, click Tables, and edit the table.
- On the Fields tab, edit the field you want to hide dynamically.
- Go to the Options tab and scroll down to "Make the visibility of this field conditional."
- Click Add Condition to open the condition editor.
- From the drop-down, select the parent field that determines whether the field appears.
- Select the values that need to be selected in the parent field in order for the dependent field to appear. Hold down Ctrl to select multiple values for a condition.

- Click Finish to return to the Field wizard.
- To add another condition, repeat step 4. You can add as many conditions as necessary, until you run out of available parent fields.
- Make adjustments if needed:
- To modify an existing condition, click the edit icon next to the condition row.
- To delete an existing condition, click the delete icon.
- To remove all existing conditions for visibility dependence, click Remove All.
- If multiple conditions are set, choose whether to require All of the conditions be met, or Any.

- Click Finish to apply your changes and return to the Table wizard.
Example
Let’s consider an example in contract management. Suppose the Contract table contains a date field, Contract End Date, which should be visible if the Renewal Type field has the value Auto-Renewing, Notify Staff to Renew, or One time contract. Contract End Date should also be visible if the Status is Cancelled, regardless of the Renewal Type.
To meet this requirement, add the two conditions on the Options tab of the Field wizard and choose "Any of the conditions are met."
As with other field settings, System Admins or Table Admins can set visibility dependencies, provided their group has admin access to the tables containing the affected fields.
Required Field Permissions
In order to see a visibility dependent field, users must have view permission for the dependent field itself. In addition:
- When a single visibility condition is set, users must have view permission for the field that controls visibility, the parent field.
- When “all” of multiple conditions must be met, users must have view permission for all of the parent fields.
- When “any” of multiple conditions must be met, users must have view permission for at least one of the parent fields which is “true,” i.e., which is currently meeting the condition and allowing the dependent field to appear.
Notes:
- It is not necessary for a parent field to appear on the layout in order for a dependent field to recognize its value.
- If any of the parent fields is itself hierarchically dependent, users must have permission to view the parents of those parent fields, i.e. the “grand-parent” fields.
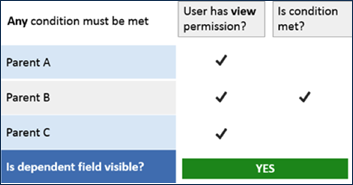
Multiple Visibility Condition Permission Examples
The graphic examples below show how different combinations of view permissions and true conditions affect users’ ability to see a dependent field.
All Conditions


Any Condition


Setting Visibility Dependence with a Saved Search
In addition to setting visibility dependence based on the value in a field, you can also configure visibility dependence so a field is only visible when a saved search finds a given record. This allows you to create more powerful conditions for visibility dependence.
For example, maybe you want to make the Contract Notes field visible only when the Contract Amount field is between $10,000 and $50,000. To accomplish this, you can use a background table with a few fields, as well as a linked field, an Update Fields action, and a saved search in the Contracts table, which together set a trigger field. The trigger field allows you to determine the visibility of the Contract Notes field.
Let's see how you can configure the previous example by using the instructions below. If you have a different use case, you can substitute your own search condition, fields, and other items where relevant.
Create the Background Table
Begin by creating a background table to hold the record and the necessary fields. Two fields define the numeric range that the saved search will later use, and a third field acts as the trigger field for the visibility dependence.
- Go to Setup > Tables and click New. The Table wizard opens.
- Enter "Numeric Range" for the table's name.
- Click the Fields tab.
- Create a Choice field to act as the trigger field:
- Hover over New and select Choice. The Field wizard opens.
- On the General tab, enter "Show Contract Notes" for the Field Label.
- Select Yes/No for the choice list.
- Click Finish.
- Create the fields that the saved search will use, which in this case are two Currency fields:
- On the Fields tab, hover over New and select Currency. The Field wizard opens.
- On the General tab, enter "Start Point" for the Field Label.
- Click the Display tab, enter "$" for the Currency Symbol, and choose to always show 2 decimal digits.
- Click Finish.
- Repeat the previous four steps to create a second Currency field, but enter "End Point" for the Field Label.
- In the Table wizard, click the Layout tab and add the fields you created anywhere on the layout.
- Click Finish to create the table.
- Create a record in the table and set each field you created:
- Choose Yes for the Show Contract Notes field.
- Enter 10,000 for the Start Point field.
- Enter 50,000 for the End Point field.
- Click Finish.
Create the Link to Selected Fields from Other Table
Next, create a Link to Selected Fields from Other Table in the Contracts table that links to the ID and Show Contract Notes fields in the Numeric Range table.
- Click Setup Contracts on the left pane. The Table wizard opens.
- Click the Fields tab.
- Create and configure the Link to Selected Fields from Other Table:
- Hover over New and select Link to Selected Fields from Other Table. The Field wizard opens.
- On the Table tab, select the Numeric Range table.
- Click the Fields tab.
- Select both the ID field and the Show Contract Notes field.
- Rename the ID field to Numeric Range ID. Keep the same name for the Show Contract Notes field.

- Click Next and then click the Display tab. We'll come back to the Options tab after creating the field.
- Select the input aid for each field in the linked set:
- For the Numeric Range ID field, select Hyperlinked View Only.
- For the Show Contract Notes field, select Plain Text View Only.
- Click Finish. You're returned to the Fields tab of the Table wizard.
Configure the Default Value
Now that the linked set is created, configure the behavior for its default value. This is where you use an Update Fields action and a saved search to find the record in the Numeric Range table, which sets the Show Contract Notes trigger field.
- Edit the linked set you just created and click the Options tab.
- In the "Set default value..." area, select "run the ___ action" and click Create Action. The Actions wizard opens.
- Click Create Update Fields Action. The Update Fields Action wizard opens.
- Configure the Update Fields action:
- On the General tab, enter "Set Show Contract Notes Field" for the Action Name.
- Click the Fields tab and select the Numeric Range ID field.
- Click the Values tab and select the "Use the [search name] search..." option.
- Click Create New Search. The Saved Search wizard opens.
- On the General tab, add a Simple filter where the Start Point field is less than or equal to the Variable
$contract.contract_amount. - Add a second Simple filter where the End Point field is greater than or equal to the Variable
$contract.contract_amount. Note that pointing to a Calculated Result field will not allow the default value to populate instantly, and it will instead populate only when you save the record. When you're finished, the saved search should look like this:
- Click the Options tab and enter "LF: Show Contract Notes Search" or similar for the name of the saved search.
- Click Finish. You're returned to the Values tab of the Update Fields Action wizard.
- On the General tab, add a Simple filter where the Start Point field is less than or equal to the Variable
- Make sure the "Use the [search name] search..." option is selected, choose the saved search you just created, and select "Choose the first record returned by the search in sort order."

- Click Finish, make sure the "U: Set Show Contract Notes Field" action you just created is selected, and then click Finish again in the Actions wizard. You're returned to the Field wizard.
- In the "Set default value..." area, inside the "run the [action name] action..." option, make sure the Set Show Contract Notes Field action is selected, and then select the Contract Amount field in the second drop-down field.
- Click Next and then click Finish. You're returned to the Table wizard.
- Click the Layout tab and add the fields in the linked set to the layout. It's often a good idea to add fields like these to the Background Fields section of the History tab.
Create the Contract Notes Field
Next, create and configure the Contract Notes field to use visibility dependence.
- In the Table wizard, click the Fields tab, hover over New, and select Text.
- Enter "Contract Notes" for the Field Label.
- Click the Options tab, go to the "Make the visibility of this field conditional" section, and click Add Condition.
- Select the Show Contract Notes field, choose the Yes value, and click Finish.
- Click the Display tab and set two display options:
- For the Width of Input Field, enter 50.
- For the Height of Input Field, select multi-line 3 rows high.
- Click Finish. You're returned to the Table wizard.
- Click the Layout tab and add the field to the layout.
- Click Finish.
Test the Visibility Dependence
Lastly, test that the visibility dependence works as intended.
- Open a record in the Contracts table.
- Enter a value between 10,000 and 50,000 in the Contract Amount field.
- Confirm that the Contract Notes field appears.
- Change the value in the Contract Amount field so that it's less than 10,000 or greater than 50,000.
- Confirm that the Contract Notes field is no longer visible.
Tab Visibility
If a user does not have permission to view any of the fields in a record tab, the tab will automatically disappear from view. If the visibility conditions are satisfied for even one field in a tab, the tab will be visible in the record layout. If the visibility conditions for any field are changed so that the user can view it, the tab will automatically become visible for them.