Using the Agiloft Contract Assistant for Outlook
The Agiloft Contract Assistant for Outlook is a powerful tool that helps you work with contracts. With the app, you can easily:
- Add attachments from existing records to an outbound email
- Add email information, such as attached files and email text, to existing records
- CC Agiloft in an email to ensure responses are automatically captured in the system
Before you can use the app, you need to configure it in your KB and install it in Word.
Logging In
To log in, follow the steps below. If this is your first time logging in to the app, consult the Initial Use section.
- Open Microsoft Outlook.
- Open an email, or create a new email draft.
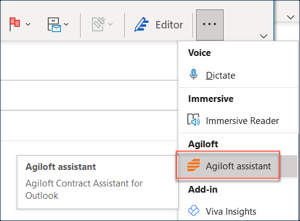
- The app should now be clickable from either:
- The ribbon:

- The three dot menu:
- The ribbon:
- Choose your KB.
- Input your Agiloft credentials, and click Log in.
Initial Use
The first time you open the app, you need to connect to a KB. To do so, follow these steps:
- Open Microsoft Outlook.
- Open an email, or create a new email draft.
- The app should now be clickable from either:
- The ribbon:
- The three dot menu:
- The ribbon:
- Open your KB in your web browser.
- Copy the URL from directly after the
https://through.com. Thehttps://is included by default in the app, so you don't need to copy that part of the URL. Any additional URL string will result in an error in step 6.
- Paste the shortened URL into the Your Agiloft website field.
- Click Continue. If you get a network error, check that you entered the URL correctly by repeating steps 5 and 6.
- Select your KB from the drop-down list. If you see a field instead of a drop-down list, copy the KB Name from the top right-hand side of Agiloft, just to the left of the Help icon, and paste it in the field.
- Click Add.
- Enter your login information for the KB you opened in step 3. Then, click Log in.
Connecting to additional KBs
You can connect the app to multiple KBs. To add KBs:
- Open Microsoft Outlook.
- Click the app from the top right-hand side of Outlook.
- Click Add KB. If you don't see the option to Add KB, click the server icon and click Add KB.

- Open the KB in your web browser.
- Copy the URL from directly after the
https://to.comonly. Thehttps://is included by default in the app, so you don't need to copy that part of the URL. - Paste the shortened URL in the Your Agiloft website field.
- Select your KB from the drop-down list. If you see a field instead of a drop-down list, copy the KB Name from the top right-hand side of Agiloft, just to the left of the Help icon, and paste it in the field.
- Click Add.
Working with the App
For information about adding email information to records, or adding record information to emails, consult the sections below.
Adding Email Information to Records
Use the app to attach emails, and their attached files, directly to existing records in Agiloft. This is often used for emails in the inbox, but you can use it in any folder in Outlook. For example, if you sent a follow-up email and later decide you want to add it to the record, you can go to the Sent folder and add it from there.
- Open Microsoft Outlook.
- Open an email that contains information you'd like to add to a record.
- Open the Agiloft app and log in.
- Select the table you'd like to work with from the drop-down list at the top of the app. This populates the app with all the records from the table you selected.
- Search for a specific record, or simply scroll through the list. Select the record to open a small window at the bottom of the app.
- Click Add to this [Table Name] to send the information found in the email to
Agiloft.
- The email information is sent to Agiloft as a new record in the Email Communication History table that is linked to the record selected in step 5. This record contains the original recipient, subject, actual text content of the email, the actual attachment, and the date the record was created.
- If the email has a file attached, the file is sent to Agiloft as a new Attachment record that is linked to the record selected in step 5.
Emails that have been sent to Agiloft are marked with a blue icon.
Adding Record Information to Emails
Follow the steps below to add information from your KB directly into email drafts, and ensure responses to your emails are recorded automatically in Agiloft.
- Open Microsoft Outlook.
- Open the email you'd like to respond to, and click Reply or Reply All.
- Open the Agiloft app and log in.
- Select the table you'd like to work with from the drop-down list at the top of the app. This populates the app with all the records from the table you selected.
- Search for a specific record, or simply scroll through the list. Select the record to open a small window at the bottom of the app.
- Click the link in the Attachments field to view the record's attached files.
- Click an attachment to add it to the email. There is no specific limit to the amount of attachments you can add to an email from the app, but if you add a significant amount, you might exceed Outlook's email size limits.
- Click Add this Contract as a Recipient. This adds the inbound email address from the configuration process to the CC field of the email draft. If any recipients respond with the inbound email still CC'd,
Agiloft creates a new record in the Emails table linked to the record selected in step 6.
- If you click Add this Contract as a Recipient on multiple records, the email is linked to the record selected most recently.
- If you don't have inbound email set up, you can still click Add this Contract as a Recipient to push email information into the Email Communications embedded table, as long as you send the email soon after the button is clicked.
- Send the email.