User Access
Users can access the system with or without a login. In either case, login data has its source in one of two places:
- Users who actively log in to Agiloft, or who access the system with the Anonymous User, have a corresponding user record in one of the subtables of the People table. Users are generally imported, created manually, or generated through some other automated process.
- User data can also be stored in an external system, such as in LDAP or Microsoft Active Directory (AD), which is used as the primary set of user information. An Identity Provider stores the user's login and password across several applications or systems.
Even if a user is authenticated through LDAP or AD, Agiloft creates a user record for them that is then used in rules and other parts of the system as if the user were a native user.
Prerequisites
If you want to make changes to your knowledgebase login page or password reset page, we recommend you have the following:
- Basic knowledge of HTML
- Basic knowledge of CSS
You can learn more about these topics at W3 Schools.
Accessing the System with a Login
There are several ways to log in to Agiloft:
- Through the system login page.
- Through a custom login block on another web site.
- Through an autologin hyperlink or button that contains a login, password, and other parameters, such as KB name, table, state, search, record ID and so on. This hyperlink can be encrypted and time limited if it is sent in an outbound email.
- Through a single sign-on method. If a user is already logged in to a corporate intranet or web portal and then clicks a hyperlink, the user information can be passed into the system to authenticate the user without having to enter a login again.
The system login page is generally located at https://hostname/gui2/login.jsp. For certain servers, http://hostname/gui2/login.jsp or http://hostname:8080/gui2/login.jsp might be used.
Reset a Password
There are two ways to let a user reset their password:
- To let a user reset their password via email, assign them to a group that permits this on the General tab of the group permissions.
- If you are using a custom login page, add a Send Password link or button to your login page that calls up another custom HTML page.
You can find more information about passwords in Password Management.
Reset Password Page
Users can access the password reset page by clicking the forgotten password link on the login page. This allows users to reset their password, but it does not send them their current password, which could create a security problem. Instead, the password is changed to a random string of characters, the new password is sent by email or text message, and the user must then log in and create a new password from inside the system.
Reset Password by SMS
In addition to email, you can allow users to receive a password reset token by SMS. A 6-digit SMS code is generated and sent to the cell phone number in the user's profile, if one exists. The login screen will change to an authentication screen where the user must enter the code. After this, they can enter and confirm their new password.
Accessing the System without a Login
Not all users are given logins, but in many cases these users still need to access the system to update records. For instance, an external user might not have a login, but they might be allowed to use email hyperlinks that allow them to access the system to update a service record, if you enable this in your Security settings. With email updates like these, the system checks the user's email address and tries to match it to a record in the People table to find the user's login. If the system does not find a login or finds no matching record, it logs the user in as the Anonymous User.
Anonymous User
The Anonymous User is an actual user in the system with a user record. Users without logins create and edit records under this user. When users without logins make changes to records, the Anonymous User appears in Append Only fields and History fields.
If you send email links to people who are not users, make sure to put the Anonymous User in a group that has the right to view or edit other people's records, and enable the anonymous user to use hotlinks in your Security settings. Otherwise, the user will be unable to view or edit the record if they click the email link. Keep in mind that if you put the Anonymous User in a Power User group, they will use an assigned or floating Power User license.
Do not delete the Anonymous User. Otherwise, users without logins will be unable to access the system.
Best Practice Tip
If you plan to use email with known external contacts so that they can update or create records, set up user records for them in the External Users table, even if you don’t want them to actually log in to the system.
When a new external user is created, you can have a rule that sets a login by default to their email address and sets a password to a random string. If you don't place them in a group, they will never be able to actually log in to the system. But by giving them a login, you allow the system to better process any changes they make, and you can track these changes in History fields.
Custom Login Methods
If you're comfortable with HTML and CSS, you can customize how users log in to your system. For instance, you can add custom login blocks or password reset blocks to webpages, as well as use predefined templates to create custom login pages and password reset pages. You can add your own logo, change text, and adjust various style options to match a desired look and feel.
Create Custom Login and Password Reset Pages
If your knowledgebase is hosted on Agiloft's servers, you can use the following instructions to create a custom login page and a custom password reset page. If your knowledgebase is hosted on your own server, see Add a Static Login Page for information on creating a custom login page.
Update the Login Page Template

To help you create custom login pages more easily, use a template to begin.
- Download the template.
- Open the file with a simple text editor or a free source code editor, such as Notepad++.
- Update the following items in the login page template:
- Update the
titleelement with the title you want to appear in the browser's tab.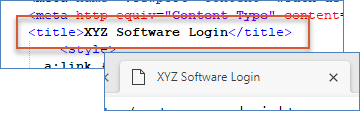
- Update the
imgelement with a new image file:- If the file is web-based, update the
srcattribute with a link to the image of your desired logo. Addaltandstyleattributes, specifying appropriate alt text and the image's width and height in pixels.
- If the file is local, simply include the filename, such as
"xyz-logo.png"or similar, including the quotation marks. You will provide the file to the Agiloft Support team to upload in a later step.
- If the file is web-based, update the
- Update the
h1element with your company's name.
- Update the
actionattribute of theformelement with the current login URL for your KB.
- Update the
valueattribute of the firstinputelement with your KB project name. If you don't know this, ask your assigned implementer or project manager.
- Update the
valueattribute of the secondinputelement by creating an updated KB login URL, using this form:https://yourKB-dns.agiloft.com/logins/folder/login-page-template.html. For example, if your original KB login URL ishttps://xyz.agiloft.com//gui2/login.jsp, your template file will be saved in a folder on your server calledtemplate, and your template file is namedxyz-login.html, thevalueattribute will look like this:value="https://xyz.agiloft.com/logins/template/xyz-login.htm".
- Update the
hrefattribute of the lastaelement with the filename of your password reset page template. Remember this filename so that you use the same name when you update the password reset page template in the next section.
- Update the
- If desired, update the optional color and style properties in the login page template:
- Adjust the style of the "Forgot your password?" link:
- Update the
colorproperty in thea:activeselector with a new color for the link. - Update the
text-decorationproperty in thea:hoverselector with the hover behavior for the link.
- Update the
- Update the
background-colorproperty in thebodyselector with a new background color.
- Update the
colorproperty in theh1selector with a new color for the title.
- Update the
colorproperty in thetdselector with a new color for the "Username:" and "Password:" text.
- Adjust the style of the "Forgot your password?" link:
- Save the template file and leave it open. This allows you to easily copy color codes and other data to the password reset page template.
Update the Password Reset Page Template

Next, update a similar template to help you create a custom password reset page. For all color choices, we recommend using the same colors from the login page template.
- Download the template.
- Open the file with a simple text editor or a free source code editor, such as Notepad++.
- Update the following items in the password reset page template:
- Update the
titleelement with the title you want to appear in the browser's tab.
- Update the
imgelement with a new image file:- If the file is web-based, update the
srcattribute with a link to the image of your desired logo. Addaltandstyleattributes, specifying appropriate alt text and the image's width and height in pixels.
- If the file is local, simply include the filename, such as
"xyz-logo.png"or similar, including the quotation marks. You will provide the file to the Agiloft Support team to upload in a later step.
- If the file is web-based, update the
- Update the
h1element with your company's name.
- Update the
actionattribute of theformelement with the current password reset URL for your KB.
- Update the
valueattribute of the thirdinputelement with your KB project name. If you don't know this, ask your assigned implementer or project manager.
- Update the
- If desired, update the optional color and style properties in the password reset page template:
- Update the
background-colorproperty in thebodyselector with a new background color.
- Update the
colorproperty in thediv.containerselector with a new color for the "Login or Email address" text and the instructional text.
- Update the
colorproperty in theh1selector with a new color for the title.
- Update the
pelement with new instructional text for the password reset process.
- Update the
- Save the file with the same name you specified in the template for the custom login page.
Finish the Process
To complete the process, send the templates to Agiloft, test the new pages, and edit the appropriate global variables in your KB.
- Create a support ticket, attach the template files you updated and your optional company logo, and request that they be uploaded to your KB's server. Make sure the template and logo filenames match the filenames you used within the templates themselves.
- Wait for the Agiloft Support team to verify with you that the files have been uploaded.
- Once verified, test that both the KB login page and the password reset page work.
- After confirming that the pages work, log in to the KB as an admin user and go to Setup > System > Manage Global Variables.
- Change the Login URL and Exit URL global variables to the updated KB login URL.
Add a Custom Login Block to a Webpage
Custom login blocks can be added to any webpage using standard HTML:
<form method= "post"
 action="http://www.example.com/gui2/login.jsp" >
 <input type= "hidden" name= "KeyID"
 value="0" >
 <input type= "hidden" name= "state"
 value= "Main" >
 <input type= "hidden" name= "project"
 value= "KnowledgeBaseName" >
 <input type= "hidden" name="exiturl"
 value="http://www.example.com" >
 <input type= "hidden" name= "loginurl"
 value="http://www.example.com" >
 <table border= "0" width= "90%" >
 <tr><td align=left>Username:</td>
 <td> </td>
 <td>
 <input type="text" size= "30"
 maxlength= "50"
 name= "user"
 value= "admin">
 </td>
 </tr>
 <tr><td align=left>Password:</td>
 <td> </td>
 <td>
 <input type="password" size= "30"
 maxlength= "50"
 name= "passwd" >
 </td>
 </tr>
 <tr>
 <td align=left> </td>
 <td> </td>
 <td>
 <input type= "submit"
 value= "Login" >
 </td>
 </tr>
 </table>
 </form>
This will result in:

Using a Bash Script to Generate a Login Page
The bash script file linked below will allow you to generate such a login page. Simply download the script to the Linux server and run it:
sudo bash make_html.sh
Add a Custom Password Reset Block to a Webpage
Custom password reset blocks can also be added to any webpage using standard HTML:
 <form action="http://[serverhostname]/gui2/resetPassword"
 method=post>
 Login:<input type=text name=login size=25 maxlength=50><br>
 or email address:<input type=text name=email size=25
 maxlength=50><br>
<input type="hidden" name="resettype" value="email" />
<input type="hidden" name="resettype" value="text message" />
<input type="hidden" name="mode" value="request" />
<input type=hidden name=project value=[KB Name]>
<input type=submit value=Go>
<form>