Salesforce Integration
This article describes how to set up Salesforce synchronization in your Agiloft knowledgebase. Synchronization between Salesforce and Agiloft allows you to integrate and update your data in real time between both systems. If you already use Salesforce to manage marketing, sales, service, or other content, it's much easier to sync content between both systems than to manually re-enter existing data in Agiloft. Similarly, if you already have data in Agiloft and want to transfer that data to Salesforce, syncing the data saves both time and effort, and it ensures data in both systems is kept up to date.
All Salesforce tables are supported in Agiloft, including both standard tables and custom tables. For a given table, you can choose to sync some, all, or none of the fields.
Prerequisites
- Create a Salesforce developer account using an email address you can access. Make sure your Salesforce account has permission to create the object being configured.
- Create a new, separate admin account in Agiloft specifically to use as the credentials to run the Salesforce sync.
- Before you begin, if you're setting up a Salesforce sandbox, you must set the sf_authorize_url and sf_token_url global variables (Setup > System > Manage Global Variables) to begin with test.salesforce.com, or with your custom sandbox URL if you have one, instead of beginning with login.salesforce.com. If you later switch from a sandbox to a production environment, you must undo this and change the first element back to
login.
Connecting Systems
Start by launching the Agiloft managed package in Salesforce and connecting the two systems. Note that the managed package is an add-on, so you must work with Agiloft to purchase the add-on and access the link to set up Salesforce this way. The managed package is compatible with Professional, Enterprise, and Unlimited editions of Salesforce.
The Salesforce managed package is designed to sync Salesforce Opportunity records with Agiloft Contract records, including Opportunity line items and Products. It doesn't include other objects out-of-the-box, nor does it offer multi-to-multi table mappings. To set up Salesforce without the managed package, skip to the Configuring Advanced Settings section and create a new sync configuration manually. If you want to use multi-to-multi table mappings, you will need to create two one-way sync configurations, each with multi-to-multi table mappings enabled, with one syncing data from Agiloft to Salesforce and the other syncing from Salesforce to Agiloft.
To install the managed package:
Obtain the direct link and password to install the managed package from your Agiloft contact.
- Open the link and proceed to install the package.
Log in with your Salesforce developer account.
- Choose whether to install the package for admins only, all users, or specific list of users and click Install. Wait while the app is installed.
- When the installation success message appears, click Done.
- Click the App Launcher icon and use the search bar to find and select Agiloft Configuration.

- Follow the instructions to copy the root URL of your Agiloft KB, and then paste that URL into the field in Salesforce and click Login to Agiloft.
- Enter the Agiloft credentials for the Salesforce sync admin user you created as a prerequisite. Do not change the selected language or interface when logging in.
- If prompted to grant permission to the other system, click Allow. Wait for a message to confirm successful connection. Salesforce also sends an email with the organization, user, and package IDs.
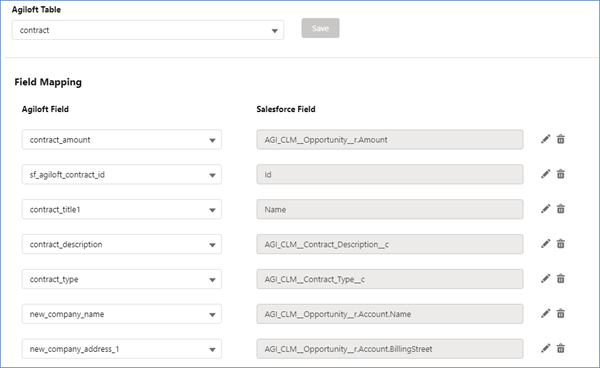
- Return to the Salesforce page and click the Field Mapping tab.
- In the Agiloft Table drop-down, the Contract table is selected by default. Don't change this selection unless your contract data is stored in another table. If it is, select that table from the drop-down.
-
Agiloft and Salesforce fields are mapped for you automatically, based on the out-of-the-box setup of each system. If you haven't made changes to your
Agiloft or Salesforce system, you can leave the mappings as-is. If you have made some customizations, review each mapping pair to make sure it is appropriate. Likewise, if you identified a different table in step 11, you need to map all the fields anew.
- To change the Agiloft field, use the drop-down to select a field from the list.
- To change the Salesforce field, click the edit icon and use the drop-down to select the Salesforce field. Fields with > at the end of the title are fields that point to other Salesforce tables, and can be used to map to fields in those secondary tables.
- When you configure all the fields, select or clear the Include CPQ checkbox at the bottom of the list. This determines whether product data is synced from Salesforce to Agiloft. If you include CPQ in your sync, synced contracts automatically include any linked products, and the product list in Agiloft is also kept up to date so that users can create contracts in Agiloft with the correct product list. To use just one of these options, select the checkbox and then edit the sync configurations in Agiloft later.
At the bottom, you can click Add Mapping to open additional rows for you to map fields, or click Reset Mappings to return to the default configuration.

At this point, you can only configure mappings for the primary contract table. After you finish setting up sync for the primary contract table, you can map additional Agiloft tables by Configuring Advanced Settings. If you included a mapping between a Salesforce picklist and Agiloft Choice field, make sure to complete Picklists to Choice Lists.
- When you're finished, click Upload Mapping. Note that this overwrites the field mappings in your existing Salesforce > Agiloft sync configuration, if you have one.
With the managed package configured, the Agiloft CLM section of Salesforce includes a Sync to Agiloft button to push data to Agiloft. This is visible for all users selected in step 4 above, when the package was installed.
Example Workflow
When you use the managed package setup, this is the usual user workflow:
- In Salesforce, the user creates an Agiloft Contract record and completes the required fields.
- The user clicks Sync to Agiloft directly in Salesforce.

- A draft contract is automatically created in Agiloft.
- The contract follows its established workflow in Agiloft.
- Once the contract is signed and ready to be sent back to Salesforce, the user clicks Sync to Salesforce in the record in
Agiloft.

- The latest attachment, Status, and Contract Manager fields are synced back into Salesforce.
Configuring Advanced Settings
After you've connected your KB with Salesforce, you might want to sync additional objects and tables beyond contracts. You can do so by adding more entities to the sync configuration on the Agiloft side.
If you didn't use the managed package because you needed to sync with different settings, use these steps to create a sync configuration from scratch. In this case, you need to first obtain your Salesforce security token using the developer account. In Salesforce, click your user icon in the top right and go to Settings > My Personal Information > Reset Security Token. This sends the security token to your account's email address. For more information, see Reset Your Security Token.
To access advanced settings:
In your Agiloft knowledgebase, go to Setup > Sync > External Sync.
- Edit the Salesforce sync configuration, or create a new configuration if you don't have one yet.
- If you connected to Salesforce already, notice that most of the settings on the General tab are already configured. If you're creating a new sync configuration:
- Set the External System Type to Salesforce and leave the default Third-party ESA (HTTP) option selected.
- Set up Directions, Related tables, and Conflicts according to your requirements, and set any other options as desired. These settings are treated as the default for the sync overall, but you can configure individual tables to map in specific directions on the Mapping tab later. Note that "Allow Multi to Multi Table Mappings" is not compatible with two-way sync.
If you connected to Salesforce already, the ESA Settings tab is also already configured, so you can skip to the next step. If you're creating a new sync configuration, select a login option:
OAuth 2.0: For this method, you need a Redirect URI, Key, and Secret value. To get them, follow these steps:
- Before you begin, if you're setting up a Salesforce sandbox, you must set the sf_authorize_url and sf_token_url global variables (Setup > System > Manage Global Variables) to begin with test.salesforce.com, or with your custom sandbox URL if you have one, instead of beginning with login.salesforce.com. If you later switch from a sandbox to a production environment, you must undo this and change the first element back to
login. In Agiloft versions prior to release 23, you must also contact Support and ask them to update the values for these variables directly in the database. Finally, clear the KB cache in the admin console (Debugging > Cache > Clear Cache), or contact Support and ask them to do it if you don't have admin console access. First, use the wizard text to help you construct the Redirect URI appropriately. It should follow the
https://<server>:443/gui2/sf/oauth/loginformat, with <server> being the specific domain of your Agiloft KB.In another browser window or tab, log in to Salesforce and go to the Setup menu.
Go to the App Manager and click New Connected App.
Complete the required Connected App Name, API Name, and Contact Email fields.
Select the Enable OAuth Settings checkbox.
Copy the Redirect URI you entered in step 3a, then return to Salesforce and paste that value into the Callback URL field.
- In the OAuth Scopes section, select "Full access (full)" in the Available OAuth Scopes list and click the arrow to add it.
- Do the same for "Perform requests on your behalf at any time (refresh_token, offline_access)".
- Click Save. In the message that appears, click Continue and wait 10 minutes as prescribed.
- When the Connected App is ready, copy the Consumer Key and Consumer Secret values into the corresponding Agiloft fields.
Then, click Verify Credentials to make sure the authorization is working.
- Before you begin, if you're setting up a Salesforce sandbox, you must set the sf_authorize_url and sf_token_url global variables (Setup > System > Manage Global Variables) to begin with test.salesforce.com, or with your custom sandbox URL if you have one, instead of beginning with login.salesforce.com. If you later switch from a sandbox to a production environment, you must undo this and change the first element back to
Login/Password: For a Production environment, enter https://login.salesforce.com/services/Soap/u/33.0 in the Salesforce WSDL Endpoint field. For a Salesforce sandbox, use https://test.salesforce.com/services/Soap/u/33.0. as the WSDL Endpoint. If you receive an error, follow the SOAP API Developer Guide to identify the current endpoint. Then, enter your Salesforce account email login. In the Password field, use the following format: salesforcepasswordSECURITYTOKEN. For example, SfP4s5w[]rdSECURITYTOKEN.
On the Mapping tab, map the Agiloft tables and fields with the external Salesforce system. For each mapping:
Locate the Agiloft table in the list and then select the corresponding Salesforce table from the drop-down menu.
Click Map. The Field Mapping wizard opens. On the Field Mapping tab:
In the Record Modification Timestamp Field, select a field that provides the timestamp in each system to indicate the latest version of the record. If you set the table to Synchronize in the System Update Type in the next step, the timestamp field is compared between systems to determine which record's values are synced to the other system.
- For System Update Type, choose the sync direction for the table. You can choose a different sync direction for individual tables than you chose for the overall sync on the General tab, but you can't contradict the General tab setting. For example, if you chose to Update Agiloft Only on the General tab, you can't choose the Export option here to send data to Salesforce. This setting also determines whether real-time automation is possible between systems; to use real-time automation, you must set this to Synchronize. Export and Import work only for scheduled automation.
- Synchronize : Updates records in both systems based on the timestamp field. If you plan to use real-time automation with Apex triggers, you must select this option.
- Export: Updates records in Salesforce to match field values in Agiloft.
- Import: Updates records in Agiloft to match field values in Salesforce.
- In Allowed Operations, choose which sync operations are allowed during the sync.
- Determine how the record ID is generated during the sync. This can be done by Salesforce or Agiloft. If you generate record IDs with Agiloft, you must also specify a prefix and a table column to store the generated IDs.
- If desired, select any actions you want to run after a successful sync.
- Choose whether to include records in related tables. Selecting this option can impact performance.
For each Salesforce field you want to sync, select the corresponding Agiloft field from the drop-down. Then, choose whether the field value is updated in Agiloft, Salesforce, or both systems. Update options are disabled if the sync direction does not permit them. For fields with multiple choice values, complete the dialog box that opens to map individual choice fields.
Use this tab to map links to single fields, but not complete linked sets. Linked sets should instead be mapped in step 6 below, on the Relation Mapping tab.
Use the Identifying column to select fields to identify matching records between the systems. If you want to match records only when all the Identifying fields match, select the "Use strict match for identification" option. Otherwise, the system first attempts to identify matches by all fields, and if no match is found, it then narrows down the Identifying fields one at a time until a match is found.
The fields you choose as Identifying also depend on the direction of sync. To sync from Salesforce to Agiloft only, select the Salesforce Record ID field as Identifying, and map it to a Text field in Agiloft that will store the value. To sync from Agiloft to Salesforce only, select the Agiloft ID field as Identifying, and map it to a number field in Salesforce that will store the value. For two-way sync, choose a field that is unique, but has the same value in both systems, always; for example, an email address. You can't use the ID fields for this purpose because the Salesforce ID is different than the Agiloft ID for the same record.
- Click Next.
- On the Filters tab, if you need to prevent records created or updated in one system from being synced to the other, create a saved search to filter the desired records.
- Click Finish. The Field Mapping wizard closes.
- Repeat the previous steps for each table and set of fields you want to sync, and click Next when complete.
On the Relation Mapping tab, you need to explicitly match any linked field relationships across mapped tables that you did not select on the Mapping tab. In general, it's best to use the Mapping tab for links to single fields, or linked sets where only one of the fields in the set will be synced. For linked sets, use Relation Mapping to connect the complete set with the appropriate Salesforce entity. Note that you can't map relationships where the field in one system is required, but the field in the other isn't.
Set any linked field relations between mapped tables. Linked relationships between Salesforce tables must be preserved with corresponding links in Agiloft or you cannot save the sync configuration. See the second bullet of the Additional Notes section below for more information.
- Choose whether the field values are updated in Agiloft, Salesforce, or both systems.
- Click Next.
On the Running tab, choose whether synchronization is initiated manually, via actions and rules, or via Salesforce. For more discussion of these options, see Automating Synchronization.
To run a sync manually, go to a table's action bar and select Actions > Sync > Run [Configuration Name]. In the window that appears, click Synchronize now to run the sync. You can watch its progress, and if needed, click the hyperlinks to review the log file or the affected records.
- On the Export tab, customize any export settings related to the sync configuration. This allows you to transfer your sync configuration to another KB, if desired.
Click Finish.
Picklists to Choice Lists
If you are mapping a Salesforce picklist or multi-picklist to Agiloft as a choice or multi-choice field, you need to perform some additional configuration after uploading the field mapping. This configuration involves choosing the values that will appear in the list.
- Navigate to Setup > Sync.
- Under External Sync, click Configure.
- Edit the SF - AL record. It may take a few moments to load.
- Click Next on the General tab and the ESA Settings tab.
- On the Mapping tab, click Edit Mapping for the table you want to sync, or create a new one.
- Complete or review the Field Mapping tab, and use the SF Choice field to correlate with the Picklist field or the SF Multichoice Field to correlate with the Picklist Multiselect field, depending on what format you need to use.
- Click Finish.
Adding New Users
When you choose to install the package for admin users, all users, or a list of specific users, Salesforce grants a set of permissions based on that selection. If you add more users in the future, you must manually grant those permissions to those users in Salesforce if they need to use the integration with Agiloft.
In Salesforce:
- Grant the user full create, read, update, and delete access to any custom Salesforce objects that are synced with Agiloft.
- In Apex Classes, grant the user access to each Apex class included in the
Agiloft integration. You can find the full list of these classes in Platform Tools > Custom Code > Apex Classes by looking for classes labeled AGI_CLM. To add a class:
- Search the class name from the main search box.
- Click the Security link.
- Add the user to the list of Enabled Profiles.
- Go to Users > Profiles, open the user profile details, and then click the Enabled Custom Metadata Type Access link. Then, add access to the Agiloft CLM metadata.
Additional Notes
Before attempting to sync with Salesforce, check the configuration of the Agiloft fields you mapped:
Make sure linked fields are mapped only once, either on the Mapping tab or the Relation Mapping tab. In general, it's best to use the Mapping tab for links to single fields, or linked sets where only one of the fields in the set will be synced. For linked sets, use Relation Mapping to connect the complete set with the appropriate Salesforce entity.
For each linked field being synced, edit the field, go to the Mapping tab, and select "Allow entries not in source table."
Example
In Salesforce, the Contracts to Accounts relationship is required. For any contract in the Contracts table, you must create a link to the Accounts table specifying the relevant account. In Agiloft, this relationship is instead a link from the Contracts table to the Companies table, but the link is not required for a given contract. If you're syncing the Contracts table, you need to go to the Contracts table in Agiloft and configure the linked set to the Company table to be required. You can do this on the Options tab of the Linked Field wizard by changing the "Require the user to choose record(s) to be imported?" option to Yes.
- For all fields being synced, edit the field, go to the Options tab, and confirm the field does not require unique values.
These are necessary for the sync to save values from Salesforce that differ from Agiloft values. The following fields are common changes in the out-of-the-box knowledgebase:
- Lead Table: The Company / Location Name field should not require a unique value.
- Company and Person Table: The linked field set to the Locations table should use the "Allow entries not in source table" option.
If you need to copy or sync your KB to another KB, such as a test KB you use that is kept separate from your production KB, you need to change all sync configurations. This includes both hotlinks and external IDs, in both Agiloft and Salesforce, because the sync is completely separate from the sync you configured in any other KB.
Automating Synchronization
If you only need to synchronize Agiloft and Salesforce occasionally, you can manually sync them without additional setup. If you need to keep the systems in sync on a daily basis, or in real time, you can automate your Salesforce sync using the steps below.
Time-Based Automation
Use the following steps to set up a time-based rule to automate the sync process. As rules can be set to run as often as every 5 or 10 minutes and Real-Time Automation is difficult to configure, this is often the best choice.
- Navigate to Setup > Sync and edit your Salesforce sync configuration.
- Click Next twice, and then click the Running tab.
- Make sure the "By Actions (Rules/Workflow)" option is selected and click Finish.
- Navigate to Setup > Rules and click New. The Rule wizard opens.
- On the General tab, enter a name and select the table you're syncing.
- On the Rule Type tab, select the "At selected time intervals" option.
- On the Condition tab, select the "Run once per scheduled time interval" option.
- On the Schedule tab, apply the rule however often you want the sync to occur.
- On the Action tab, click Create Sync Action. The Sync action wizard opens.
- Enter an action name.
- Click the lookup icon for the External System ID field and select your sync configuration.
- Click Finish. The Sync action wizard closes.
- Click Finish in the Rule wizard.
The sync operates for all tables mapped in the sync configuration, regardless of which table contains the rule. If you need to sync some tables separately, create a separate Salesforce sync configuration for each table and use them in different Sync actions and rules. However, be careful with multiple Salesforce syncs so that you don't create conflicts with existing mappings.
Real-Time Automation
You can automatically push updates between Agiloft and Salesforce in real time, so that when someone makes a change to a record in one system, that change is automatically synced to the other as soon as the change is saved. Note that the table mappings in Agiloft's sync configuration must have System Update Type set to Synchronize in order for real-time automation to use those mappings.
Agiloft to Salesforce
You can sync individual records with Salesforce by configuring a Sync action in Agiloft with the "Sync a single record only" checkbox selected. Make sure this action is used in a context where records are selected, such as one of the following:
- Selecting records in the table view and using the Actions option in the action bar
- Creating an Action Button to use inside individual records
- Using a rule targeting a specific record or set of records
If you configure a Sync action to sync a single record only, and you run that action in a context where records are not selected, no records are synced by the action. If you need a Salesforce Sync action for a time-based rule or another non-record-specific context, you must create a separate Sync action to use.
With real-time sync, you should also confirm your settings in the main sync record:
- On the General tab, make sure the "Include records in related tables" checkbox is selected.
- On the Mapping tab, open each table mapping and make sure "Search for related records" is selected on the Field Mapping tab.
Salesforce to Agiloft
On the Salesforce side, you can use these URL parameters to sync a particular record: &SeanceValidator.Kick.Logged.Users=false&explicittables=SF_TABLE_NAME&explicitids=SF_RECORD_ID
Follow the steps below to initiate a sync with Agiloft when a record is changed in Salesforce, where only that changed record is synced. The Agiloft table mappings used must have System Update Type set to Synchronize in order for them to be used in such a sync.
- In Agiloft, create a new user record that Salesforce can use to access the system for sync. If you assign an existing user that is used in other processes, Salesforce might attempt to sync while that account is in use, and the sync will not work. Make sure the user has full permissions to every table included in the Salesforce sync.
- Go to Setup > Sync and edit the Salesforce sync configuration.
- Copy the External System ID Prefix value, without the KB name, and paste it in a text editor where you can access it later, such as Notepad.
- In the same program, paste this template. Make sure to use your server domain name, such as
example.agiloft.com, rather than the server hostname, such asps108.agiloft.com.https://[server_name]/gui2/login.jsp?keyID=0&user=[user_name]&passwd=[passwd]&KB=[KB]&action=sync&externalSystemID=[externalSystemID] - Modify the template to suit your system by changing each of the placeholder values:
- [server_name] - your server name, such as demo.agiloft.com
- [user_name] - the username for the user record you created in step 1
- [passwd] - the password for the user
- [KB] - the KB name, such as Demo
- [externalSystemID] - the external ID prefix you copied in step 3
- Go to Setup > Access and click Automatic Login Hotlinks.
- Copy the modified URL template and paste it into the Encrypt Hotlink field.
- Set the desired Expiration value. When the hotlink expires, you need to use these steps again to update your configuration in Salesforce, so choose the expiration time with that in mind.
- Click Encrypt.
- Copy the encrypted hotlink and paste it into your notes for future reference.
With this information from Agiloft, you can proceed to Salesforce.
- Log in to Salesforce and go to Setup > Security Controls > Remote Site Settings .
- Click New Remote Site.
- Give it a name and in the Remote Site URL field, enter your server's base URL, such as https://demo.agiloft.com.
- Click the gear icon in the top right and click Developer Console.
- If you've already configured your system to sync Salesforce files, and you've already created the AgiloftCallSyncUrl apex class, edit the class. Otherwise, go to File > New > Apex Class, name the class "AgiloftCallSyncUrl", and click OK.
For the class, enter the following code, customizing it with your encrypted hotlink URL (in
put_your_generated_hotlink_here) and your complete set of synchronized tables (listed after or instead ofAccount.sObjectType.getDescribe().getKeyPrefix())that you mapped in the Agiloft sync configuration:- Make sure you've placed your encrypted hotlink instead of the placeholder at the beginning of the code block.
- Make sure you've listed all the Salesforce tables that you want to use with real-time sync.
- Select File > Save to save the class.
- Next, you need to create an Apex Trigger for each Salesforce table you want to sync. Follow these steps for each table:
- Go to File > New > Apex Trigger and name the trigger "[table name]_sync_trg". For example, to sync the Account table, name the trigger Account_sync_trg.
- In the sObject field, select the Salesforce table.
- Click Submit.
In the console, enter the code for the appropriate table from the code blocks listed below. To use more than one of the tables below, repeat these steps to create an additional trigger for each additional table. When you add the code, make sure the trigger syntax matches the trigger name you chose.
- Select to File > Save to compile and save the trigger.
Sync Salesforce Files
File with Versioning Fields are synchronized with Salesforce Attachments automatically, but if you intend to synchronize with Salesforce Files and need to make sure that changes are automatically reflected in Agiloft, you need to enter code in the Salesforce developer account. The code automatically updates the Last Modified field of the containing record whenever the File is changed in the Salesforce account, which ensures the latest version of the File is synced.
If you already set up Real-Time Automation for the ContentDocumentLink table in Salesforce, you are already syncing with Salesforce Files and you don't need to complete this setup.
The sync creates a new version of the file whenever a change is made, so make sure the Agiloft field has Enable Versioning set to Yes on the Options tab of the Field wizard. Otherwise, changes from Salesforce to Agiloft are only compared to the first sync.
To set up Files sync:
- In Salesforce, click the gear icon in the top right and click Developer Console.
- Go to File > New > Apex Class.
- Name the class "AgiloftCallSyncUrl" and click OK.
For the class, enter the following code, customizing it to use your set of synchronized tables:
- Select File > Save to save the class.
- Next, you need to create an Apex Trigger for Salesforce's ContentDocumentLink table, in order to update the File's parent record on each File update. Go to File > New > Apex Trigger.
- Name the trigger "ContentDocumentLink_sync_trg" and select ContentDocumentLink for the sObject field.
- Click Submit.
In the console, enter the following code, customizing it to use your set of synchronized tables:
- Select to File > Save to save the trigger.
Add Object Permissions in Salesforce
When you configure integration with a new Salesforce object, you need to make sure your Salesforce account has Create permission for that object.
- Log in to Salesforce and open the account profile.
- Go to Settings > Advanced User Details and click on the Profile link.
- Click Edit at the top of the page to allow changes to the profile.
- Under Custom Object Permissions, select the Create permission for the object being synced.
- Save the changes.
System Preparation for Custom Integrations
If you need to configure your Salesforce sync without using the managed package, you must first make sure your systems have the necessary structure to allow syncing between them. After you complete this section, return to Configuring Advanced Settings to begin setup.
Preparing Salesforce
Review the tables and fields in Salesforce that you want to sync. To do so, click the dots in the top left of the Sales Console to open the App Launcher. In the App Launcher, select the app that contains your data or most closely suits your integration purpose. In Salesforce, apps are containers that hold the tables you can map to Agiloft with your integration. From the app page, you can then select a table and create a test record to see fields in that table.
Preparing Agiloft
Make sure all tables and fields you want to sync with Salesforce have been created and configured appropriately. If you want to sync the Contracts table specifically, you need to sync both the Contracts and Companies tables because they share so much information. For best results, follow these steps to prepare the Companies and Contracts tables:
- Go to Setup Companies and go to the Fields tab.
- Create a new Text or Short Text field.
- Name the field Salesforce Account ID, or something similar. This field will receive the account ID from Salesforce.
- Go to the Options tab and make the field required.
- If you want to prevent companies from sharing a Salesforce ID, make the field unique.
- Click Finish.
Now, prepare the Contracts table:
- Go to Setup Contracts and go to the Fields tab.
- Edit the linked field set from the Companies table and add the new Salesforce Account ID field to the set.
- As part of a linked set, you can't require this specific field be set. Instead, you can do one or both of the following to enforce or encourage setting a value in this field:
- Set up a Validate Action to prevent saving when the Salesforce Account ID field is empty.
- Edit the linked field set, go to the Mapping tab, select "Allow entries not in source table," and then make the Salesforce Account ID field required. You might also want to create a rule that triggers when the Salesforce Account ID changes, and then executes a Linked Record Action to copy the new Salesforce account number.
As you complete the steps in the Configuring Advanced Settings section, make sure to map both the Account ID and the Account Name from Salesforce to fields in the Companies table. Also make sure the Account ID is mapped in the Relation Mapping settings. When you test your synchronization, check that the Salesforce Account ID is populated in both tables.
Troubleshooting
If you set up your integration using the managed package, and the Sync to Agiloft button in Salesforce does not sync new contracts to Agiloft:
- In Agiloft, go to Setup > Sync and click Configure under External System.
- Edit the Salesforce to Agiloft sync configuration named "SF to AL".
- Click Next until you reach the Mapping tab.
- Edit the Contract table mapping.
- Scroll down to the Field Mapping section and clear the "Abort sync if required fields are empty" checkbox.
- Click Finish.