Okta SAML Integration
Use this topic to guide you in configuring Agiloft with SAML using Okta as the Identity Provider.
Prerequisites
To complete the setup, you need an Okta account with administrator access. You can sign up for a free trial account to use for testing. You also need admin access to your Agiloft Knowledgebase.
Adding an Application to Okta
The full setup requires you to switch between Agiloft and Okta, so before you start, open each one in its own browser window so you can easily switch between them.
In Agiloft:
- Click the Setup gear in the top-right corner and go to Access.
- Select Configure SAML 2.0 Single Sign-On.
- On the General tab:
- Select Enable SAML SSO.
- Select Create SAML IdP Authenticated user in Agiloft.
- Select the last checkbox only if you want to synchronize the user attributes in
Agiloft with those in the IdP every time a user logs in. If you leave this deselected, the user's attributes will be synchronized only when the user is first created.

- Select Employees in the drop-down to add users to the Table/Subtable shown below.
- Go to the Service Provider Details tab.
- Enter the Keystore file path, Java KeyStore Password, and Alias. If you do not already have this information and you are a hosted customer, contact Agiloft support. If you are an on-premise customer, please see Java KeyStore Generation.
- Select the Name identifier format in SAML Assertion sent by IdP. In most cases, we recommend choosing Email, to ensure the values match between systems.
- Click Next and select the "Skip the validation of Identity Provider Details while saving SAML configuration" checkbox. This allows you to save your work while you configure Okta.
- Click Finish.
- Return to Setup > Access and click Download X.509 Certificate. Save it where it is easily accessible. You will need to upload this certificate into the IdP in a later step.
- Leave Agiloft open while you configure Okta in another browser tab.
In Okta:
- Log in to the admin interface of your Okta instance.
- Select Applications > Applications and then click Create App Integration.
- Select SAML 2.0 and click Next.
- In the General Settings section:
- Enter a name for the application.
- Optionally, upload a logo and set the app visibility.
- Click Next.
- In the Configure SAML section:
- In Single sign on URL, paste the URL from the SAML V2 Assertion Consume Service (ACS) Endpoint field in
Agiloft. This is located on the Service Provider Details tab of the wizard you left open.

- In Audience URI, paste the value in the Agiloft (SP) Entity ID field in
Agiloft, typically in the form
<server>/<KB-name>. Whenever possible, make sure to use the domain name for your server, such asexample.agiloft.com, rather than the specific server hostname, such asps108.agiloft.com. - Leave Default RelayState blank and Name ID Format set to the default, Unspecified.
- In Application username, select the same identifier you selected in Agiloft. Email is usually the best choice.
- In Single sign on URL, paste the URL from the SAML V2 Assertion Consume Service (ACS) Endpoint field in
Agiloft. This is located on the Service Provider Details tab of the wizard you left open.
- Click the link to Show Advanced Settings. Leave all default options, except:
- Change Assertion Encryption to Encrypted.
- In the Encryption Certificate field, browse for and upload the X.509 Certificate that you downloaded from Agiloft at the beginning of setup.
- Change Authentication context class to Unspecified.
- If you want to map data from the SAML assertions into Agiloft when users log in via SAML, return to this page after you complete your setup. Follow the steps in Synchronizing SAML User Attributes and Mapping Group Attributes.
- If desired, preview the SAML Assertion now.
- Click Next.
- Complete the Feedback page and click Finish.
The app is now initially configured.
Configuring the New App
Now that the provider details are entered into Okta, finish configuring the app and then assign users.
- On the Sign On tab of the application in Okta, click View SAML Setup Instructions in the right pane.
- Copy the string of XML IDP metadata under Optional.
- In Agiloft, navigate back to the SAML Configuration wizard, located at Setup > Access > Configure SAML 2.0, and select the Identity Provider Details tab.
- Paste the contents of the XML file from Okta into the SAML Metadata XML input box.
- Paste the Identity Provider Single Sign-On URL, Identity Provider Issuer, and X.509 Certificate fields from Okta to Agiloft.
- Click Finish in Agiloft to save your changes.
Assigning Users to the App
Before they can log into Agiloft via SAML, your users need to be assigned to the application through the Okta admin interface. Consult Okta's documentation as needed.
- Log in to Okta and go to Directory > People.
- Add users and groups as necessary.
- Assign individual users or groups to the application. Assigning the application grants users the right to log in, and promotes the application to the user's dashboard in Okta.
- After you've assigned the appropriate users, save the changes.
Synchronizing SAML User Attributes
You might want to create groups in Okta that match Agiloft groups, or create Agiloft groups that match existing Okta groups.
Make sure you complete the setup and establish a connection between the systems before you sync attributes.
- Log into Okta.
- Go to Applications > Applications and open the application created for Agiloft.
- Navigate to the People tab of the application.
- Click on any user, then click their Profile tab to see the available attributes.
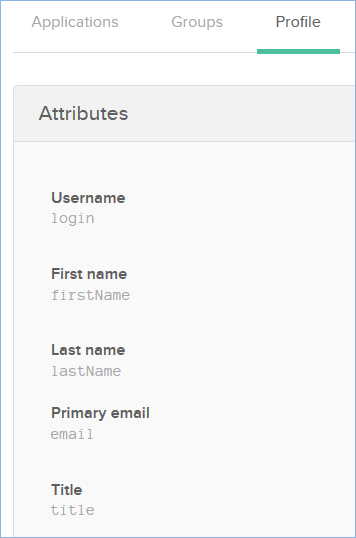
- Note down the names of any attributes you want to map, for example login, firstName, or email.
- Close the profile to return to the application settings, and go to the General tab.
- In the SAML Settings section, click Edit.
- Click Next to go to the Configure SAML screen.
- In the Attribute Statements section, there is a table of all your existing mapped attributes. The Name matches the value you noted down from the Profile page. Value references to user attributes come from the user table and are prefixed with
user., such asuser.loginto reference the Value forlogin. For more information, click the Learn More hyperlink in Okta.
- In another tab, log in to Agiloft and go to Setup > Access > Configure SAML 2.0.
- On the User Field(s) Mapping tab, enter the Names of the SAML attributes into the corresponding field input box, as shown in the image below.

- Click Next, then Finish to save.
Mapping Group Attributes
Follow these steps to map groups in Okta.
- Add a Group Attribute with an appropriate name. Set the Filter to Regex and the value to: .*

- In another tab, log in to Agiloft and go to Setup > Access > Configure SAML 2.0.
- On the User Group Mapping tab, go to the User Group Mapping section.
- Select Map the group(s) from this SAML Attribute and enter the name of the Group Attribute.
- Choose whether to update users' group membership in Agiloft based on this mapping and select the option in the wizard.
- Make sure the group names configured in Okta are present in Agiloft, and create groups in Agiloft with the same names if you haven't already.
Forcing SSO Login
Finally, to make sure users log in with SSO after the transition, manually set new passwords for users who should use SSO instead. To do so:
Go to the People table and select every user who should use SSO from this point on.
Don't select every single user in your system. It's best to leave at least one administrator unchanged, if not the whole admin team, in case you encounter SSO issues in the future that prevent users from logging in with SSO.
- Click Mass Edit, or Edit Fields, in the action bar.
- Select the Password field, then click Next to proceed to the Update tab.
- Select the formula option and enter random_password(15). This will call the random_password(15) function to randomly generate a new 15-character password for everyone you selected.
- Click Next, then Finish.
- Now, go to Setup Employees and go to the Layout tab. If you will use SSO for every user in the system, including external users, go to Setup People instead.
- Remove the Password field from the layout. This prevents users from manually setting a new password and potentially using it to log in instead of SSO.
Next, go to Setup > System > Manage Global Variables and check the Customized Variables tab for the Hotlink Type variable. If it has been customized, edit it and reset it to the default value of STANDARD.
You might also notice a setting in the People table called SSO Authentication Method. This field is set automatically by the system when you enable SSO, and should not be modified.
Access Agiloft
Once it has been properly, configured, you can log in to the Agiloft knowledgebase from either of the following ways:
- At the URL:
https://[agiloft_server]/gui2/samlssologin.jsp?project=OKTA_APP - By clicking the appropriate application icon in Okta.