Link to Single Field from Multiple Tables
This data type is used to create a field that pulls its possible values from more than one source table. Although this data type isn't very common, it is perfectly suited to specific scenarios.
Example
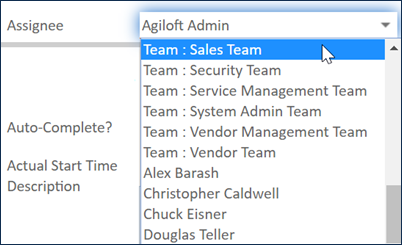
For example, you might have an Assignee field in the Task table pull its values from the People table as well as from the Team table so you can assign not only to individuals but also to whole teams.
Creating a Link from Multiple Tables
To create a Link to Single Field from Multiple Tables:
- Click Setup [Table], or click the Setup gear in the top-right corner, click Tables, select the table, and click Edit.
- Go to the Fields tab.
- Hover over New and select "Link to single field from multiple tables." This opens the wizard on the Table tab.
Table Tab
On the Table tab, you configure the data source for the linked field.
- Select the source table for your linked field. This is the table that holds the data you want to reference in the table you're working in. For example, if you're editing the Contract table to pull in the name of a salesperson, you would select the People table. You can select tables from the current KB, another
Agiloft KB, or an external database table.
- If you select a different source KB, provide the login credentials for a member of the admin group. Then, click Get Tables and select the table you want to use as the source.
- If you select an external database, you must add a database descriptor to the application server. Then, click Get Tables and select the table you want to use as the source. Data pulled from external databases is view-only.
- Click Add Source Table.
Repeat steps 1-2 for any other tables you want to pull from.
You can create a field that pulls from different source data types, such as pulling a Text field from one source table and a Floating Point field from another. In this case, the field is displayed as a Text field.
- In the Admin Notes field, enter a brief description of the field and its function, as well as any interaction with other fields or automation that other administrators might need to know.
Mapping Tab
The Mapping tab holds some of the most important options for configuring the linked field.
- First, select whether to allow the linked field to hold links to multiple records. Links with this option are referred to as "multiple values enabled," and they work differently from links that connect only one record at a time. After you create the field, you can't change this selection. Choose one of the options:
Yes, fast search. If you need to link to multiple records, this is usually the best option. This allows you to use the data from the linked records elsewhere in the target table, and it allows table searches to find the data and include it in search results. For example, if you're creating an Email CCs field that pulls from People and Teams, you might select this option so multiple recipients can be included in the CC list.
The Maximum Number of External Records to Cache global variable limits the number of external linked field records that can be cached for Fast Search. By default, this global variable is set to 100 records.
- Yes, save space. This option is only used when you want to display many fields from the source records but don't need to search on them. It only links to the data in the source table and doesn't actually copy it to the current table, which can help reduce the size of records.
- No. This limits the field to a single linked record at a time. If the field is editable and a user selects a different record, the previous selection is overwritten and the link is replaced. For example, you might want only one record selected in an Assigned To field.
- If you chose No, you can also choose whether to allow entries not in the source table. If you select this checkbox, users can enter values that don't match a record in the source table, but there won't be a link since there isn't a record to link to. We refer to non-source values in a linked field as a “loose link” as opposed to a “strict link.” If you do allow entries that aren't in the source table, select the Do not update option in the next section.
- Next, select whether to update your linked field when updates are made in the source table. Sometimes you want to keep the linked field in sync, such as keeping a user's contact information up to date. In other cases, you might want to preserve the original value, such as when pulling in the original price paid for an item. Choose one of the options:
- Do not update. After a value is chosen for the linked field, that value is static unless overwritten. This is useful when you want to preserve historical values, such as the price of a product at the time of sale, or when you want to allow entries not in the source table. This is one of the most common options.
- Update matching fields. If you want to allow entries not in the source table, but you do want to update any entries that match the source table, use this option. With this selected, the value is compared to the old value in the source record, and if the old values matched, the new value in the source record is propagated to the value in the linked field.
- Automatically Update in the background. When the linked record is updated, the update is propagated to the linked field. This is one of the most common options. For example, if you link to a Person record and the person's last name is changed, your link is updated to match.
- Automatically Update synchronously. Like the previous option, this keeps the linked field up to date when the source record changes, but in this case, the linked field is updated immediately after the source record is changed, before other rules can run and before control is returned to the user. This option is usually only necessary in complex rule situations, and you should only use it if the option to update in the background does not work correctly for your situation.
Field Tab
Here, choose a field from each table that you want to pull into the target table:
- Enter an Import Field Label to display in the target table.
- For each source table you selected, choose the field from the drop-down list of source table fields.
Permissions Tab
The Permissions tab contains options similar to other wizards, but it also has a specific bulk option to copy permissions from the source table for the linked fields. To view these permissions, click View Permissions.
You also have the option to replace these permissions with those copied from a field in the current table. To copy the permissions from a field in the current table, select it and click Copy Permissions.
When a field is linked to a field in another table, users must be given View Others' permissions to the field in the source table to be able to use the field in the target table. This allows them to view the currently selected value or select a new value for the linked field.
Options Tab
Now, determine how your linked field or fields should behave.
- First, choose how to set the default value, if at all:
- The user who creates the (target table record). This option sets the field to the value for the user who creates the record in the target table.
- The user who last edits the (target table record). This option sets the field to the value for the user who edits the record in the target table, when the record is edited. With this option selected, you usually choose Always reapply or Only update in step 2 below.
- The user in the [specified] field of the (source table 1) or [specified] field of the (source table 2) of the user who creates the (target table record). This option allows you to set the field using a value from a specific field in one of the source tables for the user who creates the record in the target table. For example, you might use this to assign the user's manager as an approver.
- The user in the [specified] field of the (source table 1) of the user who last edits the (target table record) or [specified] field of the (source table 2) of the user who last edits the (target table record). This option offers the same flexibility as the one above it, but for the user who edits the record, rather than the user who creates it.
- [Specified record]. Click the search icon to select a record in the source table to use as a template. The linked fields can automatically populated with the values from this record.
None. This leaves the fields empty until a value is selected.
If you're linking to the People table, you can also set the default value to the user who creates or edits the record, the user in the [specified] field of the user who creates or edits the field, or the user who changed the [specified] field.
- In the next section, you can make your linked field required, not required, or required only under certain conditions.
- Set Deletable? to Yes or No.
In the next section, you can restrict the source table records that are available for users to link. For example, to choose a company location in a contract, you could use a saved search to show only locations in which the Company Name matches the Contract Company Name.
If you want to use a matching field search criterion, select the field in the source table from the field drop-down, choose an operator, and choose variable rather than value from the next drop-down, then click Formula Help. Go to the Parent Field tab to find the field in the current table that you want to match against and to insert it into the search.
- If desired, add visibility conditions to hide or show the field as needed.
- If desired, add conditions to make the field editable or not editable as needed. For example, if you chose the "Always reapply" option in step 2, you might want to make editing conditional.
Display Tab
Now that you've defined the behavior, it's time to determine how the linked field or fields should look. Before getting into the wizard options, take a look at the different outputs you can offer your users.
Drop-down lists are a common choice for this data type because they show all the available options from both tables. If there are a lot of options to choose from, an input box with a pop-up might work better.
This table shows the options for displaying linked fields that allow single values. Input Aid Record Form AppearanceDisplay Options Without MVE
Hyperlinked box with look-up 
Plain text box with look-up 
Source field display with look-up ![]()
View only source field display ![]()
List of values 
Box only ![]()
Hyperlinked view only ![]()
Plain text view only ![]()
Auto Shows a List of values until 50 records exist and then switches to Hyperlinked box with look-up.
Setting Display Options
To configure your field display in the wizard:
Select one of the display options. Drop-down lists are a common choice for this data type because they show all the available options from both tables.
- If you don't have multiple values enabled, you can click the edit icon next to the selected display option to adjust the length of the field. By default, linked fields are long enough to accommodate the longest possible value from the source record, which often disrupts existing layouts and takes up more space than necessary. Editing the field length here does not affect the field length in the source table. You can also add an instructional pop-up or input instruction for the field here.
- If your display option shows values as a list, or if you're allowing multiple values in the field:
- Select the table order the system uses to show the values.
- Choose whether to show the source table name as a prefix to its values. You can enable this for none, some, or all of the source tables separately. This can be useful when the tables might have identical values, or when you want to make it easier for users to skim a long list of options.
- If your display option includes a look-up:
- Select the table or tables to search by default. When a user searches in the field or the look-up window, these tables are the default selections.
- Select a view to use in the look-up window for each source table. Make sure the view you select includes enough information for users to select the correct value.
- Complete any remaining standard field display options: input instructions, text alignment, and label and instruction placement.