Google OAuth 2.0 SSO
Use this guide to configure an Agiloft knowledgebase to use Google Single Sign-On (SSO).
Setting Up SSO
In order to complete the configuration steps, you need a Google account, typically a Gmail address, to log in to the Google Developer Console. You may use any Google account to set up your Agiloft/OAuth project; it does not have to be associated with an Agiloft user. The address should be the one that you intend to use within Agiloft to sign on and access Google Docs. Google SSO can be configured with an SSO role or an APPS role.
Finding the KB Redirect Address
Before you can start setup in the Google Developer Console, you need to find the redirect address for the KB you want to set up. As the admin user, log in to the Agiloft KB where you want to set up OAuth/Google SSO.
- Navigate to Setup > Access > Configure OAuth 2.0 Profiles and click New to create a new SSO profile.
- Copy the address in the Redirect URI field and paste it into another program for reference later, such as Notepad.
- For an SSO role, this value should be:
https://<server>:443/gui2/oauth20sso - For an APPS role, this value should be:
https://<server>:443/ui/oauth20callback
- For an SSO role, this value should be:
- In the other program, if the server part of the value includes the specific server hostname, such as
ps108.agiloft.com, replace it with your domain name, such asexample.agiloft.com. - Click Cancel.
Configuring the Integration in Google
The following configuration steps are specific to setting up Google OAuth 2.0 SSO with Agiloft. If what you see does not perfectly match the steps below, you can also reference Google's documentation here.
- Log in to the Google Developers Console using the Google account you intend to use with Agiloft to access Google docs.
- Create a new project:
- Under Enabled APIs & services, click Create Project.
- Enter a project name, select an organization if you wish, and click Create.
- Wait for the project to be created. When it's finished, the APIs & Services dashboard appears.
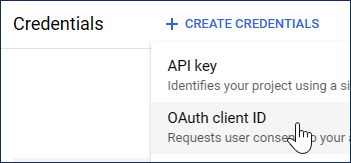
In the sidebar, click Credentials.
In the top toolbar, click Create Credentials > OAuth client ID.
- Click Configure Consent Screen.
- Select the user type for your configuration and click Next.
- Internal: If you selected an organization in step 2b, and you are part of Google Workspace, you can choose this option to limit SSO to users within your organization. We recommend using this option if it is available to you.
- External: If you did not select an organization in step 2b, or you need to allow users outside of your Google Workspace to access your KB, choose this option. Note that this might require verifying your app.
Complete the app registration page with your information. These fields determine what appears when a user logs in with Google SSO for the first time. For additional information, see Google's documentation about consent screens.
In Authorized Domains, you usually want to add both your KB URL and your own domain, if they are different. For example, if your KB URL is mycompany.agiloft.com, and your company URL is mycompany.com, you should add both to the Authorized Domains.
- Click Save and Continue, then click it again on the subsequent pages until you can click Back to Dashboard. You do not need to add any scopes at this time.
- In the sidebar, click Credentials, then click Create Credentials > OAuth client ID.
- In the Application type drop-down, select Web application.
- Optionally, enter a name for the web client.
- Leave the Authorized JavaScript origins section blank.
- In the Authorized redirect URIs field, enter the URL you copied from the KB.
- For an SSO role, this value should be:
https://<server>:443/gui2/oauth20sso - For an APPS role, this value should be:
https://<server>:443/ui/oauth20callback
- For an SSO role, this value should be:
- Save this URL for your reference, as it will be used later to create your OAuth profile in Agiloft.
- Click Create and wait for the confirmation window to appear. In this confirmation window, save the client ID and client secret values. You will need these values in the OAuth 2.0 Configuration wizard in each Agiloft KB where you use SSO with Google OAuth 2.0.
- Click OK.
If you want to enable Google Docs integration with Agiloft, complete the steps in Enabling the Google Drive API.
Enabling the Google Drive API
You can optionally integrate with Google Drive, which allows you to upload Google Docs to any GDocs-enabled file fields in Agiloft. You can enable Google Docs for a field on the Options tab of the field wizard.
- Return to the Google Developers Console if you closed out of it, and click Enabled APIs & services in the sidebar.
- At the top, click Enable APIs and Services.
- In the API Library search bar, enter Drive and press Enter.
- Click Google Drive API, and then click Enable.
- Optionally, go to the Drive UI Integration tab and configure the options for Google Drive integration with Agiloft. Click Submit to save your settings.
- Close the Google Developers Console.
Configuring SSO in the KB
As the admin user, log in to the Agiloft KB where you want to set up Google SSO.
Go to Setup > Access > Configure OAuth 2.0 Profiles and click New to create a new SSO profile.
Multiple profiles can be set up to manage the Google OAuth roles. This is important when enabling Google Drive integration.- Leave the Use full OAuth account name checkbox selected.
- Enter a name for the OAuth 2.0 provider, such as Google.
- For the role of the OAuth 2.0 Provider, select OAuth20_SSO.
- Complete the remaining fields:
- Redirect URI: Leave the default value.
- Client ID/Consumer Key: The client ID value you noted above.
- Client/Consumer Secret: The client secret value you noted above.
- Authentication URI: For Google OAuth 2.0 based SSO, enter: https://accounts.google.com/o/oauth2/auth
- Token URI: For Google OAuth 2.0 based SSO, enter: https://accounts.google.com/o/oauth2/token
- Click Finish to save the OAuth 2.0 configuration.

- Note that users can only sign in with Google SSO if the user's Login name is the same as their Gmail account, or if the Email Address for the user is the same as their Gmail account. Make sure your users meet this criteria before transitioning them to SSO.
- Log out as the admin user.
Once the above steps are completed, Agiloft users will be able to log in using their Google account.
Configuring Google Drive in the KB
To enable Google Drive in your KB, repeat the steps in Configuring SSO in the KB to create a second OAuth 2.0 profile, with these changes:
- In step 3, in the OAuth 2.0 Identity Provider Name field, enter: GOOGLE APPS
- In step 4, for the role of the OAuth 2.0 Provider, select Google_APPS.
Force SSO Login
Finally, to make sure users log in with SSO after the transition, manually set new passwords for users who should use SSO instead. To do so:
Go to the People table and select every user who should use SSO from this point on.
Don't select every single user in your system. It's best to leave at least one administrator unchanged, if not the whole admin team, in case you encounter SSO issues in the future that prevent users from logging in with SSO.
- Click Mass Edit, or Edit Fields, in the action bar.
- Select the Password field, then click Next to proceed to the Update tab.
- Select the formula option and enter random_password(15). This will call the random_password(15) function to randomly generate a new 15-character password for everyone you selected.
- Click Next, then Finish.
- Now, go to Setup Employees and go to the Layout tab. If you will use SSO for every user in the system, including external users, go to Setup People instead.
- Remove the Password field from the layout. This prevents users from manually setting a new password and potentially using it to log in instead of SSO.
Next, go to Setup > System > Manage Global Variables and check the Customized Variables tab for the Hotlink Type variable. If it has been customized, edit it and reset it to the default value of STANDARD.
You might also notice a setting in the People table called SSO Authentication Method. This field is set automatically by the system when you enable SSO, and should not be modified.
Logging into Agiloft using your Google account
Before completing the following steps:
- The Agiloft KB must already be configured to support Google OAuth SSO.
- Each user to be authenticated must have an email address or username in the OAuth Identity Provide such as Google, which matches either the Login or Email Address of the user’s record in Agiloft.
Signing in with Google
- In your browser, enter the address of the OAuth 2.0 SSO Landing Page as follows: https://<SERVER NAME>/gui2/googleoauth.jsp, where <SERVER NAME> is the FQDN/IP Address of the Agiloft instance.
Select appropriate values for Language, Project (KB), and Interface, then click Sign in with Google.
Note: The Project/KB must have OAuth 2.0 configured.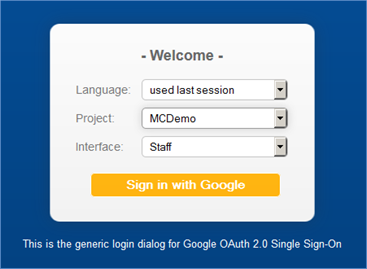
- If you are not already signed in or authenticated, you will be prompted for the Google user name and password.
- Enter your Google ID which matches an
Agiloft user and valid password.
- If you are logging in with Google OAuth 2.0 for the first time, you may be prompted with a consent screen as follows:

- Click on Accept to continue with the login. You will be redirected to your Agiloft knowledgebase.
- The PRODUCT NAME chosen during SSO setup will be shown to users on the login screen above.
- If you are logging in with Google OAuth 2.0 for the first time, you may be prompted with a consent screen as follows: