Date and Time Fields
There are four data types related to dates and times, each with differences in how they record and display data. The following sections provide details on these data types and the differences between them, and offer tips for deciding which to use.

Date Fields and Date/Time Fields
Date fields display a calendar date, such as May 15 2019, 5/15/2019, or 15 May 2019. An example of a Date field is Contract Start Date.
Date fields have a hidden default time of 00:00:00—midnight, the very beginning of the chosen date. For this reason, avoid mixing Date fields with Date/Time fields when you use Update Fields Actions. For example, if you want to tie Contract Start Date to a billing date field with an Update Fields Action, it is best if both fields are Date fields or both fields are Date/Time fields, so that the times match precisely.
Time zones have a large impact on how Date fields operate because of this hidden time value. See the Time Zone Support section below for more information.
Date/Time fields display both a date and time, such as May 12 2014 13:30. An example of a Date/Time field is Date Created, where the exact time a record is created must be captured in order to provide a complete audit trail. Capturing the time also enables more granular reporting capabilities, such as tracking how long it takes for a Support Case to be processed to completion down to hours, minutes, and seconds, rather than just the number of days.
A selection that is unique to the Date/Time data type is whether to allow users to enter a date without a time. This selection is in the Options tab, with two options to pick from:
- The system provides a default time, which you can customize, and the user can change
- The system requires that the user enter a specific time
When you create a Date field or a Date/Time field, there are some specific considerations that differ from other field types. The following sections explain the choices that address these considerations, which appear in the Options tab and Display tab of the Field wizard.
Options Tab
In the Options tab of the Field wizard, you can choose a default value for the Date field or the Date/Time field from the following options. Note that for Date/Time fields a visible time of day component is part of each option.
- Use a precise value or no value: allows you to choose a precise value. If you select this option without setting a precise value, this field is empty by default when a new record is created.
- Date [Record Name] is created: sets the default value of the field to when the record is created.
- Date [Record Name] is last modified: sets the default value to when the record was last modified.
- Date of: allows you to tie the default value of the field to the value of another Date or Date/Time field in the same table. You can make it match the value of the other field or, for a Date field, you can add or subtract days, weeks, months, or years. For example, if there is a 60-day waiting period for a contract clause, you can set the [Clause] Effective Date to match the Contract Start Date plus 60 days. For a Date/Time field, you can make it match the value of the other field or you can add or subtract more granular units of time, including seconds, minutes, or hours in addition to days, weeks, months, or years.
Date the [Field Name] field was last changed: allows you to tie the default value of the field to the date or date and time of last modification to another field in the same table. Depending on the type of field you choose to tie this field to, you see different options. If you use a Choice field, you can tie the default value of the field to when the field is set to a particular choice. For example, if you tie this field to when a contract Status changes, you can specify which status change is relevant, such as when the contract changes from Pending Signature to Signed. If you use a numerical field, you can tie the default value to when the number is changed. For example, if you tie this field to when the Contract Amount changes, you can specify what change is relevant, such as when the amount changes from $0 to $10,000, from any value to $10,000, or from any value to any value. Regardless of the type of field you choose to tie the default value of a Date field to, you can use the date exactly or add or subtract days, weeks, months, or years. Similarly, if you choose to tie the default value of a Date/Time field to another field, you can use the date and time exactly or add or subtract seconds, minutes, hours, days, weeks, months, or years. If you choose to tie the default value of this field to another field that is not a Choice or numerical field your only option is to use the date (or date and time) exactly, or to add or subtract relevant units of time.
For the default value options "Date of" and "Date the [Field Name] field was last changed," the following selection configures how the system reacts to changes to the source condition or to the field that is driving the default value option.
Best Practices
To add or subtract a month, opt for a formula in an Update Fields Action, such as $contract_start_date + 1months, rather than using one of the default value options to add a month to another date. Currently the default value options add 30 days rather than a calendar month. For example, if the Contract Start Date is July 1, using the default value option to add a month produces a July 31 result, whereas using a formula in an Update Fields Action produces an August 1 result.
Display Tab
In the Display tab of the Field wizard, you can choose how users input a date from the following options. Note that for Date/Time fields a visible time of day component is part of each option.
- Input box: allows the user to type a date. The input box is a set length, which you can customize. There is an option to display a sample format to guide the user, such as MMM dd yyyy.
- Month Day Year drop-downs: allows the user to select a date from three drop-down menus: one for month, one for day, and one for year.
- Date box ___ characters wide with calendar pop-up: allows the user the option to type in a date or choose one from the calendar pop-up menu. The input box is a set length, which you can customize.
Time
Time fields display a time with or without seconds, such as 14:00 or 14:00:30. Time fields are rarely used. They're generally only used to indicate the time a record is created for purposes of reporting or routing. One example where a Time field is used for reporting is Time Created in the Support Case Table, which can be useful for reporting which times of day are the busiest. An example of a Time field used for routing is the "Starts Work at" and "Ends Work at" fields in the Employee table, which frame working hours and help route time-sensitive records.
Time fields use the hidden date value of Jan 1, 1970. For this reason, using a formula to add time to a Time field can cause unexpected results when a formula adds enough time to push the result past midnight. For example, it is possible for a Time field with a 09:00 value to be stored in the database as "later" than a record with a time of 15:00, if the 09:00 record has been updated to January 2 1970 09:00 because a formula added enough time to push the result past midnight.
When you create a Time field, there are some specific considerations that differ from other field types. The following sections explain the choices that address these considerations, which appear in the Options tab and Display tab of the Field wizard.
Options Tab
In the options tab of the Field wizard, you can choose a default value for the Time field from one of the following options:
- Use a precise value or no value: allows you to choose a time. If you select this option without setting a precise time, this field is empty by default when a new record is created.
- Time of: allows you to tie the default value of this Time field to the value of another Date or Date/Time field in the same table. You can make it the same time of day, or you can add or subtract seconds, minutes, hours, days, weeks, months, or years.
Time the [Field Name] field was last changed: allows you to tie the default value of this Time field to the time of last modification to another field in the same table. Depending on the type of field you choose to tie this field to, you see different options. If you use a Choice field, you can tie the default value of the field to when the field is set to a particular choice. For example, if you tie this field to when a contract Status changes, you can specify which status change is relevant, such as when the contract changes from Pending Signature to Signed. If you use a numerical field, you can tie the default value to when the number is changed. For example, if you tie this field to when the Contract Amount changes, you can specify what change is relevant, such as when the amount changes from $0 to $10,000, from any value to $10,000, or from any value to any value. Regardless of the type of field you choose to tie the default value of a Time field to, you can use the time exactly or add or subtract seconds, minutes, hours, days, weeks, months, or years. If you choose to tie the default value of this field to another field that is not a Choice or numerical field your only option is to use the time exactly, or to add or subtract relevant units of time.
For the default value options "Date of" and "Date the [Field Name] field was last changed," the following selection configures how the system reacts to changes to the source condition or to the field that is driving the default value option.
Display Tab
In the Display tab of the Field wizard, you can choose how users input a time. The choices are:
- Input box: allows the user to type a time. The input box is a set length, which you can customize. There is an option to display a sample format to guide the user, such as HH:mm.
- Hour Minute Second drop-downs: allows the user to select a time from three drop-down menus: one for hour, one for minute, and one for second.
- Time box ___ characters wide with calendar pop-up: allows the user the option to type in a time or choose one from the time pop-up menu. The input box is a set length, which you can customize.
Elapsed Time
Elapsed Time fields display a numeric value based on the number of milliseconds between two values. The format is in either decimal hours, such as 15.875, or day/hour/minute/second format, such as 10 D 10 H 33 M 55 S. Time Spent in the Support Cases table is an example of an Elapsed Time field.
Options Tab
In the options tab of the Field wizard, you can select a default value for the Elapsed Time field, how to show time units, which time units to report, and which values to allow. These options are described in the following sections.
Choose the Default Value for the Field
The following options allow you to choose a default value for the Elapsed Time field.
Use a Precise Value or No Value
This option allows you to choose a period of time by entering a number of days, hours, minutes, and seconds. If you select this option without setting a time period, this field is empty by default when a new record is created.
Measure the Elapsed Time Between Two Sets of Events or Field Values
This option allows you to tie the value of this Elapsed Time field to another field in the table—to start the clock with a specific change to the other field and stop the clock when a specific event or field change occurs. The fields you can choose from are limited to Date, Date/Time, Choice, or numerical fields and depending on which type you choose you see different options. If you choose a Date or Date/Time field, the value in the field becomes the starting point of the elapsed time clock. If you select a Choice field, you can link the start of the elapsed time clock to when the field is set to a particular choice, such as when the contract Status is changed to Pending Approval. If you choose a numerical field, you can link the start of the elapsed time clock to some threshold, such as when the Contract Amount is greater than, equal to, or less than or equal to a specific dollar amount. For numerical and Choice fields, where the field changes to the specified value more than once, you can choose to start the clock either the first or last time the field has the value.
The options for stopping the elapsed time clock and generating the resulting time period are independent of the method you use to start the clock. For example, you can use Contract Start Date to start the clock and stop it with a specific change to the contract Status or Contract Amount. Here again, where the field changes to the specified value more than once, you can choose to stop the clock either the first or last time the field has that value. Alternatively, you can stop the elapsed time clock with the most recent record edit or report.
Finally you can exclude time from the elapsed time calculation based on a team's working hours, the amount of time a field in the table held a specified value, or both. For excluding a team's working hours, you can select a particular team by name or choose a team field in the table, such as Assigned Team, to dynamically set the team based on the record. For excluding the amount of time another field in the table held a specified value, you are limited to Choice or numerical fields and their options.
Show Time Units As
Your choice of how time units are displayed, the "Show time units as" selection in the Options tab of the Field wizard, drives other choices.
Multiple Time Units
Selecting "Multiple time units," such as 1 day 06 hours 30 minutes, enables you to select time units to show from the following choices: days, hours, minutes, and seconds. For example, if you choose to report only hours, then an elapsed time of 1 day, 2 hours, 29 minutes and 0 seconds is displayed as 26 hours. If the elapsed time is 1 day, 2 hours, 30 minutes and 0 seconds, then it is displayed as 27 hours because the 30 minutes is rounded up to the nearest hour. Selecting "Multiple time units" disables "Allow the following values" and "Round data."
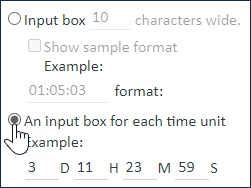
Selecting "Multiple time units" also drives the input selection on the Display tab, which sets how the field is displayed for user input in a record—you can choose to display a single input box or an input box for each unit of time selected in the "Select time units to report" option. The single input box is a customizable set length, which includes an option to display a sample format to guide the user, such as 01:05:03.
Single Time Unit as Decimal Value of Hours
Selecting "Single time unit as Decimal value of Hours," such as 30.5 hours, enables you to "Allow the following values." The choices are to allow all values or to limit acceptable entries to 10ths of an hour, such as 6.4 hours; 8ths of an hour, such as 3.625 hours; or 4ths of an hour, such as 4.25 hours. If you limit acceptable entries, invalid user entries are rejected and system generated values are rounded to fit the criteria, and the "Round data" option below is disabled. If you allow all values, you can choose whether to round values. If you do choose to round values, you can customize how many decimal digits to allow. It is the rounded number that is stored in the database. Selecting "Single time unit as Decimal value of Hours" disables the "Select time units to report" option and the option on the Display tab to display an input box for each unit of time. Users see a single input box with a set length, which you can customize and it includes the option to display a sample format.
Elapsed Time uses "Language dependent display settings" on the Display tab of the Field wizard to determine its format based on a selected language. By default this is set to "Use the current users's locale," which uses the language that the user is currently viewing the knowledgebase in, but you can change this to "Use the fixed locale" and choose which language sets the format for elapsed time and all numerical data type formats.
Time Zone Support
Date, Date/Time, and Time fields are stored in the database using the knowledgebase time zone, but you can set a different time zone to display by default, and you can set a different time zone to display on a field-by-field basis. The default time zone to display when you create a new field with one of these data types is set by the Time Zone of date/time values global variable.
On the Options tab of the Field wizard, you can define which time zone to use for a particular field:
- Default time: sets the time zone for the field to the default knowledgebase time zone. In other words, this field-level setting uses whichever of the following three options is set in the global variable, Time Zone of date/time values. By default, the global variable is set to KB time.
- KB time: sets the time zone to the one specified for the knowledgebase in Setup > System > Set KnowledgeBase Time.
Browser time: sets the time zone to the user’s browser’s time zone.
"Browser time" is the best option when you want users to see the value in their own time zone without doing any further configuration.
- User time: sets the time zone to the value in the User time zone field in the People table.
Time zones have a large impact on how Date fields operate because Date fields include a default time of day that is hidden from users. Date fields have a hidden default time of 00:00:00—midnight, the very beginning of the chosen date. For example, if a contract manager creates a contract with an end date of January 1, 2020 in Eastern Standard Time and the knowledgebase time zone is set to Pacific Standard Time, which is 3 hours earlier, the result stored in the data base is a December 31 2019 21:00:00 value.
Localization of the Display
Dates can be shown in different formats for different users, for example:
- dd mmm yyyy
- mmm dd yyyy
- mm/dd/yy
Times can be formatted with or without seconds.
These settings are defined for each team on the Formats tab of the Teams wizard. Users in different countries, for example, can be organized into separate teams with time and date displays formatted according to their country’s standard. When you create a team and set these formats, you are setting how they appear for all users for whom that is the primary team. There is currently no global variable to set the format for all users at once.
Localization of the display through the Formats tab of the Teams wizard only applies to Date, Date/Time, and Time fields. Elapsed time fields use "Language dependent display settings," on the Display tab of the Field wizard to determine their format based on a selected language.